11. How to Create a SKYVVA Inbound Interface Using Auto-Switch Mode with the SkyvvaSalesforce Adapter
Overview
This document explains how to create a SKYVVA Inbound Interface in Salesforce using Auto-Switch mode with the SkyvvaSalesforce Receiver Adapter in SAP Cloud Integration.
Auto-Switch mode automatically selects the appropriate processing method based on the number of root records received in a request.
Depending on the configured interface thresholds, the adapter can process the request using:
- Normal
- Batch
- Bulk
This tutorial covers:
- Creating and configuring the SKYVVA Inbound Interface in Salesforce.
- Configuring the Auto-Switch threshold settings.
- Creating the SAP CPI integration flow.
- Configuring the HTTPS Sender Adapter.
- Configuring the SkyvvaSalesforce Receiver Adapter.
- Deploying the integration flow.
- Testing different payload sizes with Postman.
- Monitoring the integration in SAP CPI and Salesforce.
Example Configuration
| Item | Value |
|---|---|
| Salesforce Objects | Account and Contact |
| Message Source | Postman |
| Middleware | SAP Cloud Integration |
| SKYVVA API Version | V3 |
| Adapter Mode | Auto-Switch |
| Interface Direction | Inbound |
| Processing Mode | Asynchronous |
| Operation Type | Upsert |
| Autoswitch Integrate Max Size | 200 |
| Autoswitch Batch Max Size | 5000 |
| Request Format | XML |
| Response Format | XML |
Context Before You Start
In short: Auto-Switch mode counts how many root records (Accounts, not counting nested Contact children) arrive in a request and picks one of three processing strategies automatically: Normal (one direct Apex call, no batching), Batch (the same direct-Apex-call mechanism, grouped into packages), or Bulk (SKYVVA's basket/attachment engine). Which one a given request gets depends purely on where its root-record count falls against two thresholds configured on the interface — Autoswitch Integrate Max Size and Autoswitch Batch Max Size.
Reasons to pick this path:
- You don't want to hand-pick a single fixed mode and have both small test calls and large production calls forced through it — Auto-Switch lets a 5-record smoke test and a 3,000-record production run each get a strategy suited to their size, from the same interface/channel configuration.
- You can keep everyday traffic on fast, direct processing while still having a path available for occasional larger loads, without maintaining two separate interfaces/channels.
- Traffic whose volume varies a lot between calls and where maintaining two separate interfaces/channels for "small" and "large" cases isn't worth it.
- Teams who want one interface/channel to handle both routine and occasional larger requests automatically, once the thresholds below are sized correctly for their volumes.
- Hierarchical (parent-child) payloads specifically — this is why this tutorial's example uses Account with nested Contact records rather than a flat single-object interface. Auto-Switch's threshold check only counts root records (Accounts), never their nested children, so a request with 50 Accounts and 500 total Contacts is sized as "50," not "550," when the adapter decides which tier to use. This makes Auto-Switch a good fit for hierarchical interfaces in particular: you don't have to separately account for child-record volume when sizing
Autoswitch Integrate Max Size/Autoswitch Batch Max Size— only the parent object's request-to-request volume matters.
Mode = Auto-Switch), deploy, send test payloads of different sizes from Postman, then confirm which tier each one used and that the records landed in Salesforce.
The processing method is selected according to the interface threshold settings:
| Root Record Count | Processing Method |
|---|---|
| Less than or equal to Autoswitch Integrate Max Size | Normal |
| Greater than Autoswitch Integrate Max Size and less than or equal to Autoswitch Batch Max Size | Batch |
| Greater than Autoswitch Batch Max Size | Bulk — see the note above before relying on this tier |
POSTMAN
   ↓
SAP CPI
   ↓
SkyvvaSalesforce Receiver
Mode = Auto-Switch
   ↓
SKYVVA Inbound Interface
   │
   ├── Small request  → Normal
   ├── Medium request → Batch
   └── Large request  → Bulk
   ↓
Salesforce
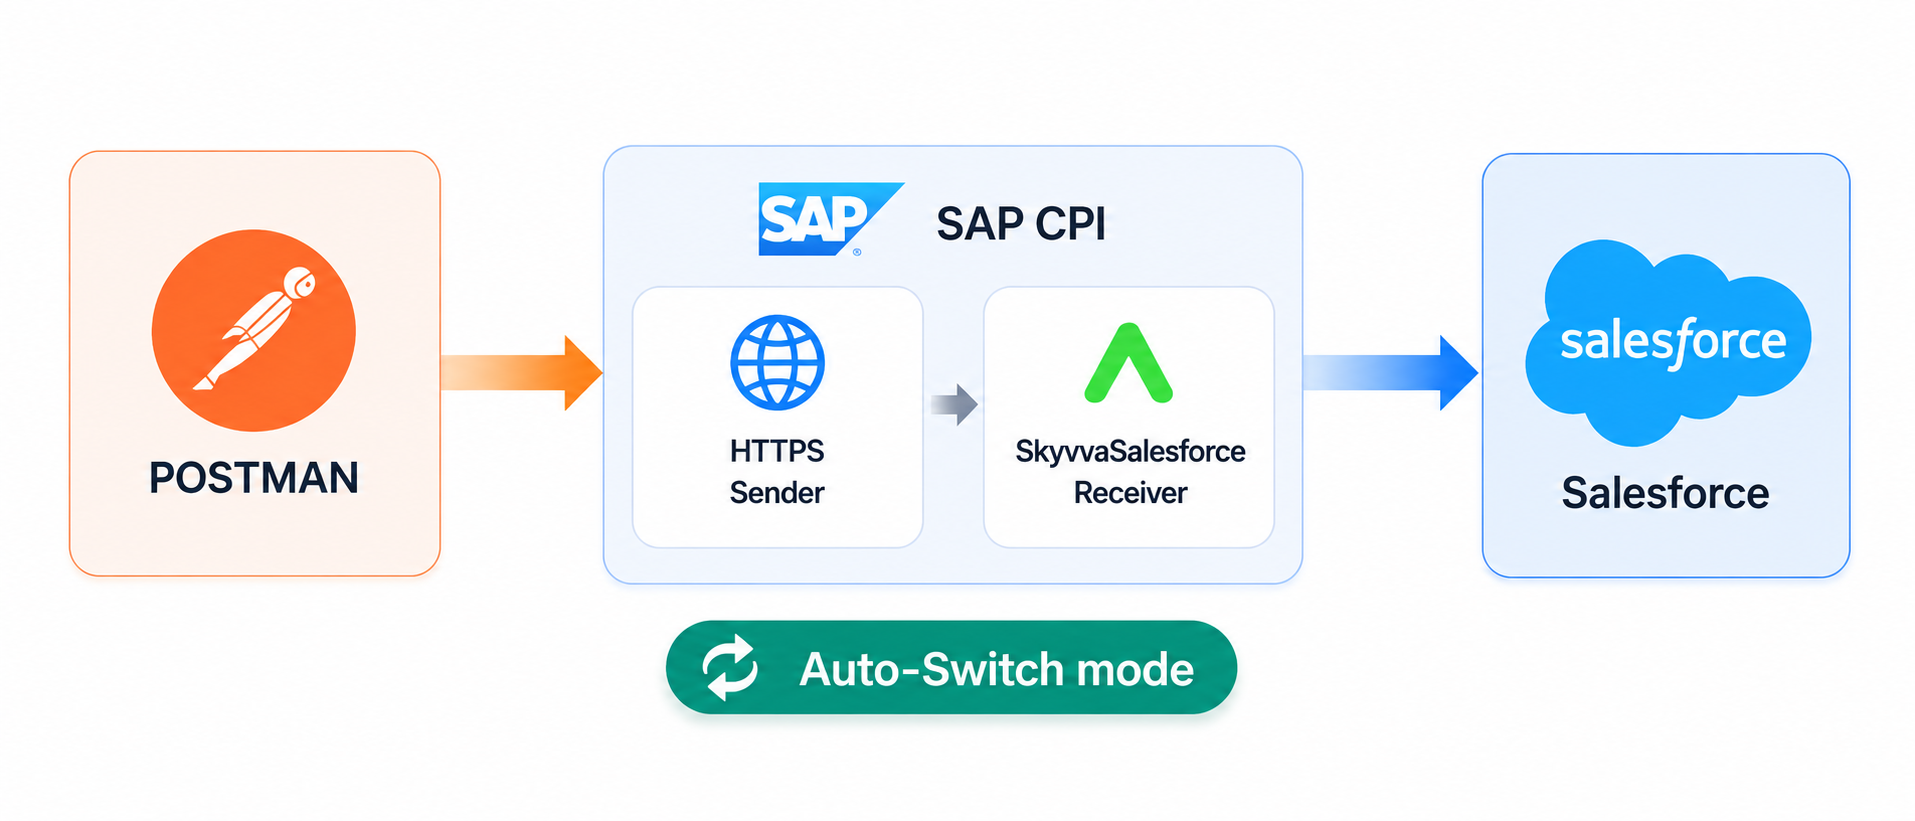
Figure 1. End-to-end message flow using Auto-Switch mode.
1. Salesforce Interface Development
1.1 Create the Inbound Interface
Create a SKYVVA Inbound Interface under the required Integration record in Salesforce.
For this example, the interface is named:AccountContactAutoSwitch_IN
Leave the Message Type field blank. For a V3 Inbound interface, leaving Message Type unset is what triggers Hierarchical Mapping — there is no MetaData Provider/Repository/Message Type hierarchy to build first; the Mapping Tool derives the parent/child tree directly from Salesforce's own schema instead.
Configure the interface as follows:
| Setting | Value |
|---|---|
| Interface Name | AccountContactAutoSwitch_IN |
| Integration | Your SAP CPI Integration App record |
| Source/Target Name | Account |
| Status | Deployed |
| Interface Direction | Inbound |
| Processing Mode | Asynchronous |
| Operation Type | Upsert |
| Message Type | (leave blank) |
| External Mapping | Enabled |
AccountContactAutoSwitch_IN, Interface Type = Main-Interface, mapped to the Account object (Source/Target Name), with Message Type left blank as instructed above:
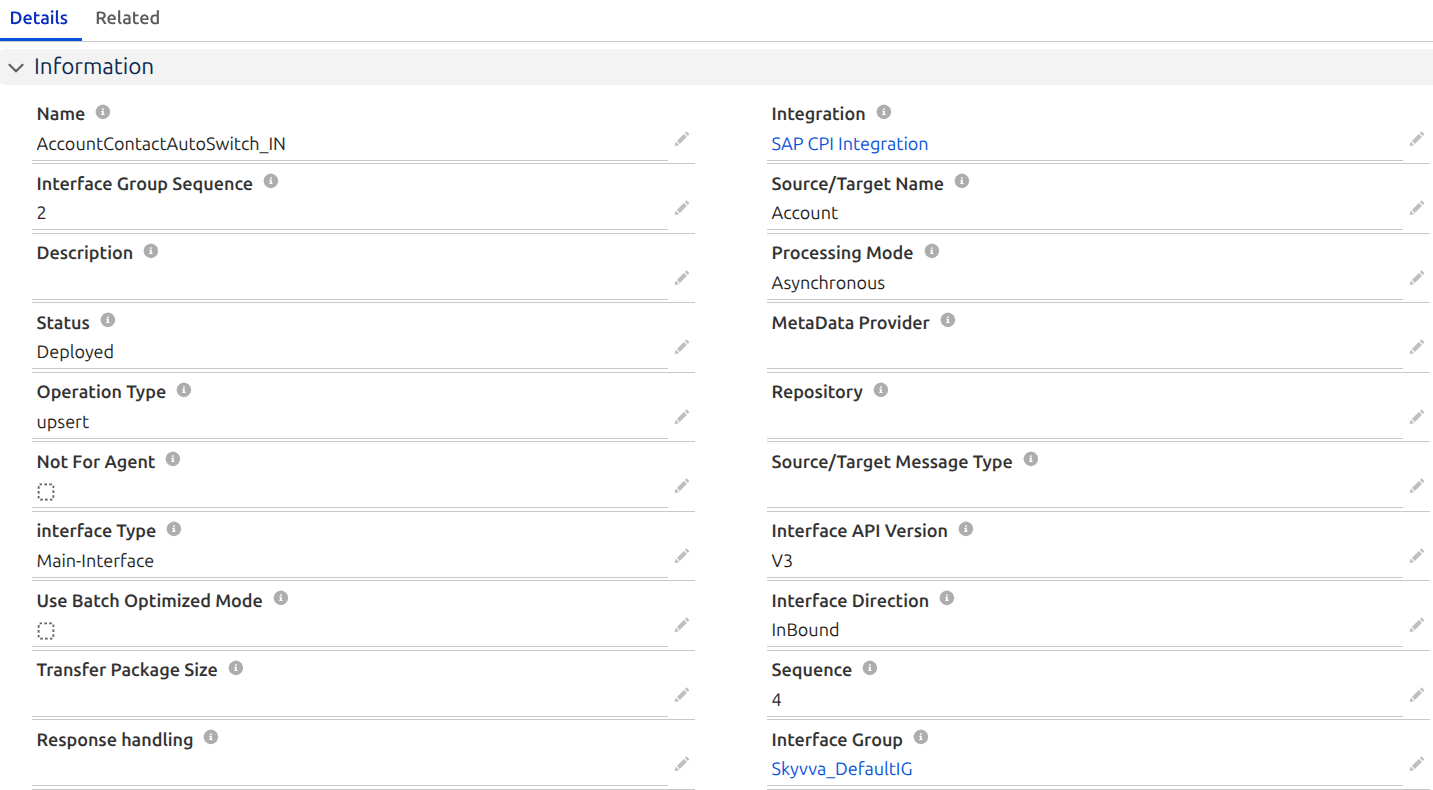 Figure 2. Main interface (
AccountContactAutoSwitch_IN) — Details tab, Interface Type = Main-Interface, Source/Target Name = Account.
Under the main interface's own Inbound Setup section,
External Mapping is enabled with Salesforce External ID = skyvvasolutions__ERP_DEBTOR_ID__c — this is the Account-level external key used to match/upsert Account records:
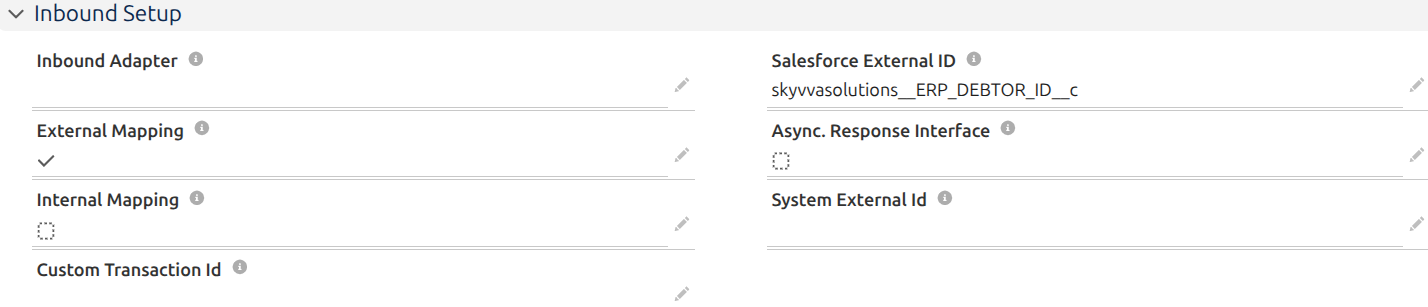
Figure 3. Main interface AccountContactAutoSwitch_IN — Inbound Setup, External Mapping enabled with Salesforce External ID skyvvasolutions__ERP_DEBTOR_ID__c (Account).
Configuring the Hierarchical Mapping in §1.2 below auto-generates a second, sub-interface for the child
Contact object. That sub-interface has its own separate Inbound Setup, with its own External Mapping keyed on the Contact-level external ID, skyvvasolutions__ERP_CONTACT_ID__c — don't confuse this with the main interface's Account-level key above, they identify different objects:
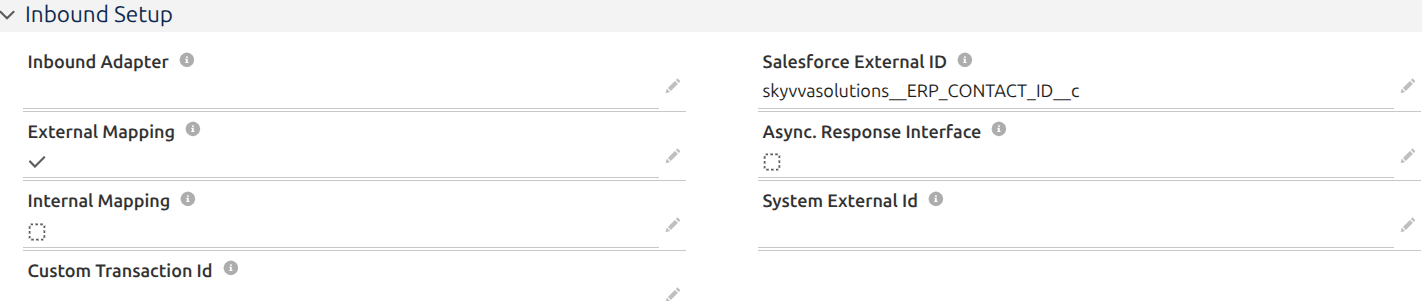
Figure 4. Auto-generated sub-interface (Contact) — Inbound Setup, External Mapping enabled with Salesforce External ID skyvvasolutions__ERP_CONTACT_ID__c (Contact).
1.2 Configure the Hierarchical Mapping
Open the interface Mapping Tool.
For this example, the integration processes Account records with related Contact records.
The hierarchy is:
Account
   │
   └── Contact
With External Mapping enabled on the interface (§1.1), field-level mapping is not needed — External Mapping auto-maps fields by name on its own. All this step has to do is drag the two relationship nodes, top-down, to generate the chained sub-interface:
Recommended Mapping Order
- Drag the Account root node onto the target Account root first. This is required, not optional — dragging the Contact child node before the Account root itself is mapped produces
"Warning! Please map its Parent first!"and silently does nothing. - Expand the Contact child relationship and drag it onto the target Contact node. No individual field needs to be dragged in either step — this is a node-to-node mapping, not a field-to-field one.
- Save the mapping.
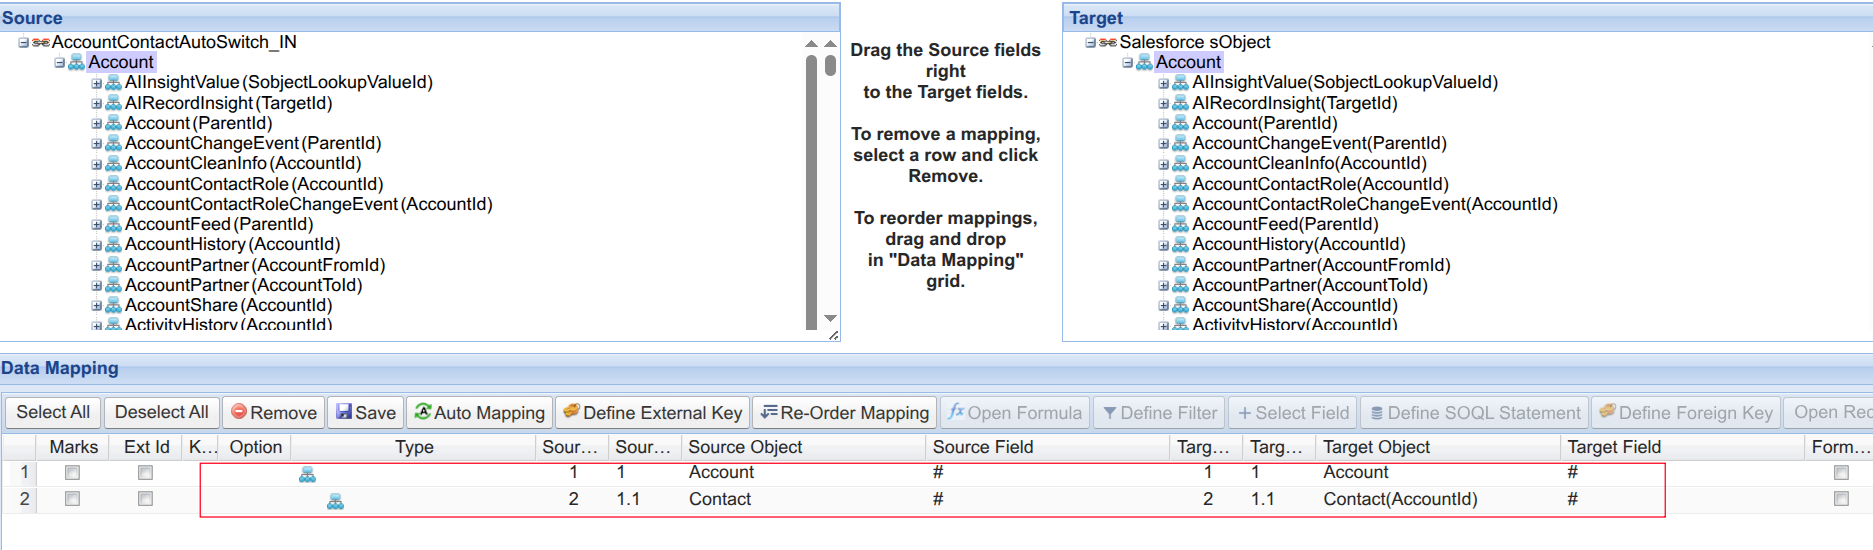 Figure 5.Hierarchical Mapping Tool — Account and Contact relationship mapping.
1.3 Configure the Auto-Switch Thresholds
Auto-Switch behavior is controlled by threshold settings on the Salesforce interface.
These settings determine when SKYVVA switches between Normal, Batch, and Bulk processing.
Configure the following values according to your expected message volume:
| Setting | Example Value | Description |
|---|---|---|
| Autoswitch Integrate Max Size | 200 | Requests up to this number of root records use Normal processing. |
| Autoswitch Batch Max Size | 5000 | Requests above Autoswitch Integrate Max Size and up to this value use Batch processing. Requests above this value use Bulk processing. |
Root Records ≤ 200
        ↓
Normal Processing

Root Records > 200 and ≤ 5000
        ↓
Batch Processing

Root Records > 5000
        ↓
Bulk Processing
Note: When Auto-Switch routes a request into Batch tier — as in this tutorial's example — current behavior is: Batch processing sends records to Salesforce in smaller parts rather than all at once, and the part size follows a fallback chain, checked in this order: the interface'sTransfer Package Sizefield (Package_Size__c) →Processing Package Size(Number_of_Records_Per_Batch__c) → the parent Interface Group's ownNumber_of_Records_Per_Batch__c→ the Integration'sPacket__c→ a hardcoded default of20if every one of those is left blank. None of these fields is set on this tutorial's interface, so the default of20applies here: 4,460 records ÷ 20 = 223 baskets (Figure 18). Bulk processing uses its own separate field for this,Bulk Package Size(Bulk_Package_Size__c), under “Bulk Setting” — the similarly namedBatch Package Sizefield (Batch_Package_Size__c) does not control the Batch-tier part size at all, no matter what it's set to, and can be left as-is. See the note in §5.3 for how this affects the response you see in Postman.
Important: checkUse Auto-Switch Modebelow and save the interface — even though theMode = Auto-Switchsetting on the SAP CPI receiver channel (§3.2) is what actually decides
Normal/Batch/Bulk for each request. The Bulk Control Board only lists interfaces whose ownUse Auto-Switch Mode(or Bulk Mode) checkbox is checked and saved on the interface record. If
you leave it unchecked, Bulk-tier requests will still process correctly, but you won't be able to
find or monitor them in the Bulk Control Board.

Figure 6. Interface Auto-Switch threshold settings.
Important: don't leaveAutoswitch Batch Max Sizeat the5000default without deliberately
checking it against your actual expected traffic — see the note in Context Before You Start.
Set it explicitly, above your real maximum root-record count per request, so it's a conscious
choice rather than an inherited default.
After completing the interface configuration and mapping, save the interface.
2. SAP CPI Development
2.1 Create the Integration Flow
In SAP Cloud Integration, navigate to Design and create an Integration Package.
Create a new Integration Flow.
Example:
| Item | Example |
|---|---|
| Integration Package | Skyvva Salesforce Adapter Testing |
| Integration Flow | AccountContact_Skyvva_AutoSwitch |
- HTTPS Sender Adapter
- SkyvvaSalesforce Receiver Adapter
HTTPS Sender
      ↓
    Start
      ↓
SkyvvaSalesforce Receiver
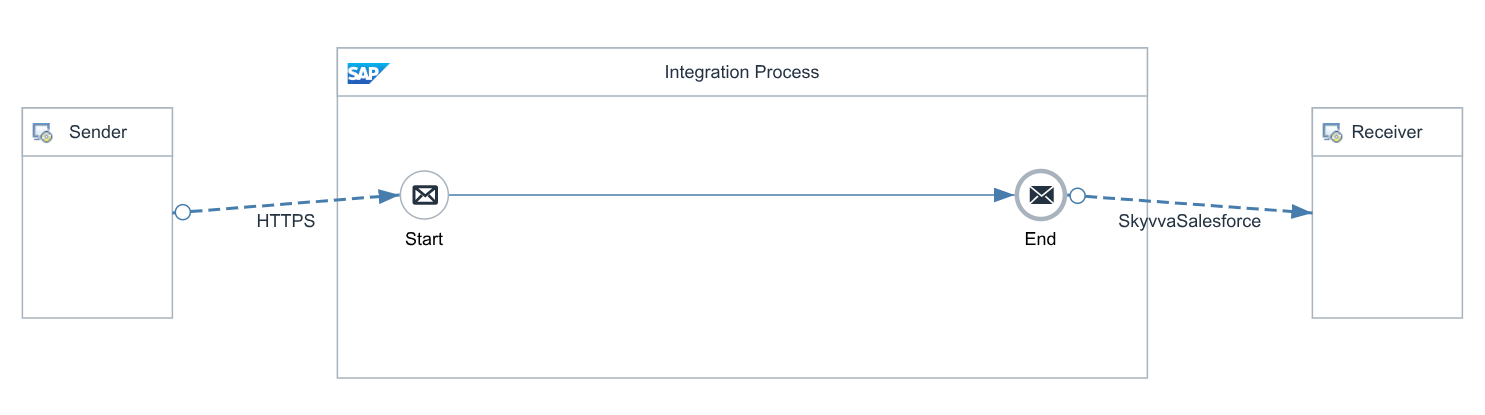
Figure 7. SAP CPI integration flow for Auto-Switch mode.
2.2 Configure the HTTPS Sender Adapter
Select the standard SAP HTTPS Sender Adapter.
General Tab
Configure the sender adapter according to your SAP CPI requirements.
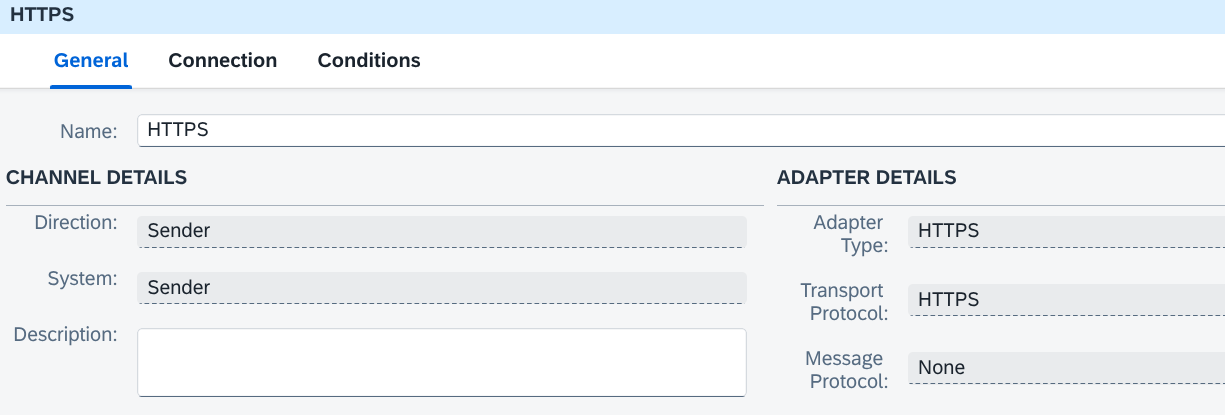
Figure 8. HTTPS Sender Adapter — General tab.
Connection Tab
Configure the connection settings.
Example:
| Field | Example Value |
|---|---|
| Address | /skyvva/AccountContactIntegrateAutoSwitch |
| Authorization | User Role |
| User Role | ESBMessaging.send |
| CSRF Protected | Unchecked |
Important: The configured User Role must be assigned to the CPI user or credential used by Postman. Otherwise, SAP CPI may reject the request with a 403 Forbidden response.
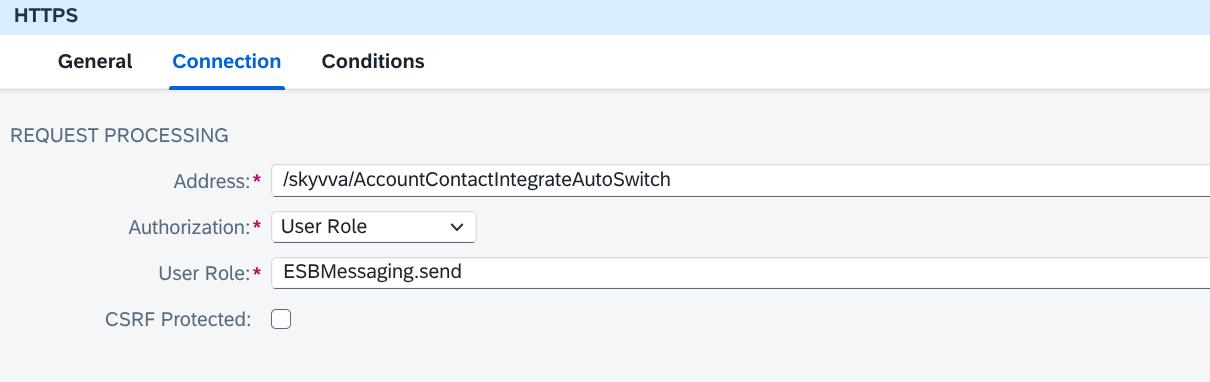
Figure 9. HTTPS Sender Adapter — Connection tab.
3. Configure the SkyvvaSalesforce Receiver Adapter
Select SkyvvaSalesforce as the receiver adapter.
The receiver channel includes the following main configuration areas:
- General
- Connection
- Skyvva
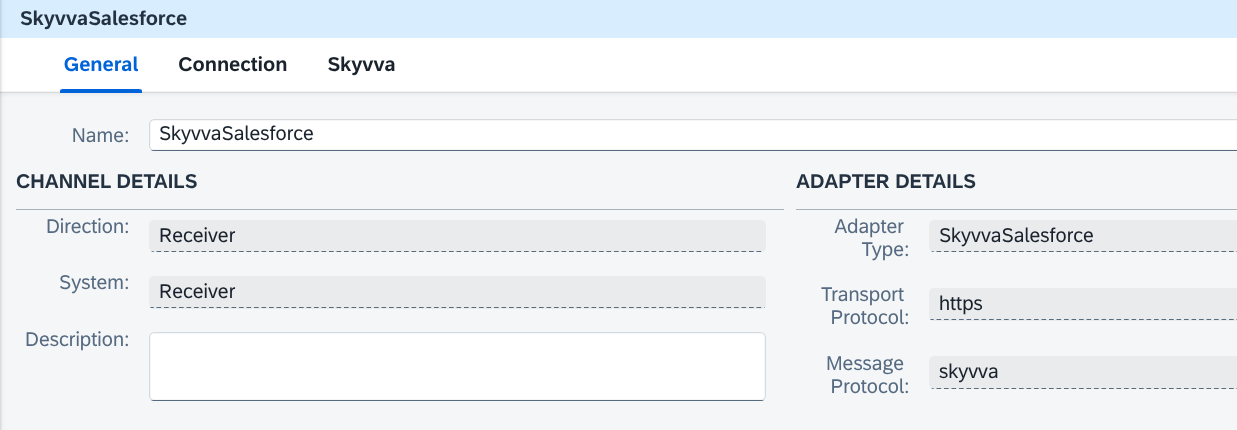 Figure 10. SkyvvaSalesforce Receiver Adapter — General tab.
3.1 Connection Tab
Configure the Salesforce authentication settings.
| Field | Example Value |
|---|---|
| Authentication Type | OAuth2 |
| OAuth2 Flow | Username-Password Credential or Client Credential |
| Login URL | Your Salesforce login URL |
| User Credential | Your CPI User Credential artifact |
| Client Credential | Your CPI OAuth2 Client Credentials artifact |
| Environment | URL |
|---|---|
| Sandbox | https://test.salesforce.com |
| Production | https://login.salesforce.com |
| My Domain | Your Salesforce My Domain URL |
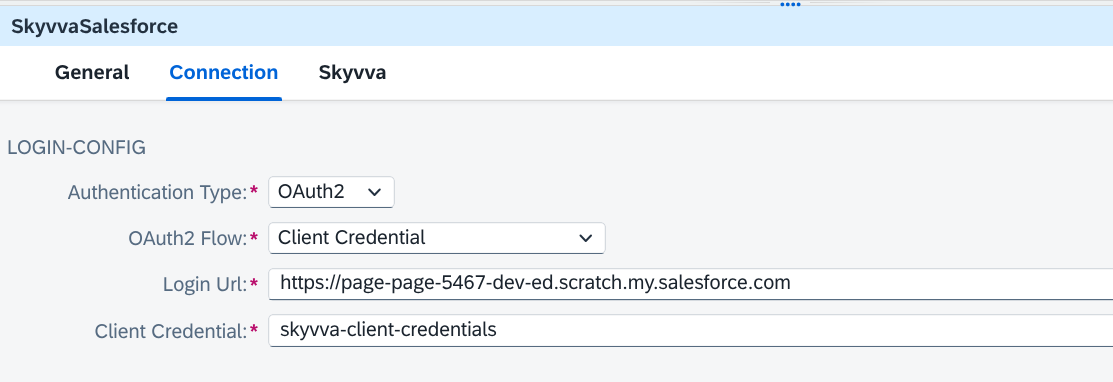
Figure 11.SkyvvaSalesforce Receiver Adapter — Connection tab.
3.2 Skyvva Tab — Request Settings
Configure the Skyvva Request Settings as follows:
| Field | Value |
|---|---|
| Skyvva API Version | V3 |
| Integration | Your SKYVVA Integration |
| Interface | AccountContactAutoSwitch_IN |
| Mode | Auto-Switch |
| Request Format | XML |
| Response Format | XML |
| Skyvva App Version | Your installed SKYVVA version |
| Salesforce API Version | Your configured Salesforce API version |
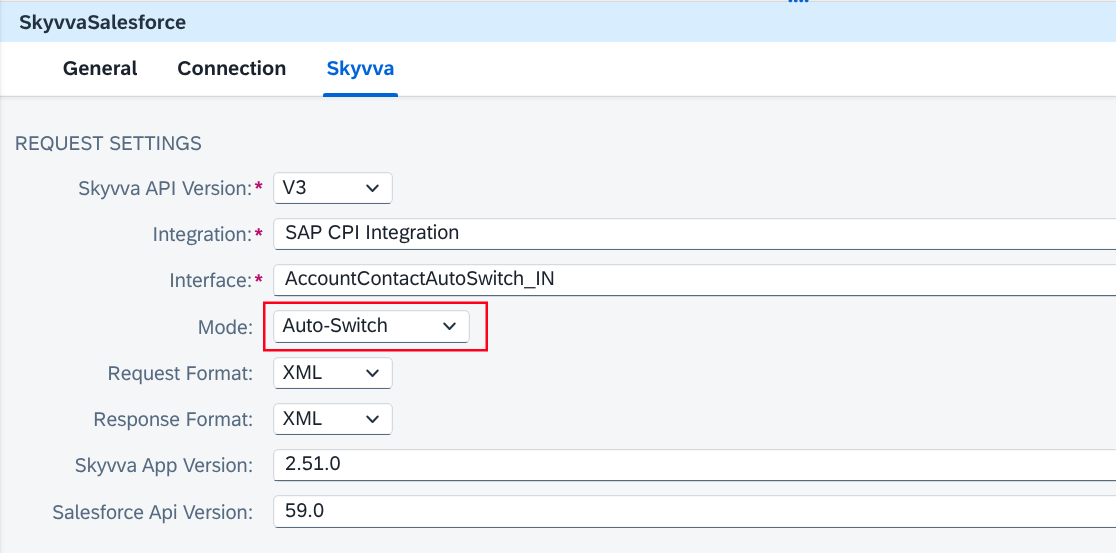 Figure 12. SkyvvaSalesforce Receiver Adapter — Request Settings.
Interface Processing Mode vs. Adapter Mode
The following settings are configured in different locations:
Salesforce Interface
Processing Mode = Asynchronous
SAP CPI Receiver Adapter
Mode = Auto-Switch
These settings are not duplicates.
The Processing Mode controls how the SKYVVA interface processes the message.
The Auto-Switch Mode determines which processing strategy is selected based on the number of root records in the incoming request.
3.3 Skyvva Tab — Adapter Settings
Configure the Adapter Settings.
Example:
| Field | Value |
|---|---|
| Logging Option | Default |
| Enable Retry for Fatal Connectivity Errors | Unchecked |
| HTTP Client Timeout | 60 seconds |
Increase the timeout when processing large requests that require additional time.
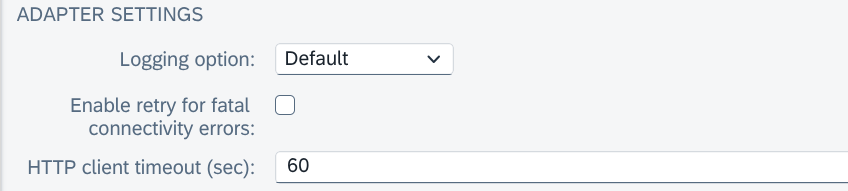
Figure 13. SkyvvaSalesforce Receiver Adapter — Adapter Settings.
After completing all configuration settings, save and deploy the integration flow.
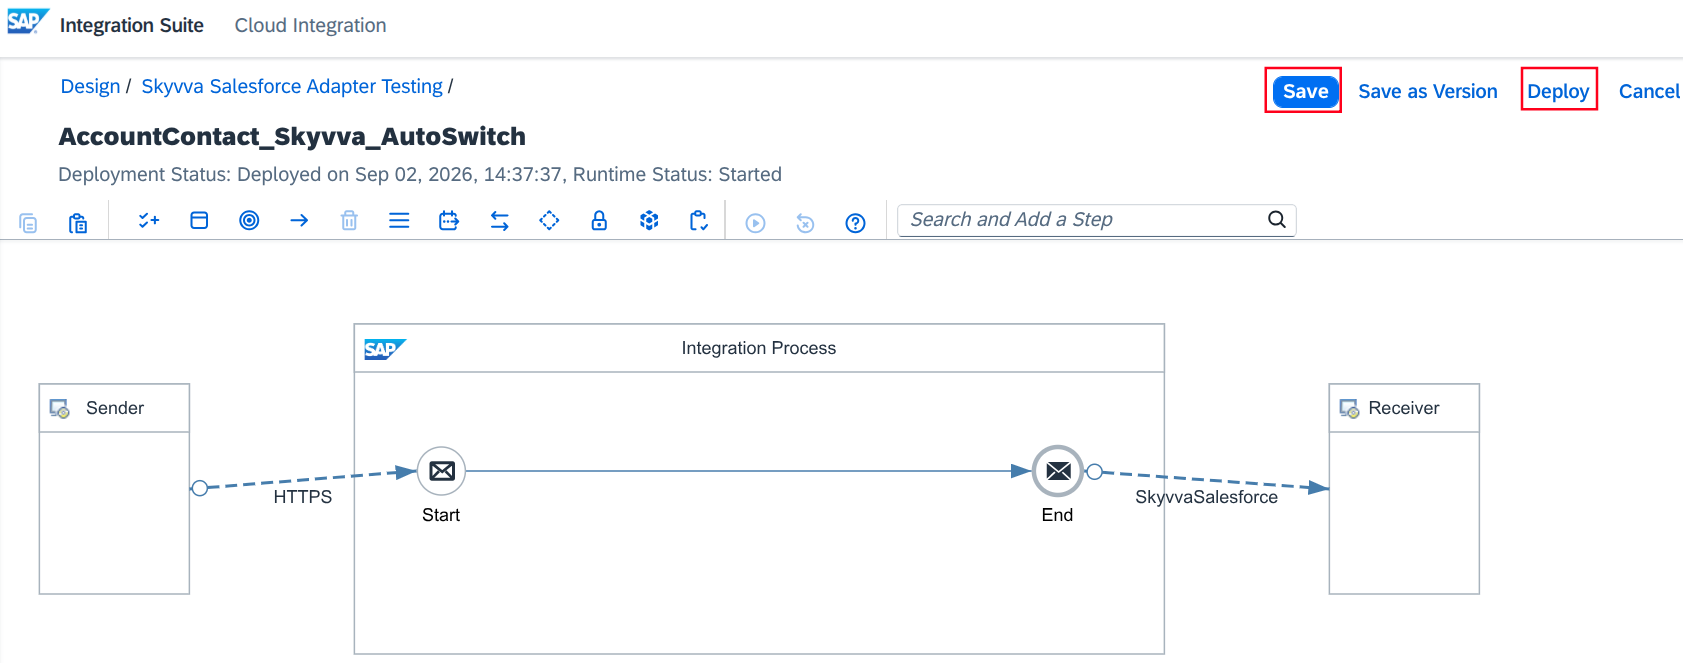
Figure 14. Integration Flow deployed successfully.
4. Get the SAP CPI Endpoint URL
Navigate to:
CPI
→ Monitoring
→ Manage Integration Content
Locate the deployed Integration Flow and copy the endpoint URL.
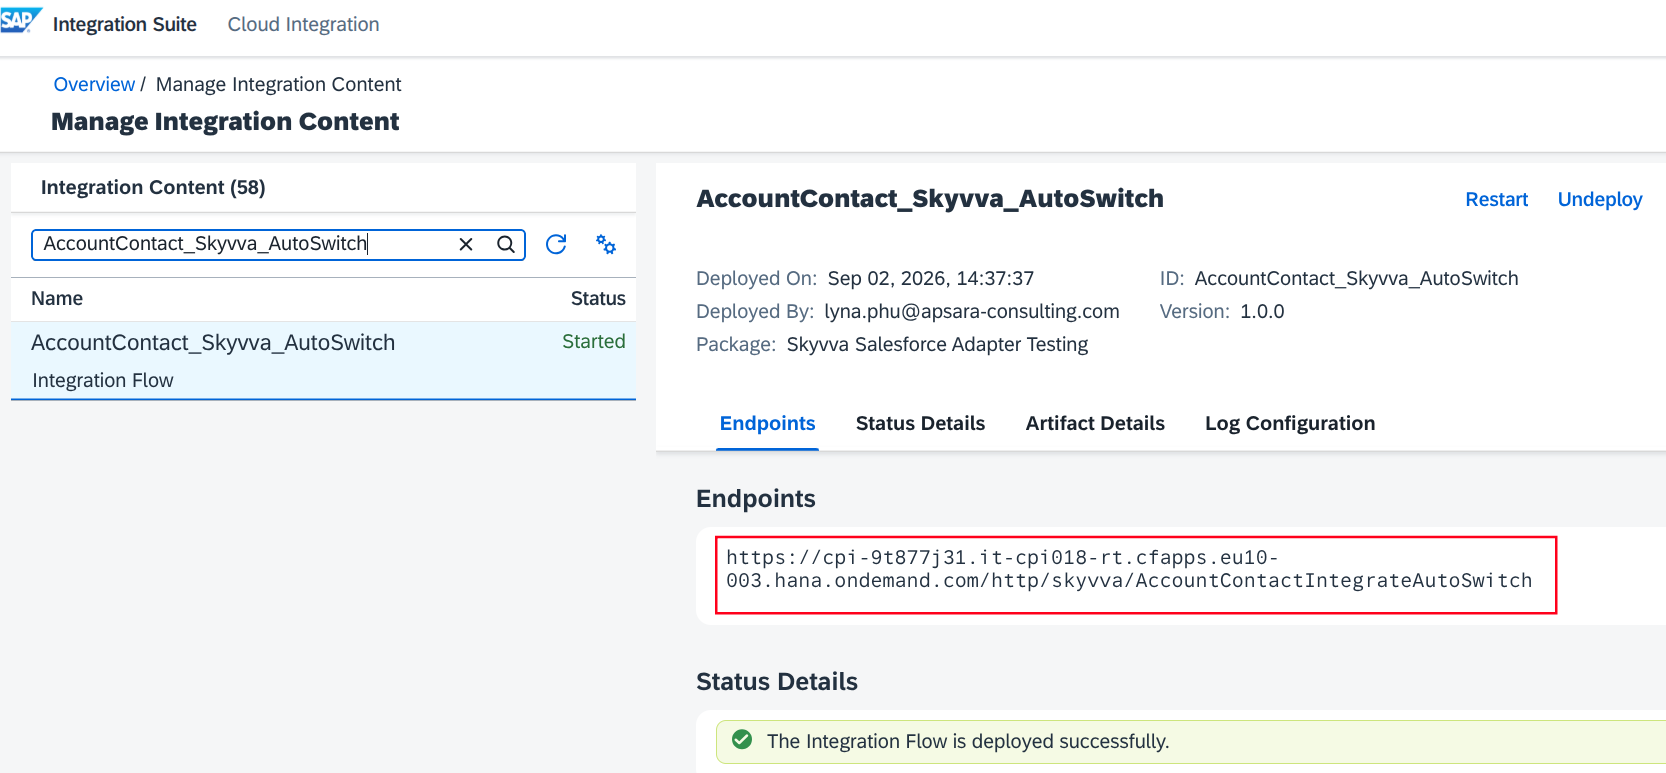
Figure 15. Manage Integration Content — Endpoint URL.
Note: The endpoint URL shape depends on the tenant generation — Neo tenants usehttps://{{TenantId}}-iflmap.hcisbp.<region>.hana.ondemand.com/http/<Address>, current SAP BTP
Integration Suite (Cloud Foundry) tenants usehttps://{{TenantId}}.<runtime-cluster>.cfapps.<region>.hana.ondemand.com/http/<Address>.
Important: Always copy the exact endpoint URL displayed by your SAP CPI tenant instead of
assembling it by hand.
5. Testing with Postman
Auto-Switch mode should be tested with different payload sizes to confirm that the expected processing strategy is selected.
Using the example thresholds:
Autoswitch Integrate Max Size = 200
Autoswitch Batch Max Size = 5000
the following tests can be performed:
| Test | Root Account Records | Expected Processing |
|---|---|---|
| Small | Up to 200 | Normal |
| Medium | 201 to 5000 | Batch |
| Large | More than 5000 | Bulk — see the note in Context Before You Start before testing this row; keep Autoswitch Batch Max Size set above your real traffic so production requests don't land here |
5.1 Configure the Postman Request
Create a new request with the following configuration:
| Setting | Value |
|---|---|
| Method | POST |
| URL | Your SAP CPI endpoint URL |
| Authorization | Authentication configured for the HTTPS Sender |
| Content-Type | Match the configured Request Format |
Request Format = XML
configure the header as:
Content-Type: application/xml
Note: For a small test payload, use Postman's raw body mode and paste the XML directly
— the dropdown next toraw(Text/JSON/XML/…) sets theContent-Typeheader for you
automatically. For a large payload like this tutorial's 4,460-record example, pasting that much
text into the raw editor isn't practical; use Body → binary instead, select the XML file
from disk, and set theContent-Type: application/xmlheader yourself on the Headers tab —
binary mode has no type dropdown of its own, so nothing sets it for you. The file content sent
is identical either way; only how you attach it to the request differs. Figure 16 shows the
binary-upload approach, used here because of the payload's size.
5.2 Example Payload Structure
The payload must match the hierarchical structure configured in the SKYVVA interface. Under External Mapping, the adapter resolves each child node by walking the Account element's descendants looking for elements named after the mapped child object (Contact) — so nest Contact elements directly under Account, with no extra wrapper element in between:
<?xml version="1.0" encoding="UTF-8"?>
<Accounts>
  <Account>
    <skyvvasolutions__ERP_DEBTOR_ID__c>ACC-000001</skyvvasolutions__ERP_DEBTOR_ID__c>
    <Name>CPI Test Account 1</Name>
    <Phone>+49-89-2867825</Phone>
    <BillingStreet>CPI Test Street</BillingStreet>
    <BillingCity>Frankfurt</BillingCity>
    <BillingPostalCode>42098</BillingPostalCode>
    <BillingCountry>DE</BillingCountry>
    <Contact>
      <skyvvasolutions__ERP_CONTACT_ID__c>ACC-000001-C01</skyvvasolutions__ERP_CONTACT_ID__c>
      <FirstName>Max</FirstName>
      <LastName>Mueller</LastName>
      <Email>max.mueller.1.1@example.com</Email>
      <Phone>+49-89-2719583</Phone>
    </Contact>
    <!-- ... 29 more Contact elements for this Account ... -->
  </Account>
  <!-- ... 4,459 more Account elements, same shape, up to ACC-004460 ... -->
</Accounts>
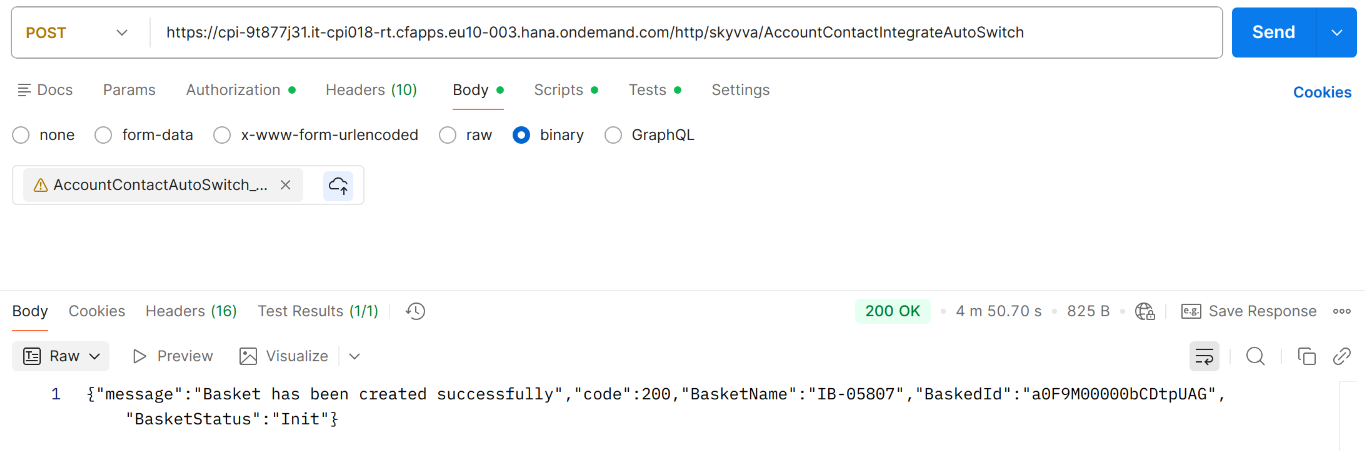
Figure 16. Postman request and response.
5.3 Expected Response
This example uses:
Processing Mode = Asynchronous
Therefore, the immediate response confirms that the request was accepted for processing.
The response does not necessarily mean that all Account and Contact records have completed processing.
Important: for larger requests, the JSON body shown in Figure 16 reflects only part of the request, not the full result. To confirm everything was processed, check the Batch Control Board (§6.2) rather than relying on the Postman response alone. For example, a request with 4,460 root Account records results in 223 separate baskets in the Batch Control Board (Figure 18) — Postman only ever shows you one of them.
Use SAP CPI and Salesforce monitoring to verify the final processing result.
6. Monitoring
6.1 SAP CPI Monitoring
Navigate to: Monitor → Monitor Message Processing
Locate the message and verify that it completed successfully.
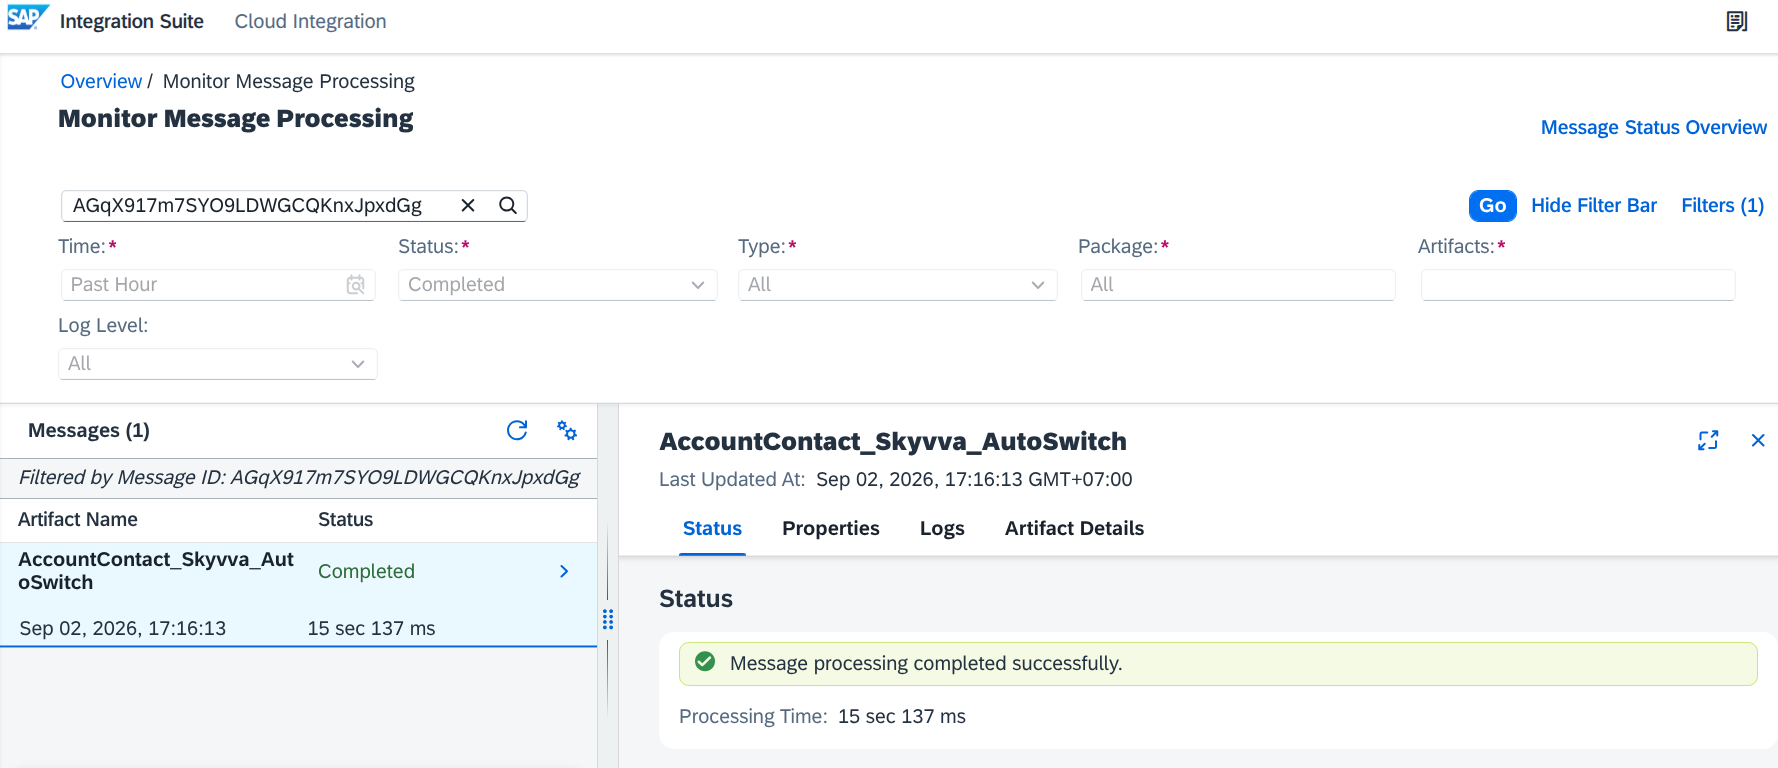
Figure 17. SAP CPI Monitor Message Processing.
A successful CPI message indicates that the request was successfully processed through the SAP CPI integration flow.
6.2 Salesforce Monitoring
After the message reaches Salesforce, verify the processing status in SKYVVA.
6.2.1 Check the Batch Control Board
For requests processed using the Batch tier, the request is queued as one or more baskets in the Batch Control Board → Working Basket.
For example, with the following thresholds:
Autoswitch Integrate Max Size = 200
Autoswitch Batch Max Size = 5000
a request containing 4,460 root Account records is processed using the Batch method because the record count is greater than 200 and less than or equal to 5,000.
Note: SKYVVA uses the term basket for the queued unit in both Batch and Bulk processing. In Batch processing, records are queued in a Working Basket. In Bulk processing, multiple records are packaged into a file-based basket/attachment.
Seeing “Basket has been created successfully” in the Postman response (Figure 16) or “Working Basket” in the Batch Control Board does not mean that the request was processed using Bulk. It indicates that the request was queued for Batch processing.
Navigate to: Batch Control Board → Working Basket
Locate the batch created for:AccountContactAutoSwitch_IN
The batch may initially have the status:Init
Select the batch and click Reprocess.
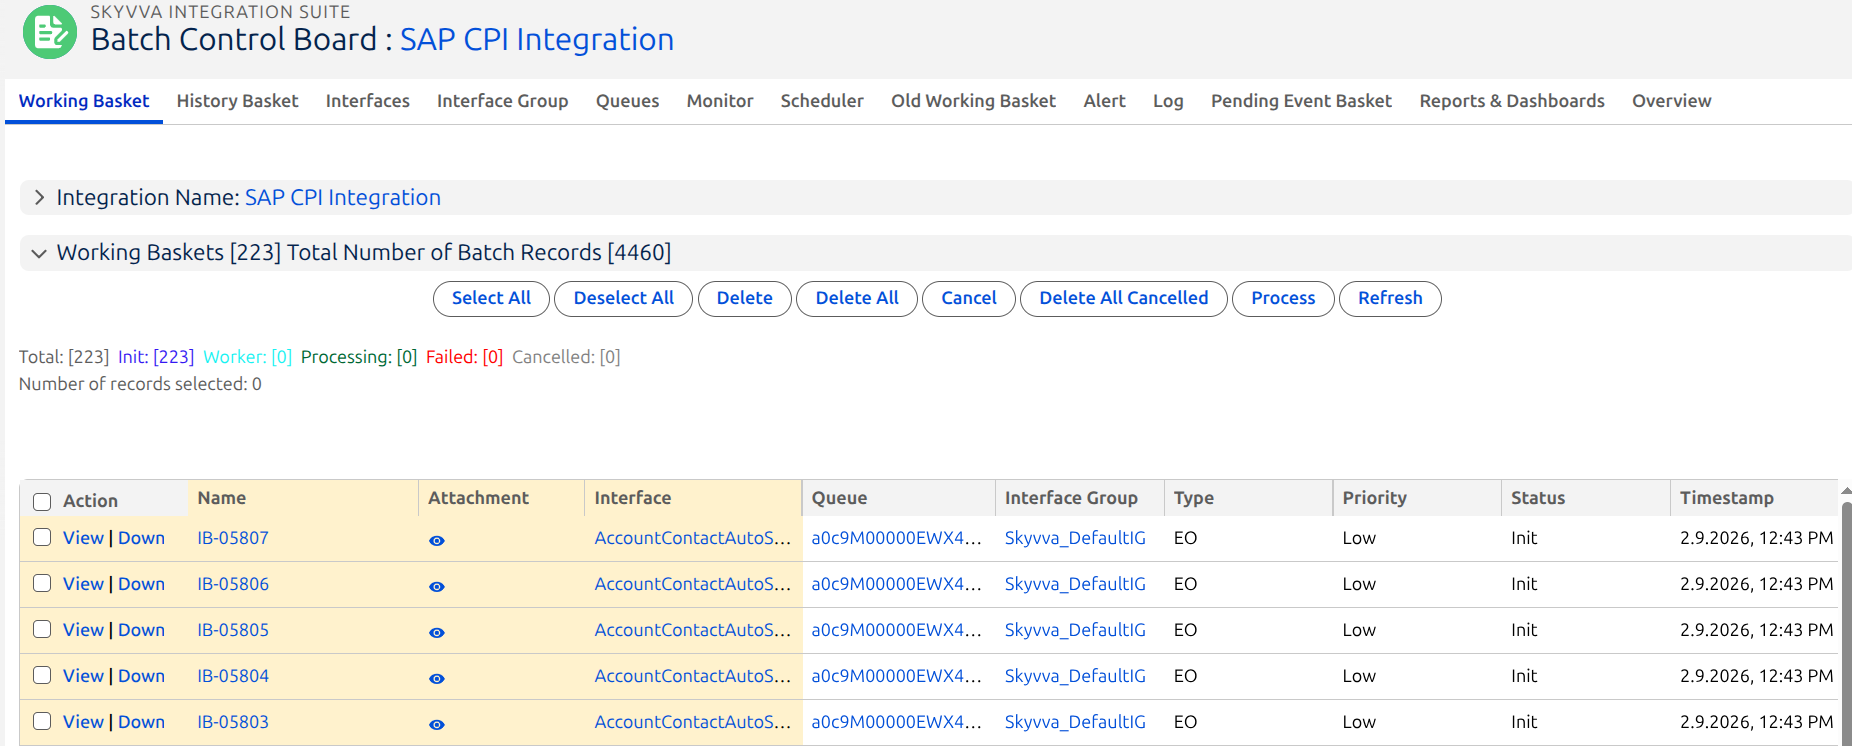
Figure 18. Batch Control Board — Working Basket showing the queued batch for AccountContactAutoSwitch_IN.
6.2.2 Check Message Monitoring
After the batch is processed, navigate to:
Skyvva Integration Suite → Message Monitoring
Locate the message associated with:
AccountContactAutoSwitch_IN
Review the processing status and verify that the message was processed successfully.
Once the message processing is confirmed, continue to §6.3 Verify Salesforce Records to confirm that the expected Account and Contact records were created or updated successfully.
6.3 Verify Salesforce Records
After the processing is complete and the message status has been confirmed in §6.2, verify the resulting records in Salesforce.
Confirm that:
- Account records were created or updated successfully.
- Related Contact records were processed correctly.
- The expected field mappings were applied.
- No processing errors were reported.
Summary
The complete integration flow is:
Postman
   ↓
HTTPS Sender Adapter
   ↓
SAP Cloud Integration
   ↓
SkyvvaSalesforce Receiver Adapter
Mode = Auto-Switch
   ↓
SKYVVA Inbound Interface
   ↓
Auto-Switch Processing
   │
   ├── Normal
   ├── Batch
   └── Bulk
   ↓
Salesforce Account and Contact
Configuration Summary
| Component | Configuration |
|---|---|
| Interface Direction | Inbound |
| Interface Processing Mode | Asynchronous |
| Operation Type | Upsert |
| External Mapping | Enabled |
| Autoswitch Integrate Max Size | Example: 200 |
| Autoswitch Batch Max Size | Example: 5000 |
| SKYVVA API Version | V3 |
| Adapter Mode | Auto-Switch |
| Request Format | XML |
| Response Format | XML |
The processing strategy is automatically selected according to the number of root records in the incoming request and the threshold values configured on the SKYVVA interface.