12. How to create an outbound synchronous interface with Account and Contact Hierarchical structure using SAP CPI adapter from Salesforce Skyvva to SAP CPI and SAP CPI to Skyvva?
How to create an outbound asynchronous interface from Salesforce Skyvva to SAP CPI
1. Overview
This document describes how to create an outbound Synchronous interface from Salesforce to SAP CPI. In Salesforce, we need to use the Skyvva SAP CPI adapter and provide the necessary CPI details to configure the adapter.
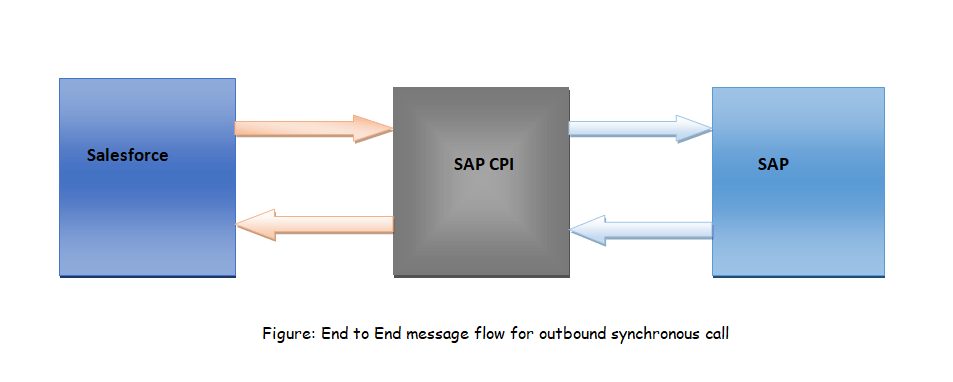
Here, in this case we are going to send the account and contact data from Salesforce to CPI, where SAP CPI adapter will send this data in JSON format. Pre-requisites:
- Skyvva Package should be installed on Salesforce
- SAP CPI user with the required authorizations for message processing
2. Salesforce Interface Development
2.1 Create Integration in Salesforce
Logon to the Salesforce, and navigate to the Integration.
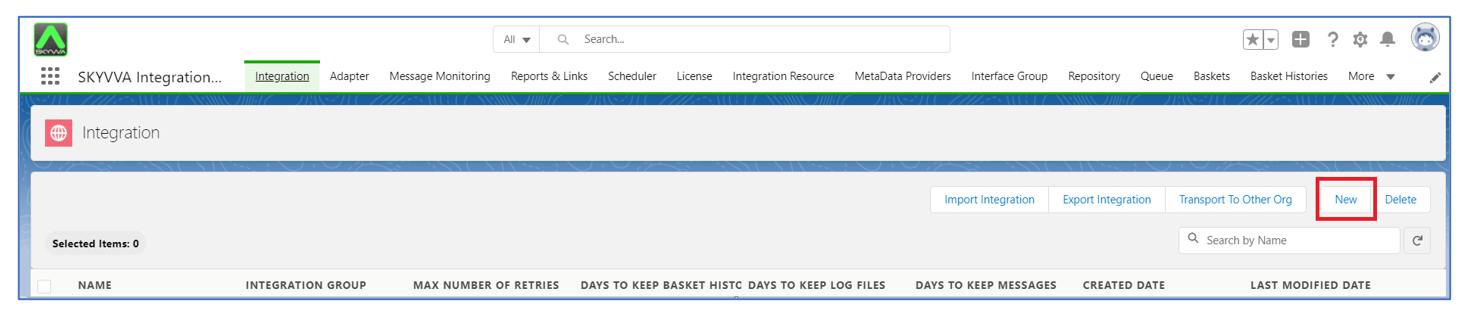
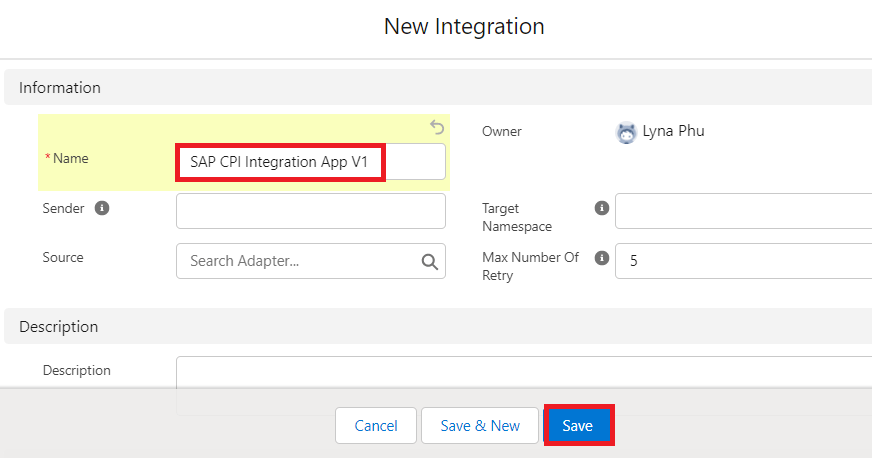
Click on New to create the new integration. Provide the integration name and save it.
Once Integration is created navigate to the interfaces and click on “New Interface” to create the new interface.

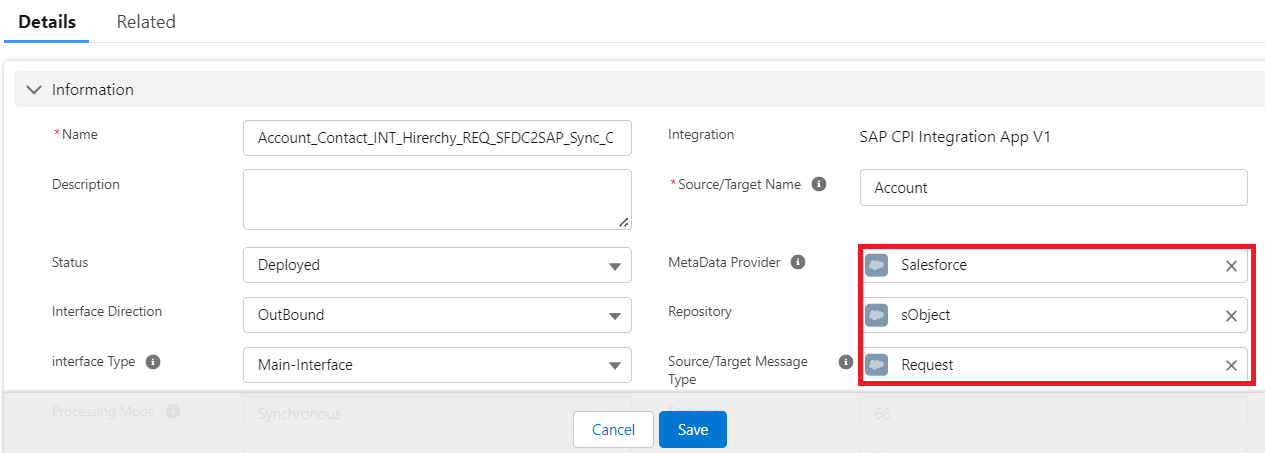
Provide the necessary details to create the outbound interface.
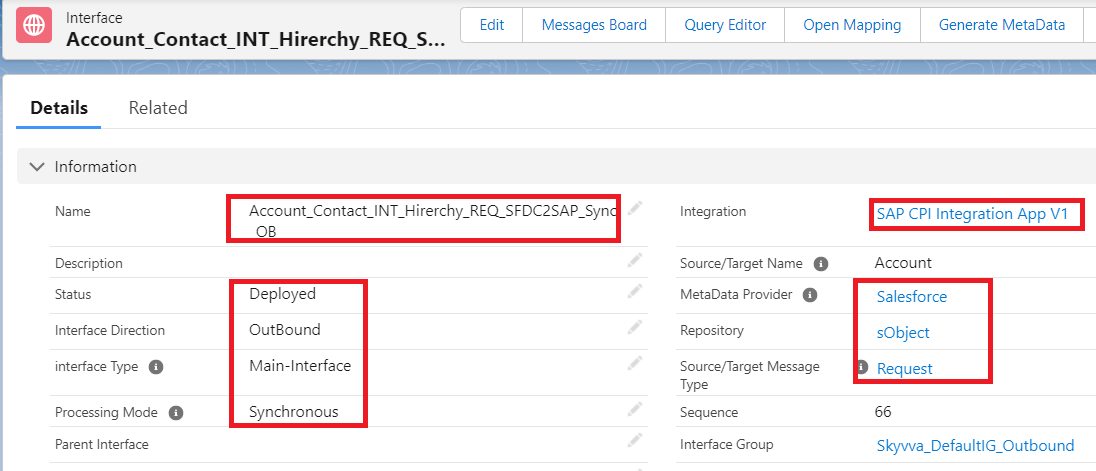
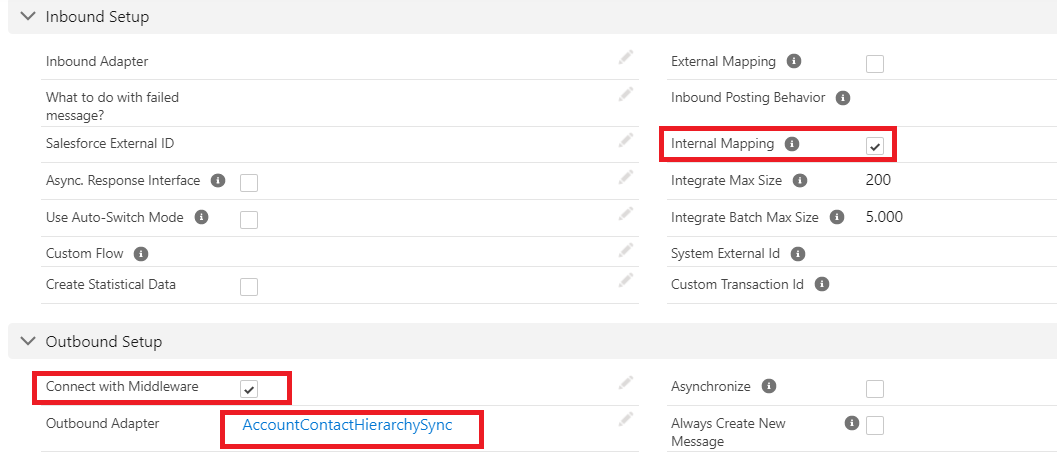
Parameters:
Name Account_Contact_INT_Hirerchy_REQ_SFDC2SAP_Sync_OB
Source/Target Name Account
Status Deployed
Processing Mode Synchronous
Interface Direction Outbound
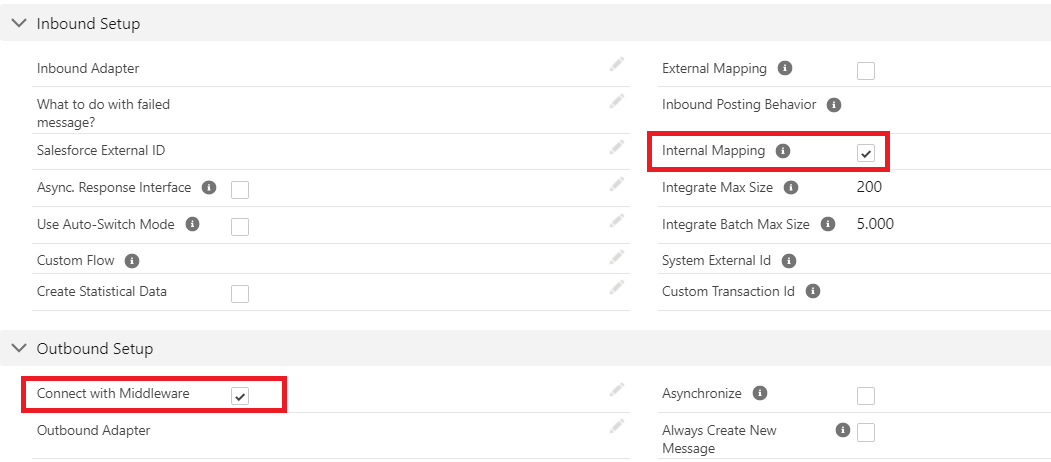
Connect with Middleware
Outbound Adapter
Internal Mapping
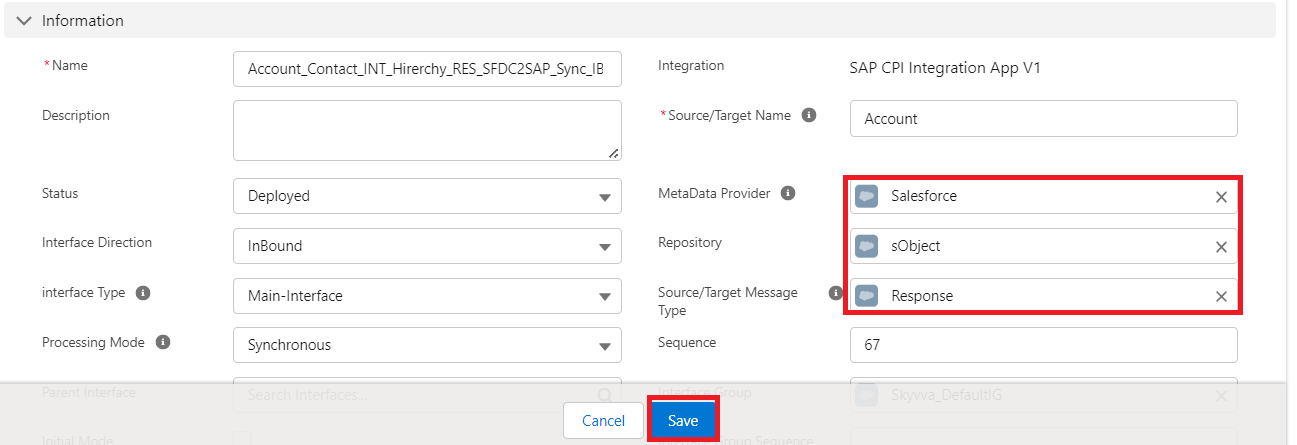
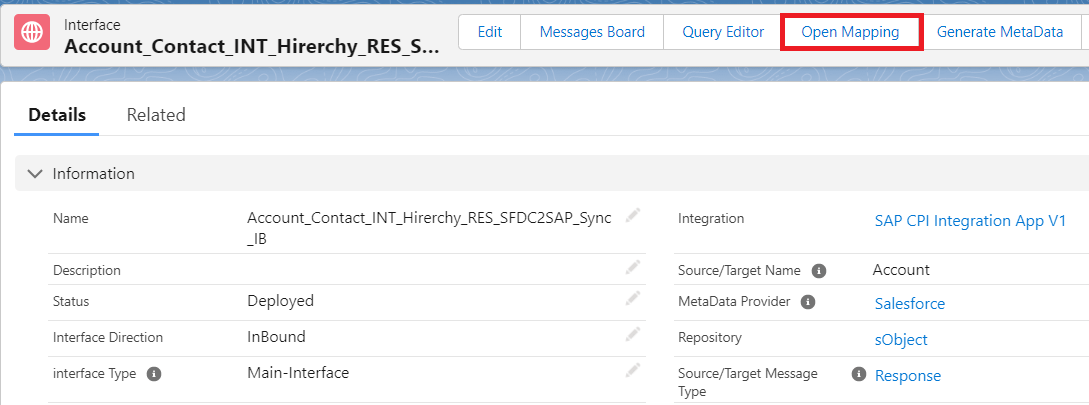
Response Interface Account_Contact_INT_Hirerchy_RES_SFDC2SAP_Sync_IB
Now save the interface. Response Inbound Interface -
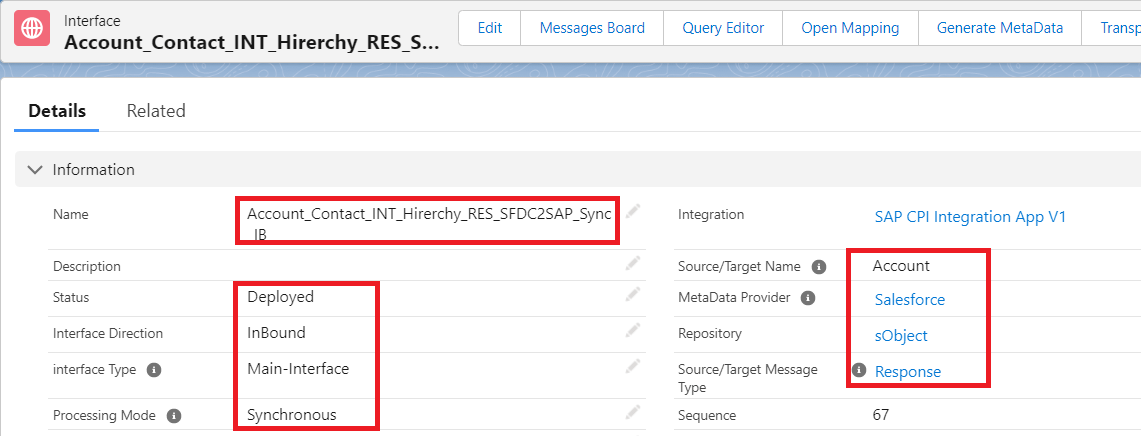
Parameters -
Name Account_Contact_INT_Hirerchy_RES_SFDC2SAP_Sync_IB
Source/Target Name Account
Status Deployed
Processing Mode Synchronous
Interface Direction Inbound
Connect with Middleware
Internal Mapping
Request Interface Account_Contact_INT_Hirerchy_REQ_SFDC2SAP_Sync_OB
Note: Here we need to update the below details in the outbound and inbound interface.
- Outbound Adapter - To connect the CPI system
- MetaData Provider (To generate the Standard structure)
- Repository (To generate the Standard structure)
- Source/Target Message Type (To generate the Standard structure)
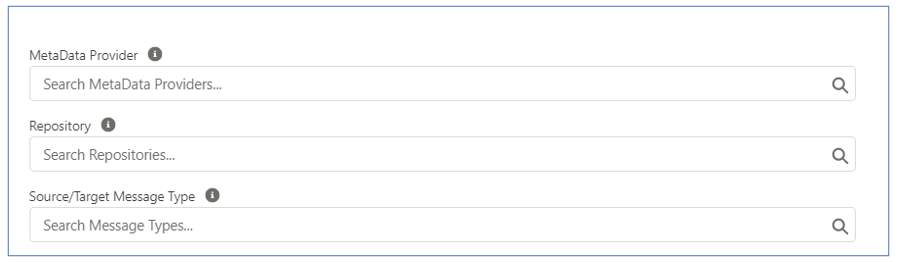
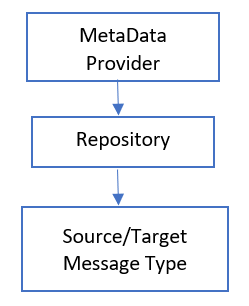
MetaData provider, Repository and Source/target message type are used in Skyvva standard REST template, which is used by SAP CPI adapter to send the data JSON format. This is the standard template which needs to be used in Skyvva outbound interface for CPI integration. Hierarchy level: MetaData contains Repository, repository contains Source/Target Message type
To create the metadata provider, navigate to the MetaData Providers and create “New” and provide the metadata provider name. Note: Metadata provider name can be anything based on the project naming convention

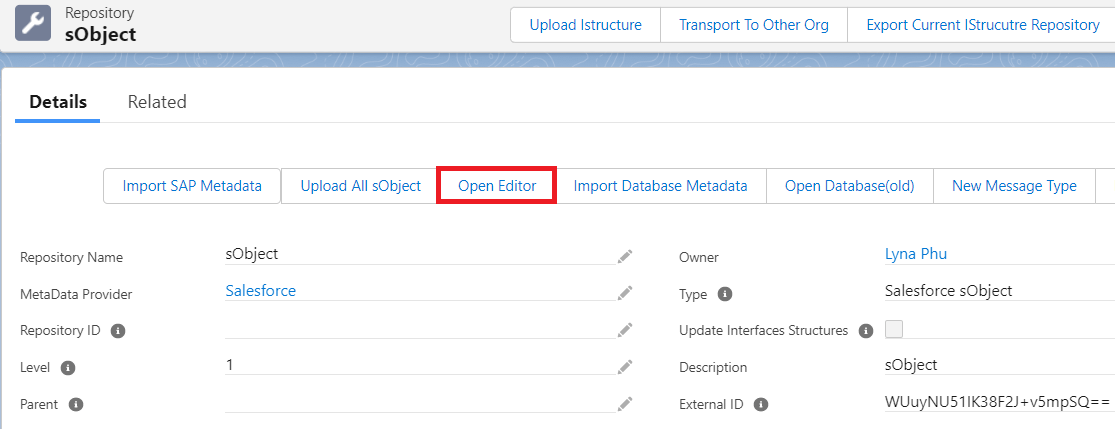
Once metadata provider created then go down and create “Repository” as shown in below screenshot.

Under the Repository, there is option to create the Message type. Click on new and create message type. Message Type: There are two ways to create message type with the below structure.
- Using REST Template (JSON)
- Creating manually
Using REST template: (Easy way) Note: We recommend to use the REST Template for both Request and Response, when we use the SAP CPI adapter. Usually the Response Interface will also work with Business message type without the REST template. Example - -->Account -->Contact To create the message type using REST template, navigate to the below path. Metadata provider > Repositories > Open Editor
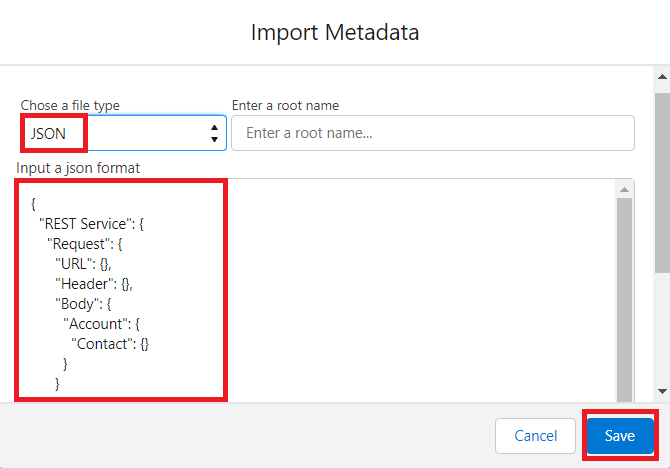
Choose filetype as “JSON” and provide Input a JSON format with below JSON text. For Hierarchical structure. We recommend to use the below REST template. In Response Interface for hierarchical structure. We recommend to use the below rest template For this Account and Contact JSON we need a 3-level message type e.g. Response(REST_Response) Body(REST_Response_Body) ListOfAccount --> Plain Structure Account -----> Salesforce sObject Contact ---> Salesforce sObject If the data is Flat then we use below Response(REST_Response) root(REST_Response_Body) Account(Salesforce sObject) {
"REST Service": {
"Request": {
"URL": {},
"Header": {},
"Body": {
"Account": {
"Contact":{ } }
}
},
"Response": {
"Body": { "ListofAccount": {
"Account": {
"Contact":{ }
}
}
} }
} The above is the standard REST template that will used to create message type.
Click on save. Once saved we can find the message type as below.
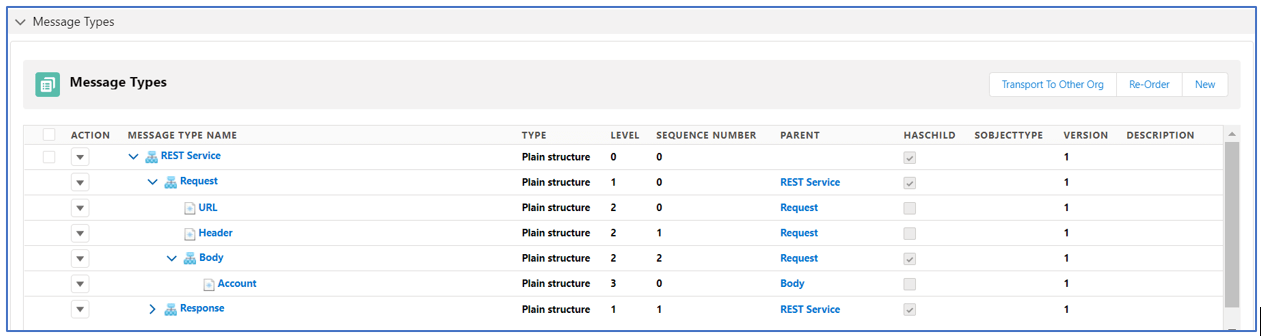
Now edit the message type to add the TYPE, LEVEL, SEQUENCE NUMBER AND PARENT. Click on action to edit the message type structure.

Update the details like type and other parameters as below.
Similarly, need to update all. E.g. Account

Ensure that message type looks as below.
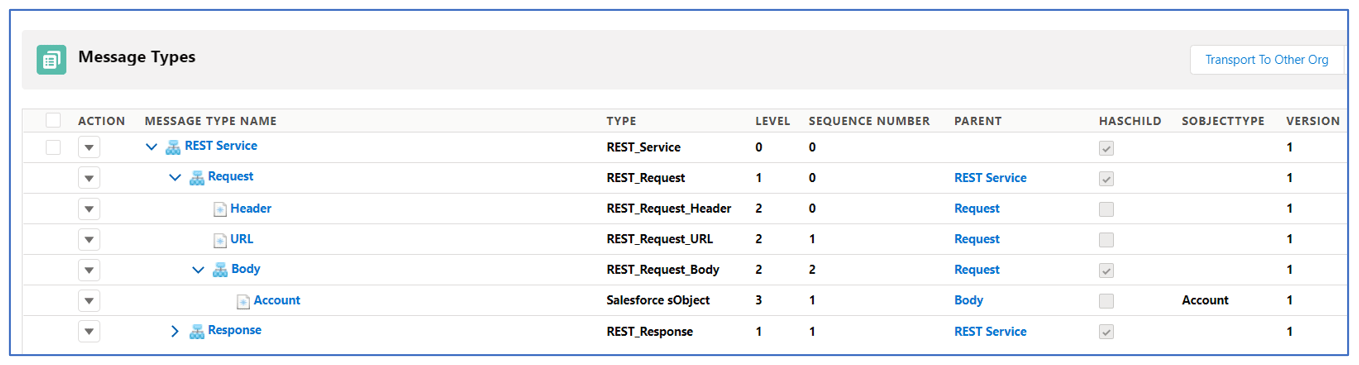

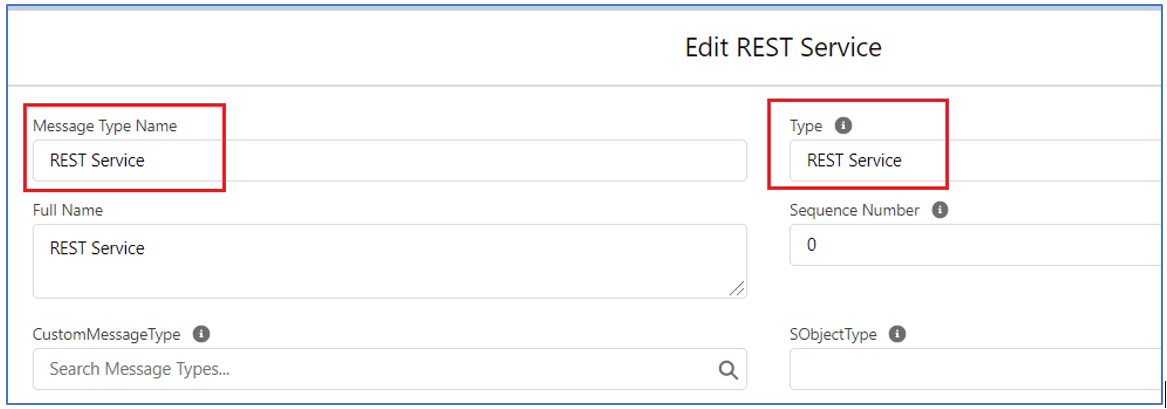
From the above screen shot, we can find the Request and Response message type. These details will be used in the outbound and the inbound interface creation. Message Type Name - REST Service, can be free text where we can use any other name also depends on the project naming convention. If we need different name, we need to define it in the REST template. Creating Manually: To create below structure, please follow below steps.

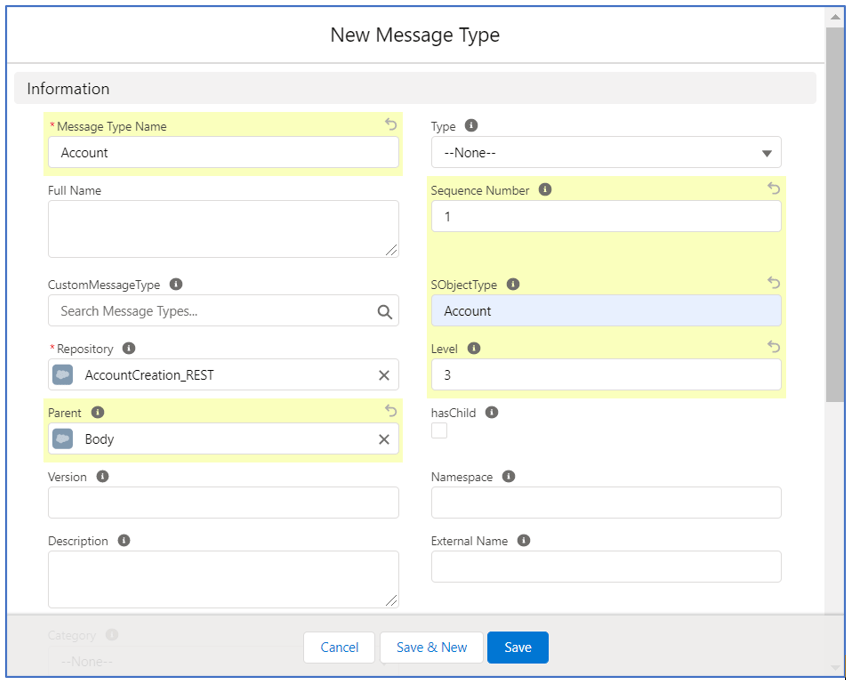
To create message type, click on the “New” and provide the message type name, choose the Type, choose the Level, choose the sequence number and choose the Parent. For example, if we need to create the “Account” under Body with type Salesforce object.
Other example, to create the Body in structure
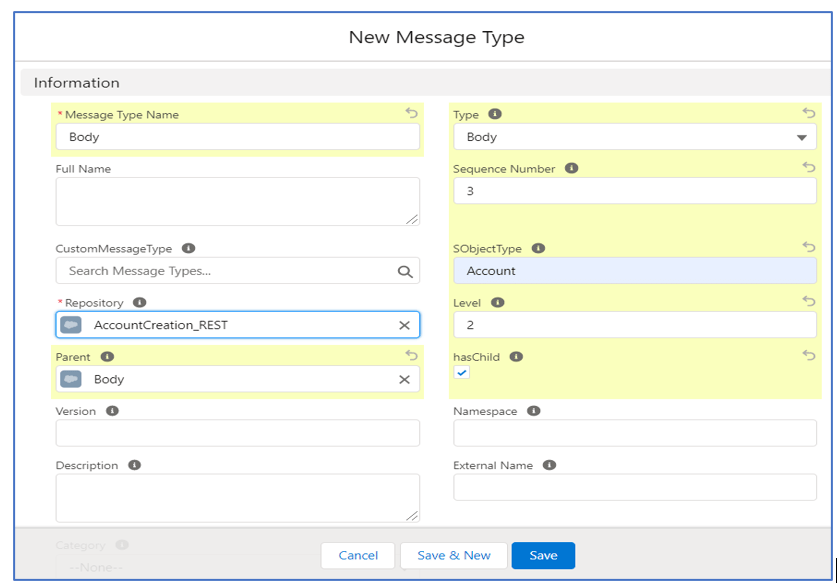
Note: Here Body has child so, we need to check the option “hasChild” Once Metadata provider, Repository name & Message types are created, then add these in both Request and Response Interface. Navigate to the interfaces and add these as shown below.
Now save the interface. Similarly for the inbound interface.
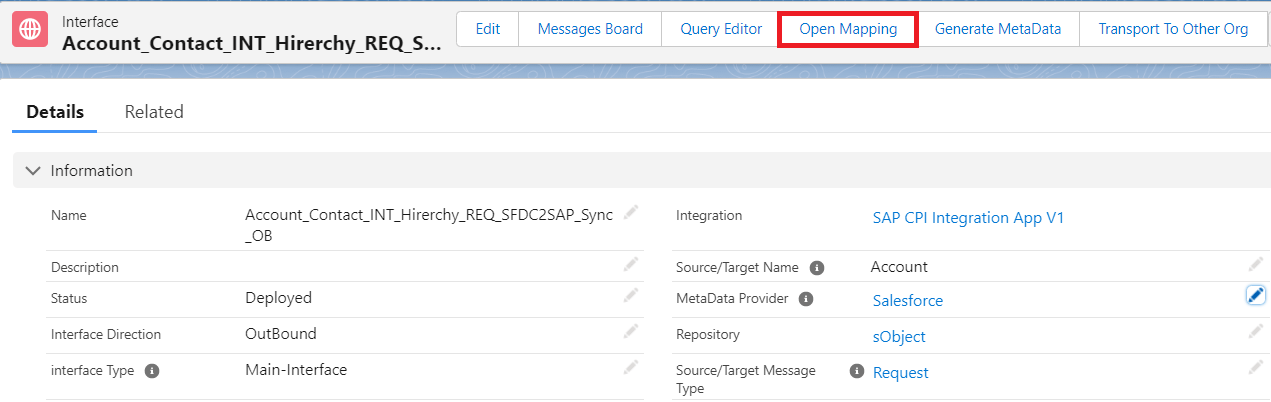
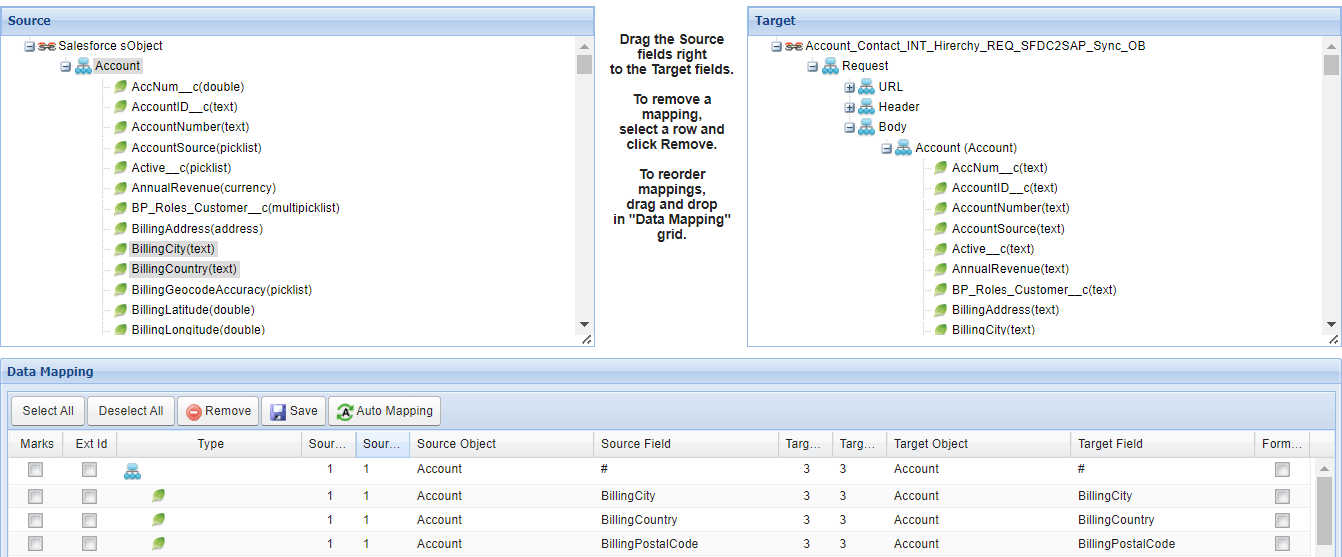
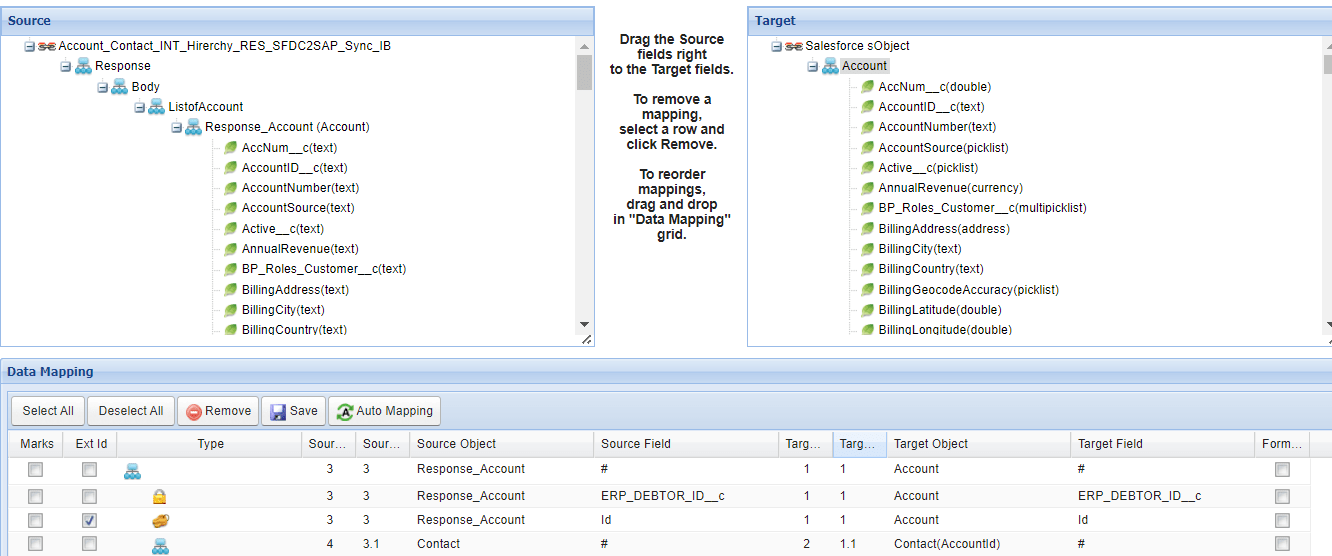
Mapping in Skyvva Interface: Now mapping need to be done in the Skyvva interface to push what are the fields need to send from Account S-Object. Open mapping in interface, please find below screenshot for reference.
We can find the mapping as below which has both source and target structures. Map the fields based on the requirement and save it.
Similarly create the mapping for the Inbound response interface
2.3 Create Skyvva SAP CPI adapter
To create the CPI adapter for outbound interface, navigate to the below path. Integration > Details > SAP Control Board > Adapter

Under adapter click on new to create the adapter.

Create a new SAP CPI adapter by providing the necessary details.
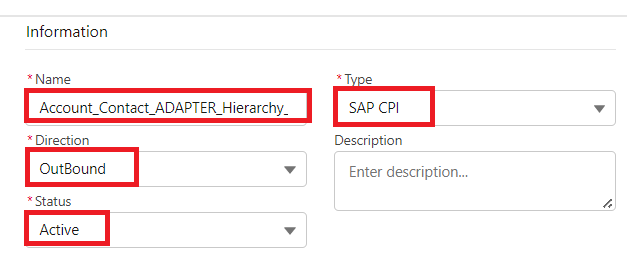
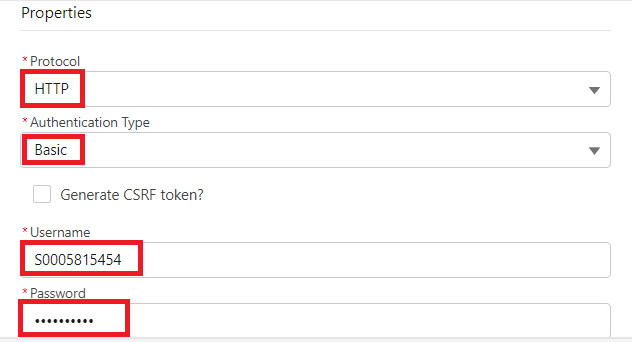
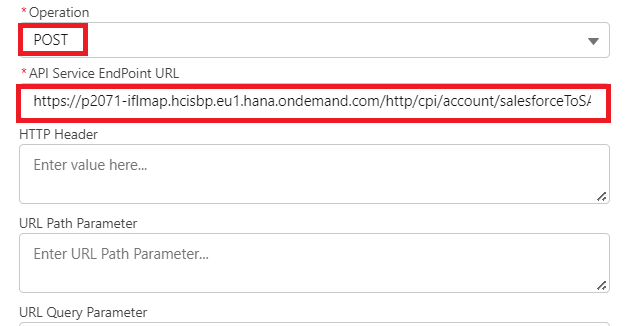
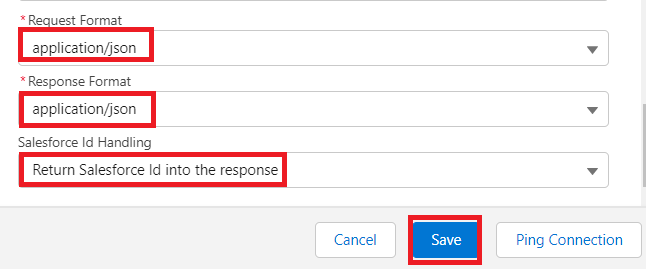
Now click on Save to save the Adapter CPI Adapter Parameters:
Adapter Name Account_Contact_ADAPTER_Hierarchy_Sync
Type SAP CPI
Direction Outbound
Authentication Type Basic
Generate CSRF token? Enable this if CSRF is checked in SAP CPI sender HTTPs adapter
Protocol HTTP
API Service Endpoint URL CPI interface endpoint url
Operation Post
RequestFormat Application/json
Once all the details are provided then save it. Now add the SAP CPI adapter in outbound interface under Outbound Setup as below.

2.3 Generate the Skyvva XSD for CPI development
Generation of Skyvva XSD (Structure) will be used in CPI for CPI message transformation. To generate the XSD from interface navigate to below path Integration > Interface > Repository

Under repository, in message types click on “Account” to download the XSD file.

3. SAP CPI Development
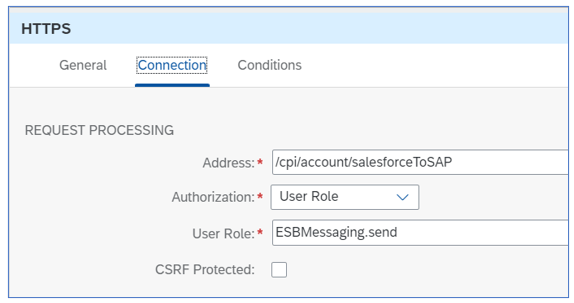
Logon to CPI tenant, navigate to the Design > Packages > Artifacts > Create new integration flow Step: 1 Create the sender HTTPS communication channel and provide the connection parameters.
Step: 2 Import the Skyvva XSD created in Salesforce (refer section 2.3) into SAP CPI system.

Once the source XSD is loaded then import the target structure (in available format) Below is the integration flow created in SAP CPI
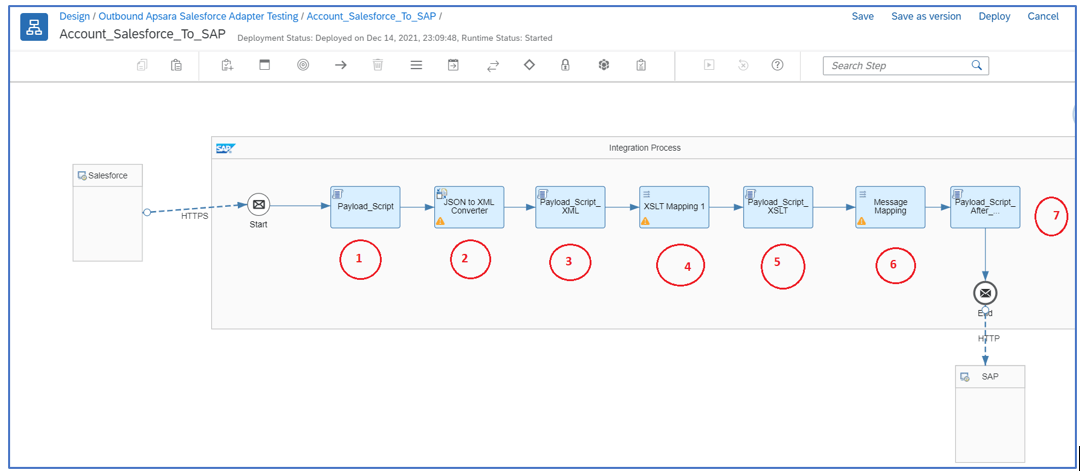
- Payload Script à Will log the source payload (JSON)
- JSON to XML Convertor à This palate is used to convert the received JSON format data to xml

- Payload Script XML à Script to log the converted XML file
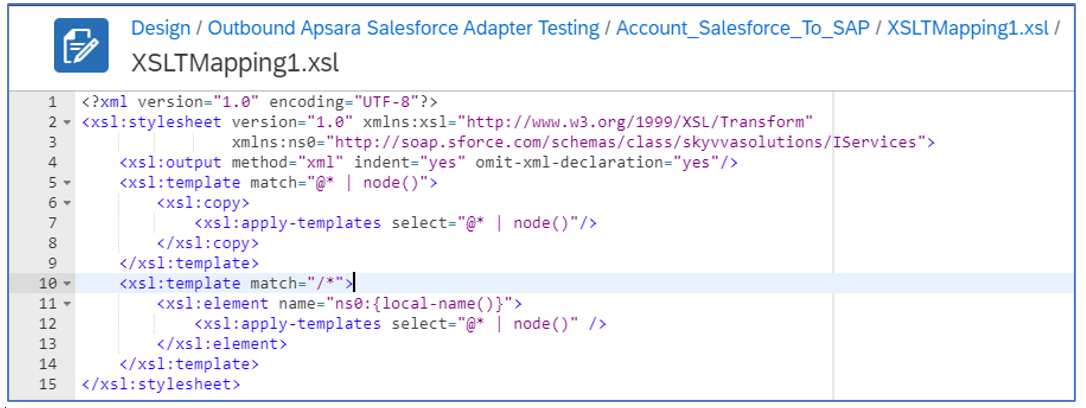
- XSLT Mapping à This XSLT mapping is used to add the prefix and namespace to the converted XML. Below XSL code for reference.
5.Payload Script XSLT, Script to log the XSLT payload
- Message Mapping, Source to Target transformation
- Payload script After mapping, Script to log the payload after mapping
4. Testing
4.1 Push the data from Salesforce to CPI using APEX code
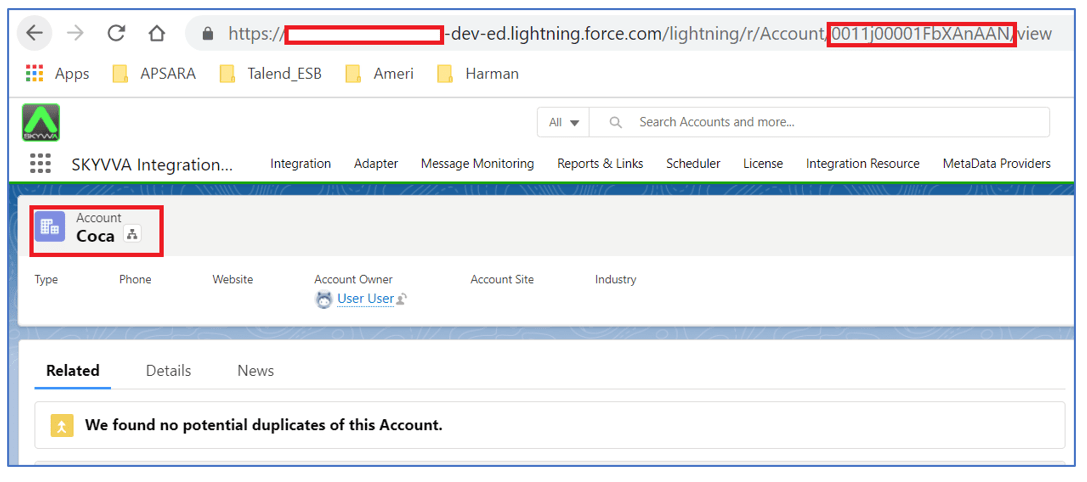
Now we are going to push the account data from Salesforce (Skyvva) to SAP CPI. Account data should be available in Salesforce. Please find below screenshot for reference.
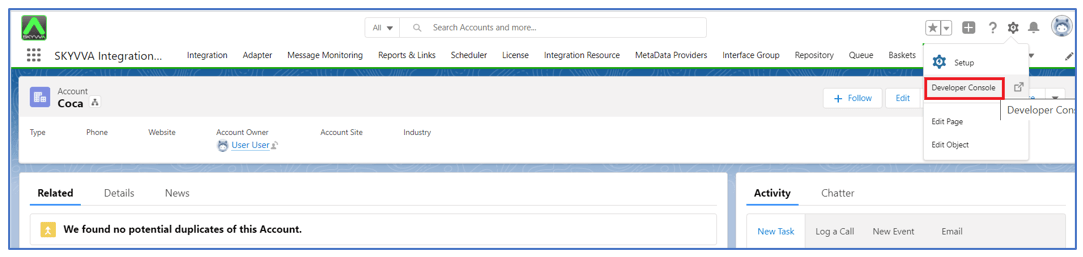
To push this data from Salesforce, navigate to Developer console.
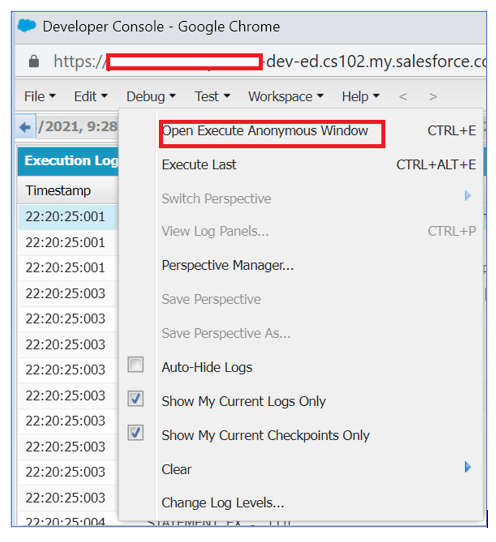
Navigate to below path Debug > Open Execute Anonymous Window
Use the below APEX code to trigger the data. //Account_CPI_OB --Interface
skyvvasolutions.CallOutControl c=new skyvvasolutions.CallOutControl();
c.returnJSONComplete=true;
c.actionDoIntegrate=true;
c.isCreateMessage=true;
String[] ids=new String[]{'0011j00001FbXAnAAN'};
skyvvasolutions.Iservices.invokeCalloutV3('CPI Integrate','Account_CPI_Interface_OB',ids,'SYNC', c);
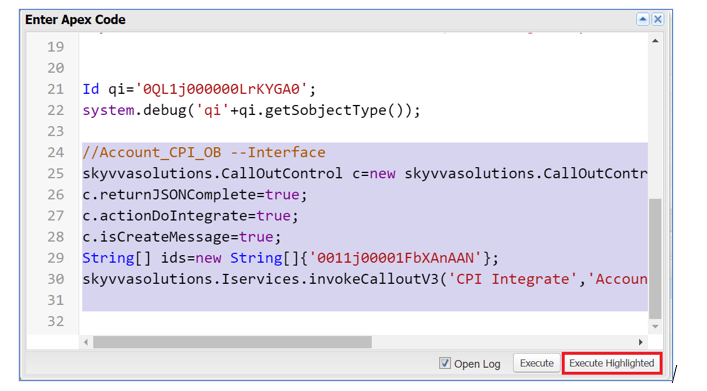
Click on Execute Highlighted to push the data. Now monitor the message in Salesforce and CPI.
4.2 Salesforce message monitor:
Navigate to Message monitoring and provide the details as below.
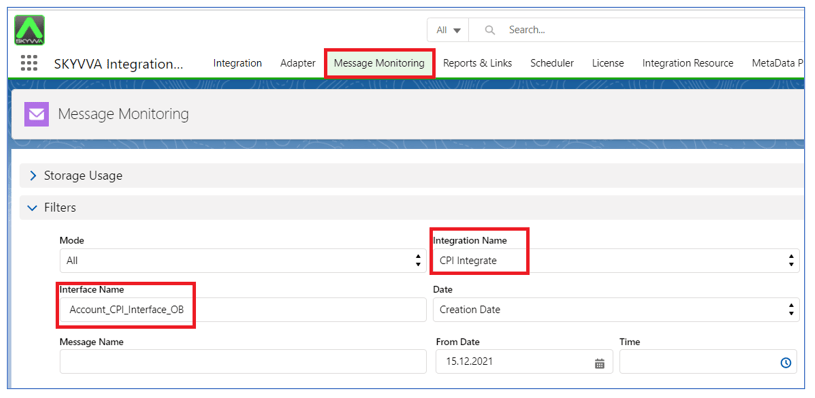
Click on search In below messages we can notice that message triggered to CPI “Green flag Status”

4.3 CPI monitoring:
Navigate to the Message monitoring in CPI and we can find the respective message in CPI with all logs.

From the above screen shot we can noticed that account data got processed in CPI.