12. Outbound Synchronous Interface: Salesforce Account to SAP CPI (Request/Response)
1. Overview
This document describes how to create an outbound Synchronous interface from Salesforce to SAP CPI that sends a flat Account record and receives a response back in the same transaction. Unlike the sibling outbound Asynchronous tutorial's scenario (fire-and-forget, no response expected), this one needs:
- A Request Interface with its own Message Type (§2.3) — built by importing the backend's
Name/BillingCountry/Tax_ID__c mapped onto it from the live Account
schema in the Mapping Tool.
- A Response Interface wired to the outbound Request interface, since
Processing Mode =
  Synchronous
expects CPI's response to be parsed and routed back into Salesforce inbound
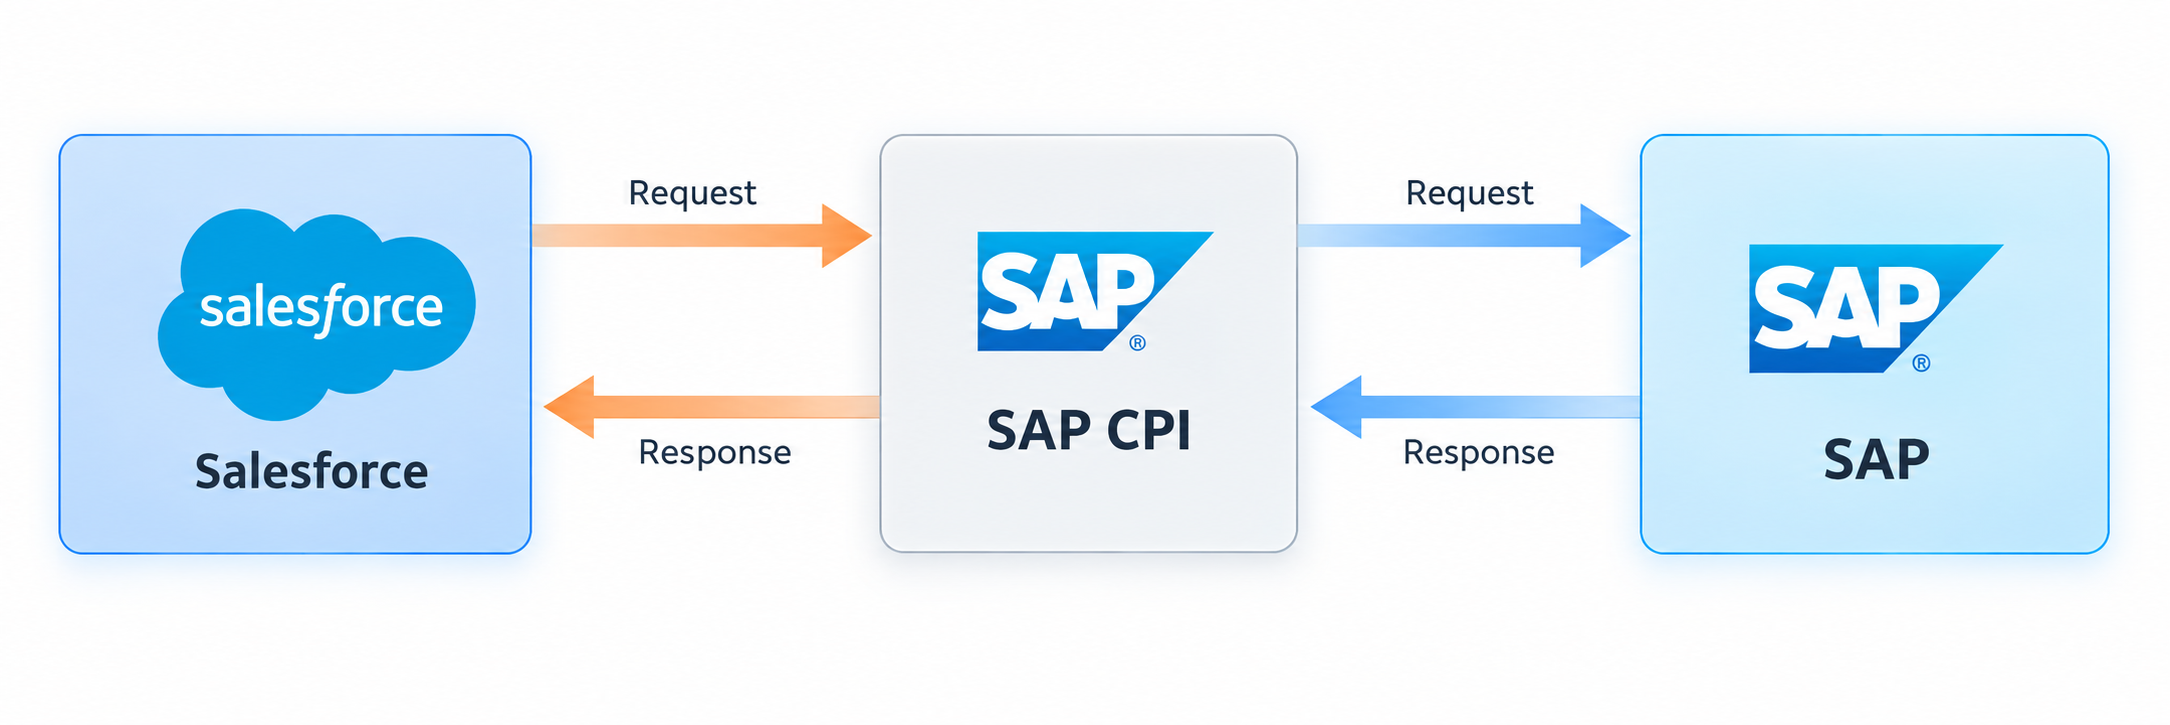
Figure 1: Salesforce Account pushed synchronously to SAP CPI and the response routed back — end-to-end flow.
1.1 Business Context
Use this pattern when the calling Salesforce transaction needs CPI's response back before it can proceed — for example, SAP (or a system behind CPI) validates or enriches a single Account's data — a tax ID check, a credit status lookup, an assigned SAP customer number — and Salesforce needs that result immediately, before the record save completes, not asynchronously.
Keep the payload flat and minimal for this pattern. A synchronous call blocks the calling transaction until CPI answers, so it should carry only the fields the immediate decision actually needs — not a parent record bundled together with a full list of child records. If what you actually need is to keep Account and Contact data consistent between Salesforce and SAP, that's a data-synchronization concern, better served by asynchronous/batch patterns — outbound for pushing Salesforce-side changes, one of the inbound Bulk-mode tutorials for pulling SAP-side changes — than by a blocking synchronous call. Reach for this pattern specifically when a single record's validated/enriched result has to come back in-line, and use the outbound Asynchronous pattern (the sibling tutorial in this series) for anything where Salesforce only needs to notify a downstream system and doesn't need anything back in the same transaction.
1.2 Tutorial Scenario
This tutorial pushes one Account record Synchronously to SAP CPI as JSON and expects a response back in the same call, triggered via Apex (invokeCalloutV3, §4.1) so the flow can be verified end-to-end without waiting for a real business event.
It configures the Salesforce-side outbound adapter (Adapter__c.Type__c = 'SAP CPI'), where Salesforce is the caller. The separate SkyvvaSalesforce CPI adapter (this repo's own product, installed inside the SAP CPI iFlow designer) is the opposite direction — see the earlier tutorials in this series covering that CPI-side adapter's Sender/Receiver channel setup instead.
Pre-requisites:
- Skyvva Package installed on Salesforce
- SAP CPI user with the required authorizations for message processing
2. Salesforce Interface Development
2.1 Create the Integration and the Request Interface
Create a SKYVVA Outbound Interface under Integration in Salesforce (create the parent Integration record first if you don't already have one).
Configure the outbound Request interface:
| Field | Value |
|---|---|
| Name | Account_INT_REQ_SFDC2SAP_Sync_OB |
| Integration | Your Integration record |
| Source/Target Name | Account |
| Status | Deployed |
| Interface Direction | Outbound |
| Processing Mode | Synchronous |
| Interface API Version | V3 — required, see the correction above |
| Message Type | required — build via §2.3, see the note below |
| Response Interface | Account_INT_RES_SFDC2SAP_Sync_IB (create this next, §2.2, then come back and link it here) |
Note: leave the Source/Target Message Type fields on this form empty for now — you'll
come back and set them once the Message Type exists (§2.3). Both interfaces need one, built the
same way: importing the backend's OpenAPI spec via Import Metadata → Open Editor.
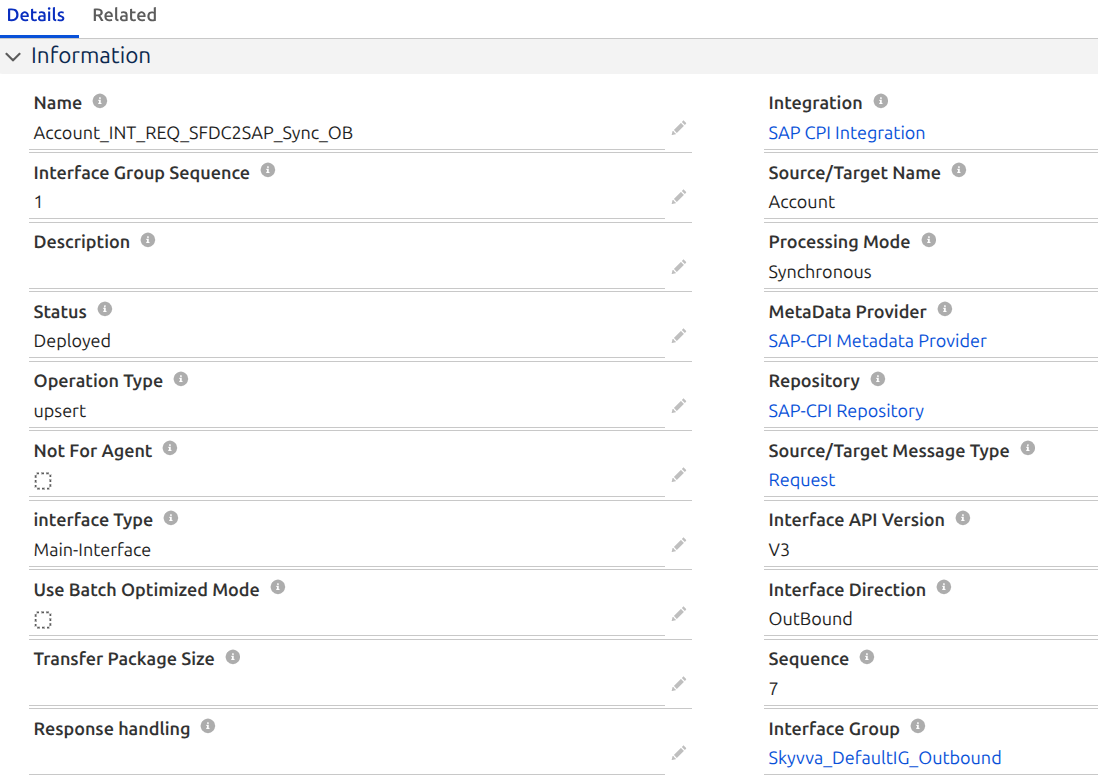
Figure 2: New Interface form — the outbound Request interface.
2.2 Create the Response Interface
Back on the same Integration record's Interfaces related list, click New Interface again to create a second interface for the inbound Response:
| Field | Value |
|---|---|
| Name | Account_INT_RES_SFDC2SAP_Sync_IB |
| Integration | Your Integration record |
| Source/Target Name | Account |
| Status | Deployed |
| Interface Direction | Inbound |
| Processing Mode | Synchronous |
| Interface API Version | V3 |
| Message Type | required — build via §2.3, see the note below |
| Request Interface | Account_INT_REQ_SFDC2SAP_Sync_OB |
Note: this Response interface **needs a real Message Type — it cannot be
MessageType-less**, same as the Request interface now (§2.1). Salesforce's own response
routing treats a blank Message Type as a signal to use an older, legacy response-parsing path
instead of the modern one this tutorial's flow depends on, regardless ofInterface API > Version. Build its Message Type via §2.3 below, the same way as the Request interface.
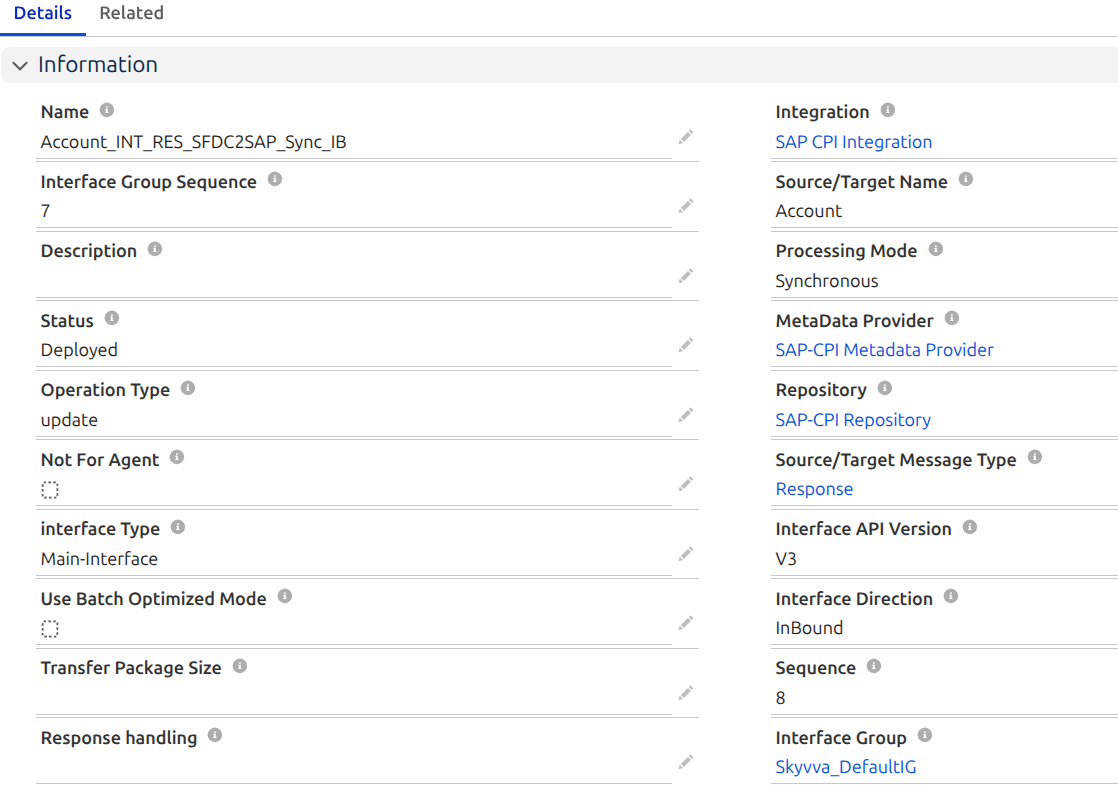
Figure 3: New Interface form — the inbound Response interface.
Go back to the Request interface (§2.1) and set its Response Interface field to this record now that it exists.
2.3 Build the Message Type(s)
Both interfaces get a Message Type here — Request (§2.1) and Response (§2.2), built the same way. The Response interface's is genuinely required: without one, Salesforce's response routing falls back to an older, legacy response-parsing path instead of the modern one this synchronous flow depends on, regardless of Interface API Version. The Request interface's isn't strictly required the same way — mapping still works by dragging fields from the live Account schema regardless of whether a Message Type is attached — but this tutorial builds one for it too (via the OpenAPI import below, §2.3.1), matching the real contract the backend service already publishes rather than leaving the shape undocumented.
Why this matters beyond the technical requirement: in a real integration, the Message Type is also what makes the payload shape an explicit, documented contract rather than something only visible by reading Apex/mapping configuration. Whoever builds the CPI side (§3) — often a different person or team — needs a concrete schema to import, not a live test payload to reverse-engineer the shape from. This tutorial's own scenario is the realistic case: you already have the backend service's OpenAPI file (from the team or system that owns it — the Tax ID validation service §3 step 4 calls via Call SAP - Tax ID Validation), so the same file does double duty — import it once to build the SKYVVA Message Type below, and reuse that exact same file again as CPI's Message Mapping schema in §3, with no separate export step producing a second copy. Exporting a schema out of SKYVVA itself only becomes necessary if you don't have that file and built the Message Type by hand instead (see the sibling outbound Asynchronous tutorial, Tutorial_05.md, for that fallback) — it generates after the fact what an existing OpenAPI spec already gives you upfront.
Create a MetaData Provider (Integration → MetaData Providers → New — any name fitting your project convention), then a Repository under it.
On the Repository, click Import Metadata → Open Editor, but set File Type = OpenAPI (not JSON), then paste or upload the spec. This generates the full Message Type tree — real, individually-mappable child nodes for every property the schema declares, nested exactly as the schema nests them — for both interfaces from one document, driven by the existing contract instead of a JSON literal you'd otherwise have to write yourself.
For this tutorial's scenario, the spec declares AccountRequest (Account > Name, BillingCountry, Tax_ID__c) for the Request interface's Message Type, and AccountResponse (Account > AccountNumber, Credit_Status__c) for the Response interface's — both under one paths operation (POST /account-validation) so the picker in each importer (SKYVVA's own, and CPI's later on) has a real entry to list rather than an empty paths: {}, which imports without error but then shows "No data" in CPI's picker (§3's internal detail covers this same gotcha on the CPI side).
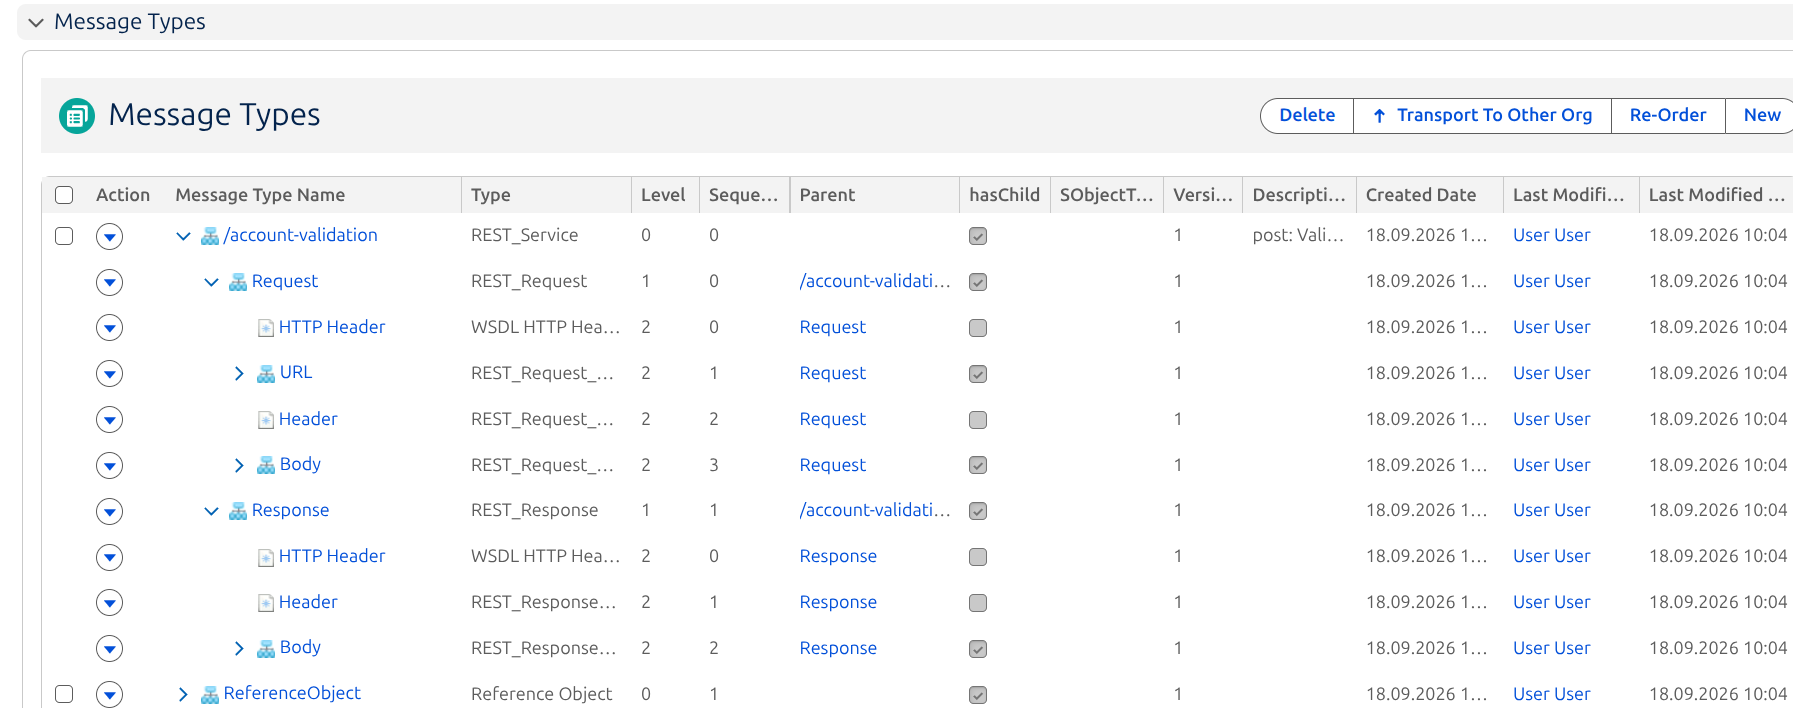
Figure 4: Repository — importing an existing OpenAPI spec, generating both Message Type trees in one step.
No existing contract to import (or the two shapes genuinely need to diverge — e.g. the SKYVVA envelope needs fields the real backend doesn't have)? This tutorial doesn't cover building the Message Type by hand for that case — see the sibling outbound Asynchronous tutorial (
Tutorial_05.md
§2.2–2.3) for the Generate Template / Import Metadata JSON methods, and its own §2.4-equivalent for
generating a Skyvva XSD from a hand-built Message Type when there's no external spec to import
instead.
Once the Message Type tree exists, link it to each interface (MetaData Provider, Repository, Source/Target Message Type fields — §2.1 for Request, §2.2 for Response), then save.
2.3.1 Map Account Fields (Request and Response)
With a Message Type now on both interfaces, open Open Mapping on each. Both trees already have real, individually-named field nodes (from the OpenAPI import, §2.3) — no childless placeholder to drag onto. For the Request interface, drag Name/BillingCountry/Tax_ID__c from the live Account schema onto their matching, identically-named nodes under the Message Type's own Account node. For the Response interface, the tree's AccountNumber/Credit_Status__c nodes come from the imported spec itself, not a live schema — map these the same way inbound field mapping normally works, targeting the corresponding Salesforce Account fields. Map each field and save.
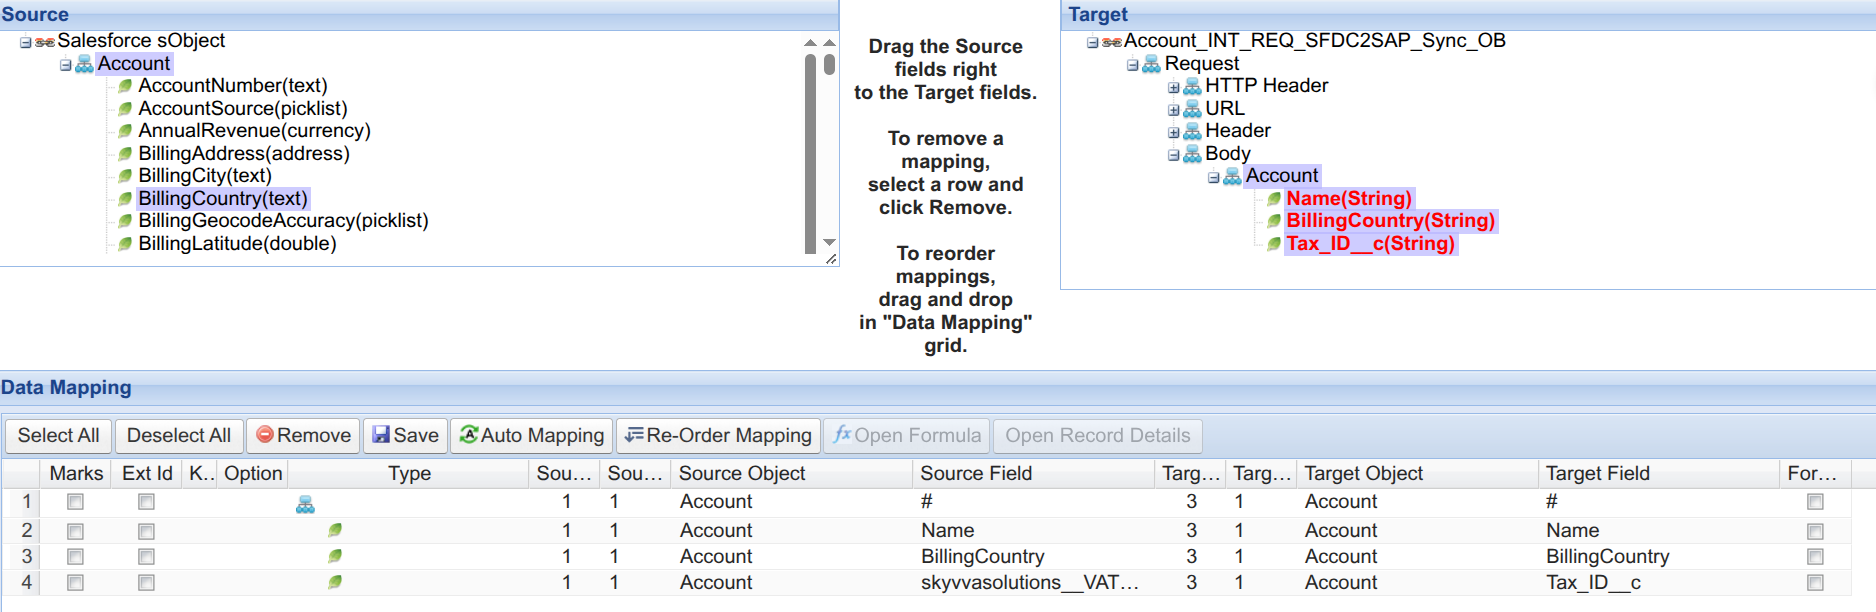
Figure 5: Mapping Tool — field mapping on the Request interface, sourced from the live Account schema.
For the Response interface, the same Mapping Tool maps the tree's AccountNumber/ Credit_Status__c nodes onto the corresponding Salesforce Account fields — AccountNumber onto the standard field of the same name, and Credit_Status__c onto skyvvasolutions__Credit_Check_Result__c, the field the SKYVVA package itself already provides (not a same-named field you create yourself):
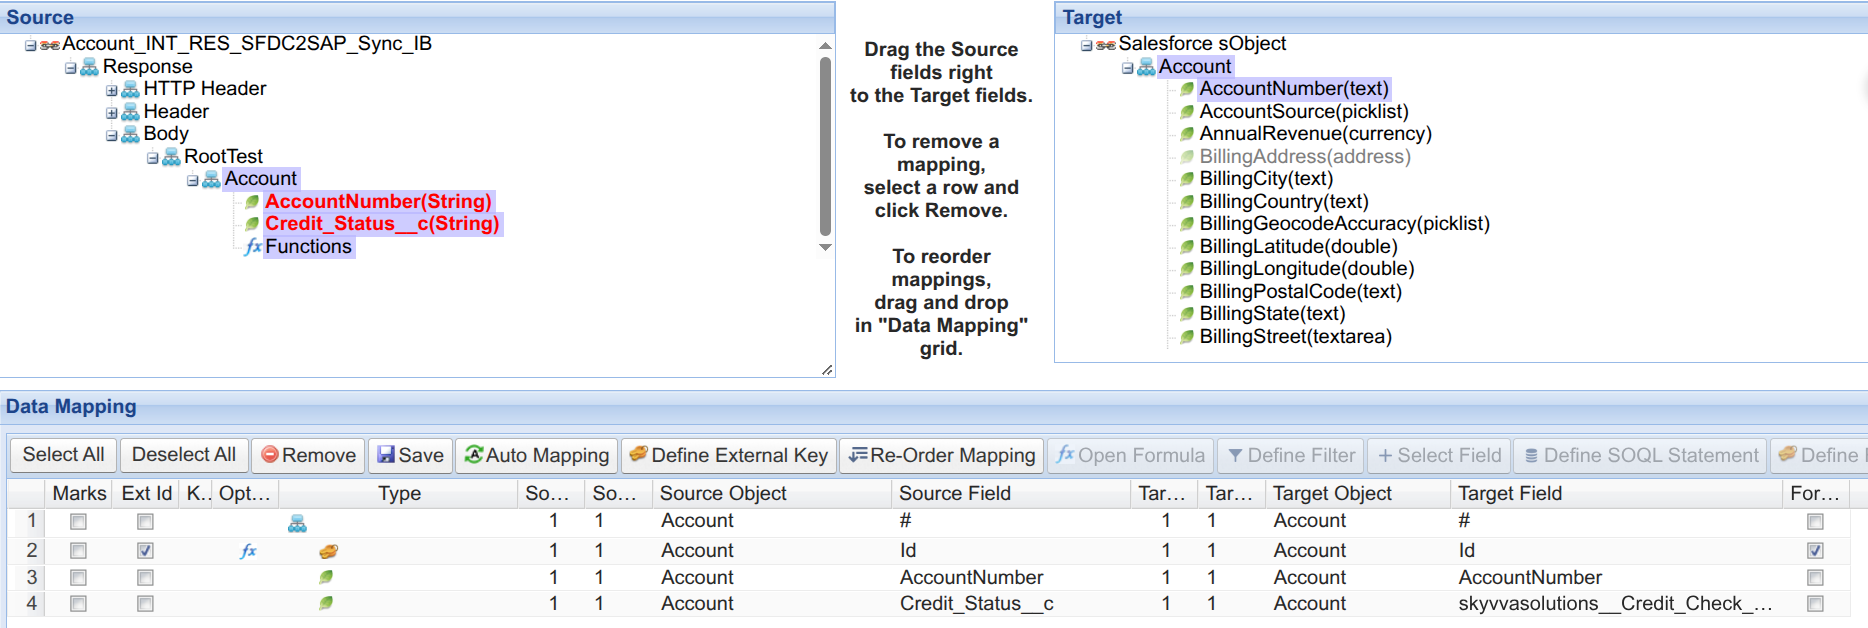
Figure 6: Mapping Tool — field mapping on the Response interface, targeting the Salesforce Account fields.
2.4 Create the Skyvva SAP BTP Integration Suite Adapter
Navigate to Integration → Details → SAP Control Board → Adapter, click New, and configure it exactly as documented in the outbound Asynchronous tutorial's §2.4 (full field-by-field reference) — the adapter configuration itself doesn't differ between the asynchronous and synchronous scenarios. For this tutorial:
| Field | Value for this tutorial |
|---|---|
| Adapter Name | Account_ADAPTER_Sync |
| Type | "SAP BTP Integration Suite" in the dropdown (stores SAP CPI) |
| Direction | Outbound |
| Authentication Type | Basic (or another value — see the outbound Asynchronous tutorial's §2.4 for all five options) |
| Protocol | HTTP |
| Operation | POST |
| Request Format | application/json |
| Response Format | application/json |
| API Service Endpoint URL | your CPI iFlow's endpoint URL |
Why JSON, not this adapter's own default (application/xml):Request_Format/Response_Format
is a two-option picklist (application/json/application/xml), andapplication/xmlis
actually this adapter type's own coded default — but real-world REST/SAP CPI convention favors
JSON from the calling application: REST-style callers like Salesforce typically speak JSON,
while SAP's internal processing (and CPI's own message engine) works in XML regardless — that's
exactly why CPI's standard JSON→XML converter step exists as a normal, expected part of an
iFlow (§3), not a workaround. Picking JSON here matches that convention and keeps Salesforce's
own outbound payload in the format a REST caller would normally produce; CPI bridges the
outbound request to XML internally for the SAP-side call, then maps the response straight back
to JSON without a second conversion step (§3).
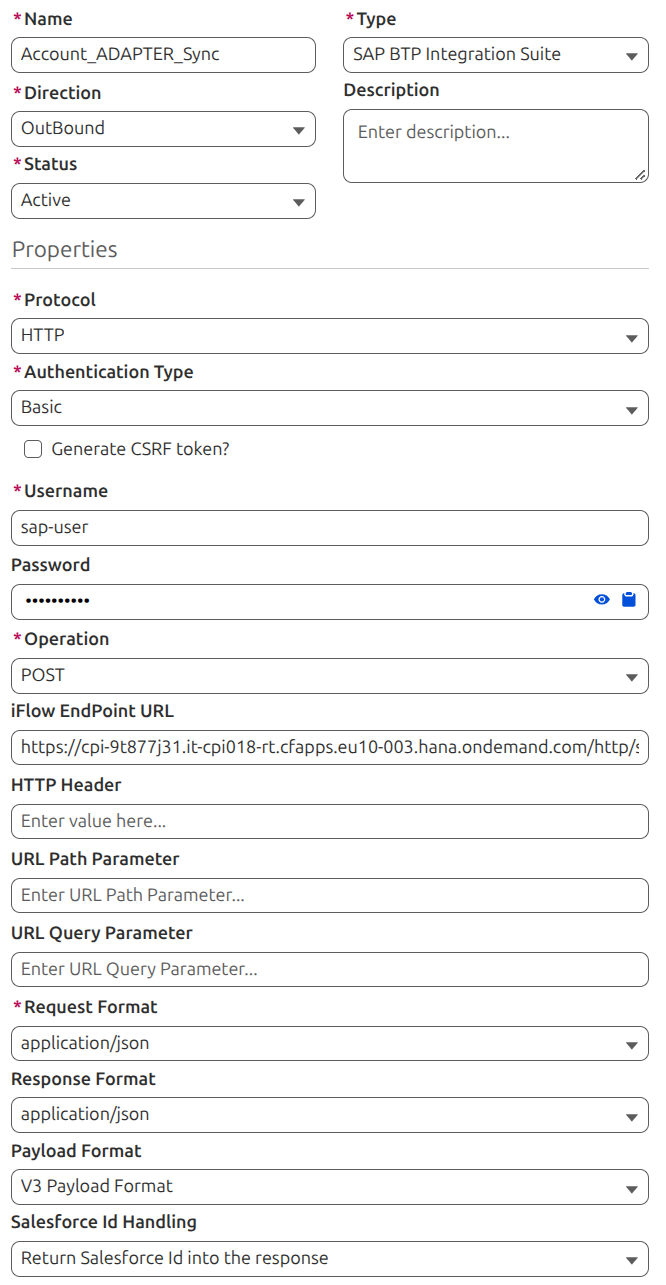
Figure 7: New Adapter dialog — Account_ADAPTER_Sync.
Save the adapter, then add it to the Request interface's Outbound Setup.
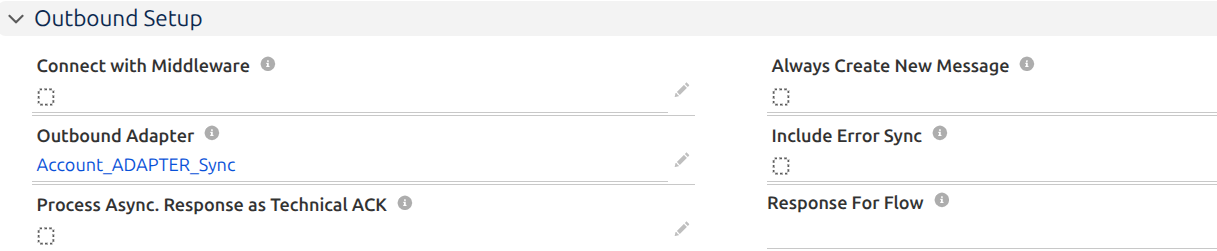
Figure 8: Adapter linked to the Request interface's Outbound Setup.
3. SAP CPI Development
This section describes generic CPI palette steps (HTTPS sender, OpenAPI import, JSON→XML, XSLT mapping), not anything specific to the SkyvvaSalesforce adapter — treat it as a starting point and confirm against your own CPI tenant's current palette.
Log on to the CPI tenant, navigate to Design → Packages → Artifacts → Create new integration flow.
- Create the sender HTTPS communication channel and provide the connection parameters.
- Import the same OpenAPI spec used to build the Message Types (§2.3) as CPI's schema resource — it already covers both the request and response shapes, so no separate export from SKYVVA is needed (§3's Message Mapping detail below covers the exact import step).
- Build the flow: a Payload Script to log the incoming JSON, a JSON to XML Converter step, another Payload Script to log the converted XML, an XSLT Mapping step to add the namespace/prefix the converted XML needs, a Message Mapping step for the actual source-to-target transformation, and a final Payload Script to log the mapped JSON payload before returning the response. The JSON→XML conversion near the start isn't a workaround — it's CPI's standard bridge pattern for a REST-style caller (Salesforce) sending a request to a platform (CPI/SAP) that processes internally as XML. The response side doesn't need the same round trip back: Message Mapping's Target Message is the same OpenAPI/JSON schema used to build the Response interface's Message Type (§2.3, §3's Message Mapping detail below), so its own output already is the final JSON body — no separate XML-to-JSON conversion step afterward.
- Add a Request-Reply step named
Call SAP - Tax ID Validationbetween XSLT Mapping and Message Mapping — this is the actual call that produces the Tax ID check / credit status / assigned customer number; nothing else in this flow does. Insert it on the connecting arrow between those two steps (hover the arrow, click the+that appears, choose Request-Reply, then rename it via its General tab), then wire its output side to a Receiver pool with an HTTPS adapter:
| Field | Value |
|---|---|
| Address | Your SAP backend's endpoint |
| Proxy Type | Internet, or On-Premise via Cloud Connector for an on-prem SAP backend |
| Method | POST |
| Authentication | Whatever your real backend requires (Basic, OAuth2 Client Credentials, Client Certificate, ...) — None if calling a plain testing mock. Client Certificate needs a Private Key Alias filled in — leaving it blank while that mode is selected will fail. |
| Timeout | 60000 ms is a reasonable default |
| Streaming | Leave unchecked — this response is small |
Retry tab:
| Field | Value | Why |
|---|---|---|
| Attach Error Details on Failure | checked | Attaches the backend's actual error response to the exception — visible in Message Processing Log, useful for diagnosing failures |
| Retry on Exception | unchecked while testing; consider enabling against a real production backend | A validation failure (e.g. malformed Tax ID) is deterministic — retrying won't change the result. Transient network failures against a real backend are a different story. |
| Retry on Error Response | unchecked | Same reasoning — a 4xx rejection isn't going to succeed on retry |
Set SAP Request Content-Type immediately before this step,
setting Content-Type: application/json — needed for the request body to be parsed correctly
by most backends.
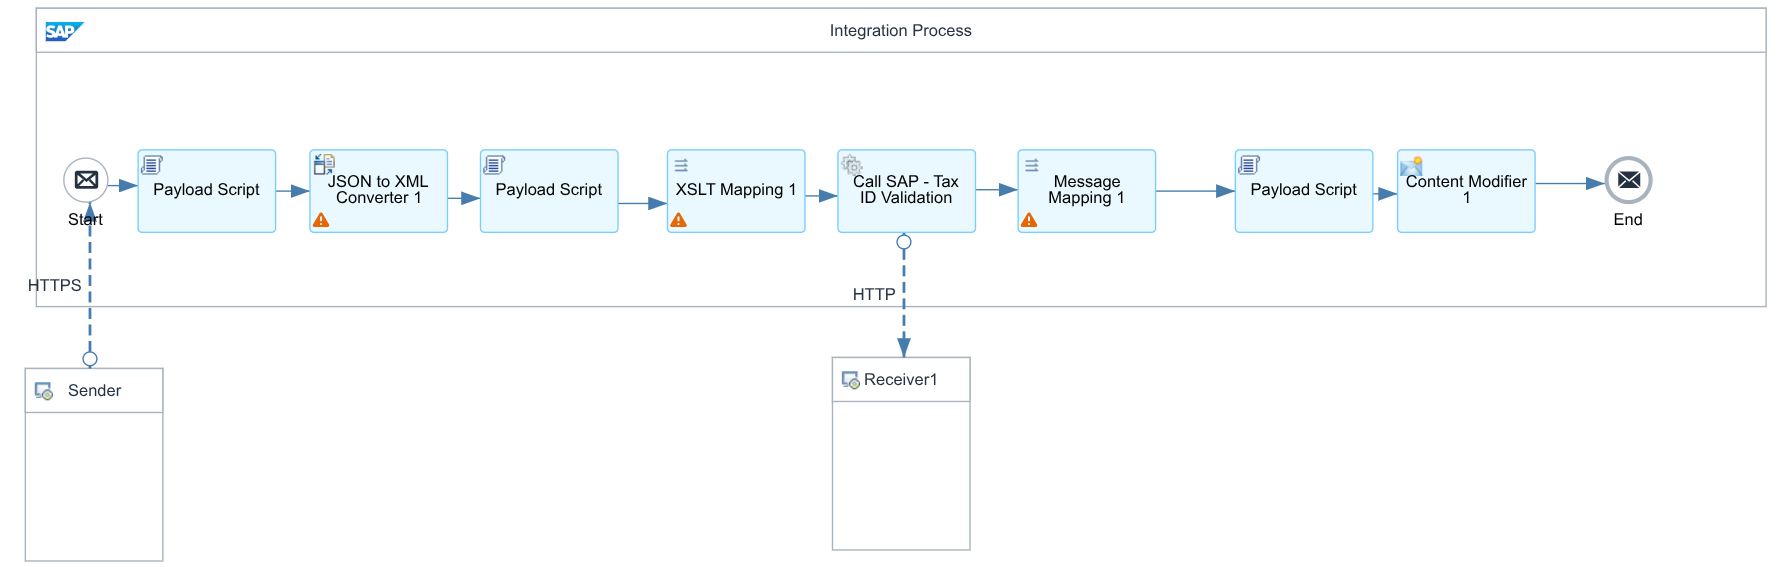
Figure 9: SAP CPI iFlow — completed flow overview.
Since this interface is Synchronous, the iFlow needs to actually return a response body shaped like the Response structure (§2.3) — the Request/Response split in the CPI flow is the counterpart to the Request/Response interface split on the Salesforce side (§2.1–2.2).
How to actually get a synchronous response back: there's no dedicated "make this synchronous" setting in CPI — an HTTPS Sender adapter is inherently request/response, since that's just how HTTP works: the caller's connection stays open until the flow answers. What determines whether the caller gets a real reply is how the flow is built:
- Keep the whole flow inline — don't fork it off. As long as the steps above run directly one after another on the same path from the Sender to the End Event, the caller's connection stays open the whole time and receives whatever is in the message body at the End Event. If the message is instead routed out to a JMS queue or a separate Process Direct flow to handle later, that decouples processing from the inbound call — the caller gets an empty/immediate acknowledgment instead, which is asynchronous behavior, not what this tutorial needs.
- Make sure the last step before the End Event actually builds the response shape — and that it's JSON, not XML. The message body at that point is what gets sent back. Message Mapping's Target Message is the same OpenAPI/JSON schema used to build the Response interface's Message Type (§2.3, §3's Message Mapping detail) — matching
Response Format = application/json(§2.4) directly, with no separate conversion step in between. The end result needs to be the shape the Response interface's Message Type expects — for this tutorial, the flatAccountenvelope built in §2.3, populated with the actual result (§4.1). - Set
Content-Type: application/jsonon the response, via a Content Modifier namedSet Response Content-Typeplaced right before the End Event, matchingResponse Format = application/jsonon the outbound adapter (§2.4) — otherwise Salesforce may not parse it correctly.

Figure 10: Set Response Content-Type Content Modifier, setting the response Content-Type header before the End Event.
- HTTP status matters too. CPI returns
200 OKby default when the flow completes without an exception, which is fine for the happy path. To signal a validation failure differently, set a different code via theCamelHttpResponseCodeheader on a Content Modifier — optional for this tutorial.
4. Testing
4.1 Push Data from Salesforce to CPI Using Apex
Use the same customer as the outbound Asynchronous tutorial's §4.1 — this tutorial demonstrates the synchronous counterpart: instead of just notifying SAP the customer exists, this call needs SAP's validated Tax ID check and assigned customer number back before Salesforce proceeds.
| Field | Example value | Role in this call |
|---|---|---|
| Name | Nordwind Fahrzeugteile GmbH | Sent — identifies the customer to SAP |
| BillingCountry | DE | Sent — needed for the Tax ID check |
Tax_ID__c | DE813495681 | Sent — custom field; create it on Account if you don't already have an equivalent. The VAT/Tax ID SAP validates. |
| AccountNumber | (blank until the response comes back) | Returned — standard Salesforce field; the Response interface writes SAP's assigned customer number here. |
skyvvasolutions__Credit_Check_Result__c | (blank until the response comes back) | Returned — field the SKYVVA package already provides (label "Credit_Check_Result"); no need to create it yourself. The Mapping Tool (§2.3.1) maps the Response Message Type's Credit_Status__c node onto this field. SAP's credit-check result. |
Account
node in the Mapping Tool (§2.3.1):
{
  "Account": {
    "Name": "Nordwind Fahrzeugteile GmbH",
    "BillingCountry": "DE",
    "Tax_ID__c": "DE813495681"
  }
}
Response JSON CPI returns, matching the Response interface's Message Type (§2.3):
{
  "Account": {
    "AccountNumber": "0000100245",
    "Credit_Status__c": "Approved"
  }
}
Ensure at least one Account exists in Salesforce, matching the shape above.
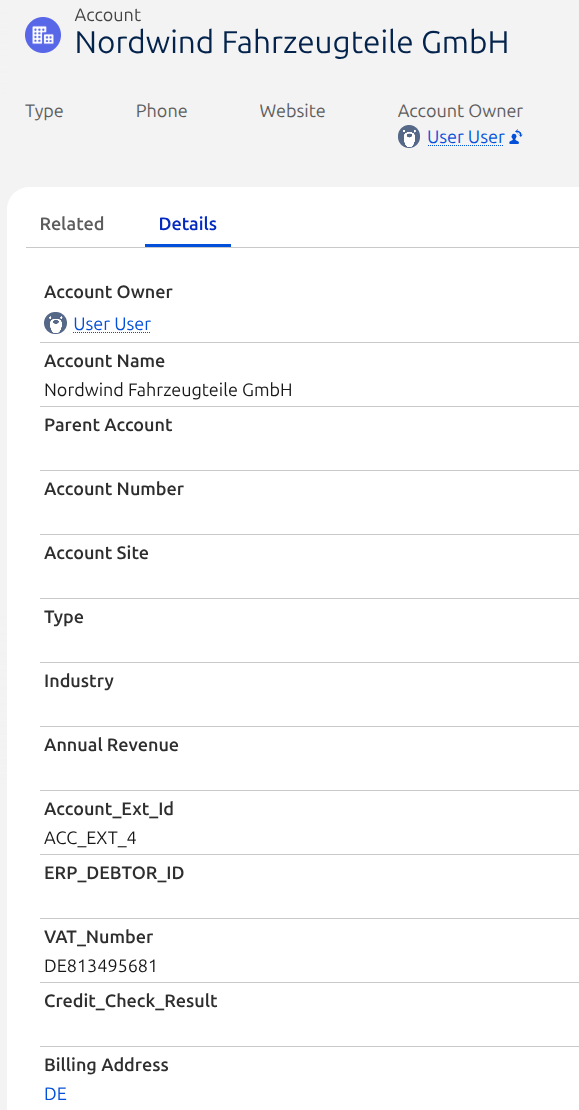
Figure 11: Salesforce Account record used as test data, before the synchronous call.
Navigate to Developer Console → Debug → Open Execute Anonymous Window and run:
//Account_INT_REQ_SFDC2SAP_Sync_OB --Interface
skyvvasolutions.CallOutControl c = new skyvvasolutions.CallOutControl();
c.returnJSONComplete=true;
c.actionDoIntegrate=true;
c.isCreateMessage=true;
String[] ids= new String[]{'0019K00001tyyd9QAA'}; //Id SObject
List<skyvvasolutions.CalloutResponse> result = skyvvasolutions.Iservices.invokeCalloutV3('SAP CPI Integration','Account_INT_REQ_SFDC2SAP_Sync_OB',ids,'SYNC',c);
Click Execute to push the data, then monitor the message in both Salesforce and CPI.
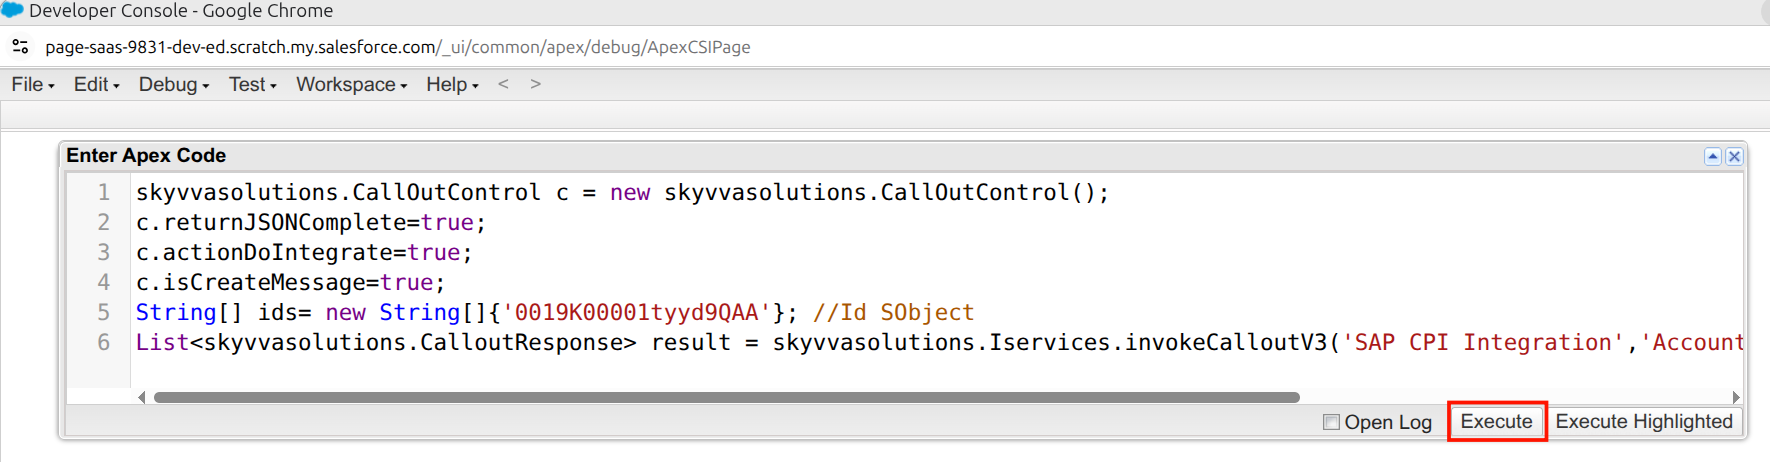
Figure 12: Running the Apex script, and the Account record's AccountNumber/skyvvasolutions__Credit_Check_Result__c populated by the returned response.
4.2 Salesforce Message Monitor
Navigate to Message Monitoring and search using the interface/integration details. The outbound message should show a green flag (success) status — and because this is a Synchronous call with a Response Interface configured, you should also see an inbound response message cross-linked to it.
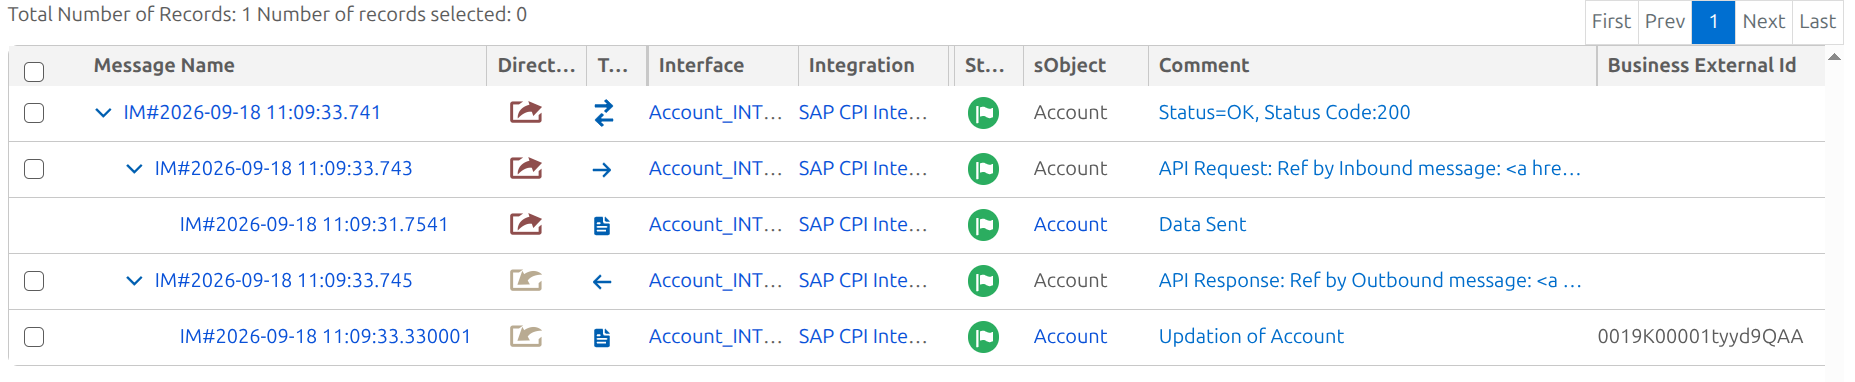
Figure 13: Salesforce Message Monitoring — outbound Request message cross-linked to the inbound Response message.
4.3 CPI Monitoring
Navigate to Message Monitoring in CPI to find the corresponding message with its full log, confirming the Account data was received and a response was returned.

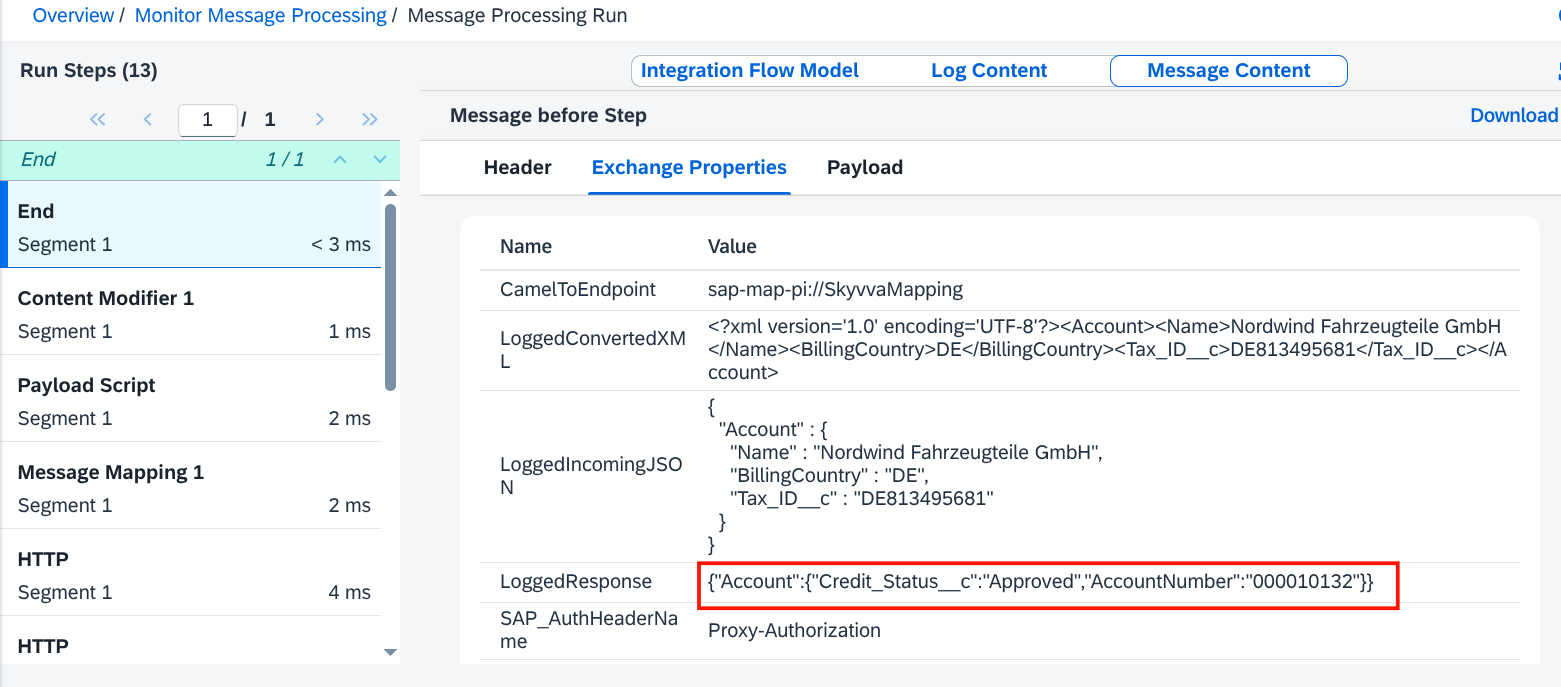
Figure 14: SAP CPI Message Monitoring — request received and response returned.
Summary
| Component | Configuration |
|---|---|
| Request Interface | Outbound, Synchronous, Interface API Version = V3 |
| Response Interface | Inbound, Synchronous, Interface API Version = V3 |
| Message Type (Request) | required — real Account > Name / BillingCountry / Tax_ID__c nodes, built via OpenAPI spec import (§2.3) |
| Message Type (Response) | required — real Account > AccountNumber / Credit_Status__c nodes, built the same way (§2.3) |
| SAP BTP Integration Suite Adapter | Outbound, Basic auth, HTTP, POST, JSON (Request/Response Format = application/json; CPI bridges the outbound request to XML internally via §3's JSON→XML converter step — the response comes back as JSON directly, no converter needed on that side) |
Processing Mode = Synchronous
requires, and both interfaces needing a Message Type. §2.3 builds it by importing the backend
service's own existing OpenAPI spec in one step — the realistic scenario for a real
integration, and the one that also lets §3's CPI-side Message Mapping reuse that same file
directly, with no separately exported Skyvva schema needed. The record itself stays flat and
minimal — just the fields the
immediate decision needs, wrapped in a single Account node rather than a parent record bundled
with a full list of children. If your use case needs to keep Account and Contact data consistent
across systems, that's what the asynchronous/batch patterns elsewhere in this series are for —
outbound for pushing Salesforce-side changes, inbound Bulk mode for pulling SAP-side changes.