15. How to Bulk Load Account and Contact Records via V4/integrate with the SkyvvaSalesforce Adapter
This document explains how to bulk-load Account and Contact master data from a source system into Salesforce through SAP CPI, using the SkyvvaSalesforce Receiver adapter's V4/integrate compatibility path. It walks through a realistic mass-onboarding scenario — a legacy CRM/ERP handing over its customer master data (accounts and their contacts) to Salesforce in large XML batches — and shows how to size, send, and verify a single large request.
In this example:
| Item | Value |
|---|---|
| Salesforce Objects | Account, Contact (parent/child) |
| Message Source | Postman (standing in for the source ERP/CRM) |
| Middleware | SAP CPI |
| Skyvva API Version | V2 |
| Skyvva API | V4/integrate |
| Processing Mode | Asynchronous (fixed by this API choice) |
| Batch size (this example) | 6,000 Accounts x 10 Contacts each (60,000 Contacts), ~30.3 MB request body |
Context Before You Start
In short: a customer-master migration typically doesn't send one Account at a time — it hands over a whole batch of Accounts, each carrying its own Contacts, in one call. V4/integrate fits this pattern well: point the SkyvvaSalesforce Receiver at it, send one XML document containing many <Account> blocks (each with nested <Contact> blocks), and the adapter converts the whole thing to the JSON shape Salesforce expects before it goes out. If your source already produces that exact XML shape, no CPI-side mapping step is needed at all; if it doesn't (the more likely case for a real ERP), one Message Mapping step (§3.1) transforms your source's own shape into it first. The realistic business shape this document covers specifically: an on-demand, operator-triggered large batch — someone (or some external process standing in for Postman here) decides it's time to push a big batch, and does.
Reasons to pick this path:
- You're migrating or bulk-loading master data from a system that already produces this flat, repeating XML shape (one root document, many Account records, each with its own Contacts) and don't want to build a CPI-side transformation.
- You want the simplest possible channel setup — one Receiver channel, no separate Integration/Interface/Mode configuration on the CPI side (those are resolved from the payload's own
fromSystem/targetObjectvalues instead). - The load happens on-demand, at a moment you choose (a cutover weekend, an initial go-live, a one-off catch-up run) — not on a fixed recurring schedule, and not gated behind a manual review step before it takes effect.
- Initial data load / cutover migrations, where a legacy system exports its full Account+Contact base as XML and CPI relays it into Salesforce in a handful of large calls rather than thousands of small ones, triggered when the migration team is ready — not automatically.
- A one-off large catch-up load (e.g. backfilling historical data) where the source's extract is naturally XML and per-record CPI orchestration isn't needed.
V4/integrate), deploying it, sending a large test payload from Postman, and verifying the result in both CPI and Salesforce.
How the Integration Flow Works
Source ERP / CRM (Postman stands in for this, sending DEBMAS06 IDoc XML)
   ↓
HTTPS Sender
   ↓
Message Mapping (§3.1) — DEBMAS06 IDoc shape → adapter's expected Account/Contact XML
   ↓
SkyvvaSalesforce Receiver Adapter (Skyvva API Version=V2, Skyvva API=V4/integrate)
   ↓  (adapter converts XML → V2 JSON shape internally)
SKYVVA Inbound Interface (Account + Contact)
   ↓
Salesforce Account / Contact records
⚠️ [SCREENSHOT NEEDED] Full canvas view of the deployed integration flow: HTTPS Sender on the left, a single SkyvvaSalesforce Receiver adapter on the right, connected by one message flow line — or, if your source needs field transformation, a Message Mapping step in between (§3.1).
Figure 1: End-to-end integration flow — Postman/source system through SAP CPI to Salesforce via the SkyvvaSalesforce Receiver's V4/integrate path (screenshot to be added).
2. Configure the SKYVVA Inbound Interfaces in Salesforce (Hybrid Mapping, Chained)
V4/integrate still lands on real SKYVVA Integration/Interface records in Salesforce — it just identifies them from the payload itself instead of from CPI channel fields. The XML body's <fromSystem> value must match the target Integration's name, and <targetObject> must match the target root Inbound Interface's name.
Because a single converted oneRecord entry carries both Account.* and Contact.* fields side by side (§7), this scenario uses two Inbound Interfaces with two different mapping styles, chained together rather than one interface doing everything:
| Interface | Role | Mapping style | Why |
|---|---|---|---|
Account_CPI_V2BulkLoad_IN | Root/parent — the targetObject the payload actually targets | External Mapping (Account.* → Account field API names, 1:1 passthrough) | Account fields already arrive as plain Account.<FieldApiName> pairs, matching real Salesforce API names exactly — no lookup/formula needed, so the simpler passthrough mapping is enough. |
A child Contact interface, e.g. Contact_CPI_V2BulkLoad_IN | Chained under the Account interface | Hybrid — External Mapping for most fields, plus one VLOOKUP formula mapping (Data Mapping tool) overriding AccountId | Every other Contact field is a plain 1:1 copy, but Contact.AccountId in the source payload only ever carries the external debtor ID (the same value as the sibling Account.skyvvasolutions__ERP_DEBTOR_ID__c in the same oneRecord), not a real Salesforce Id — resolving the actual parent Account.Id needs a computed lookup, which plain External Mapping can't do. |
LegacyERP, then both Interfaces under it.
2.1 Account Interface (root) — External Mapping
| Setting | Value |
|---|---|
| Interface Name | Account_CPI_V2BulkLoad_IN |
| Interface Direction | Inbound |
| Processing Mode | Asynchronous |
| Operation Type | Upsert |
| External Mapping | Enabled |
| Salesforce External ID | Your Account upsert-match field, e.g. skyvvasolutions__ERP_DEBTOR_ID__c |
⚠️ [SCREENSHOT NEEDED] SKYVVA Inbound Interface detail page for Account_CPI_V2BulkLoad_IN, showing Direction=Inbound, Processing Mode=Asynchronous, Operation Type=Upsert, External Mapping checked.
Figure 2: Account Interface configured for the bulk load — External Mapping enabled (screenshot to be added).
With External Mapping enabled, no manual field mapping is needed here — the converted payload's Account.<FieldApiName> entries (§7) are applied straight to the matching Account field API names, since the source already sends real Salesforce API names as element names.
2.2 Contact Interface (child) — Hybrid Mapping (External Mapping + VLOOKUP for AccountId)
Create a second Inbound Interface for Contact:
| Setting | Value |
|---|---|
| Interface Name | Contact_CPI_V2BulkLoad_IN |
| Interface Direction | Inbound |
| Processing Mode | Asynchronous |
| Operation Type | Upsert |
| External Mapping | Enabled |
| Salesforce External ID | Your Contact upsert-match field, e.g. skyvvasolutions__ERP_CONTACT_ID__c |
⚠️ [SCREENSHOT NEEDED] SKYVVA Inbound Interface detail page for Contact_CPI_V2BulkLoad_IN, showing External Mapping enabled.
Figure 4: Contact Interface configured with External Mapping (screenshot to be added).
External Mapping alone is enough for every Contact field except AccountId. The source payload's Contact.AccountId (§7) is not a real Salesforce Id — it's the same external debtor-ID value as the sibling Account.skyvvasolutions__ERP_DEBTOR_ID__c in the same oneRecord (e.g. 100001). Salesforce needs the actual parent Account.Id to link the Contact correctly, so this one field needs a computed override rather than a plain passthrough.
Open the Data Mapping tool for this interface and override the AccountId field mapping with a VLOOKUP formula:
VLOOKUP(Account, Id, skyvvasolutions__ERP_DEBTOR_ID__c, Account.skyvvasolutions__ERP_DEBTOR_ID__c)
This looks up the Account object, returns its Id, matching on skyvvasolutions__ERP_DEBTOR_ID__c against the incoming record's Account.skyvvasolutions__ERP_DEBTOR_ID__c value — resolving the external debtor ID to the real Salesforce Account record created (or matched) by the chained parent interface (§2.3), and assigning that resolved Id onto the Contact's AccountId. Every other Contact field (FirstName, LastName, Email, etc.) keeps using External Mapping's plain 1:1 passthrough — hence "hybrid."
⚠️ [SCREENSHOT NEEDED] Data Mapping tool for the Contact interface, with theAccountIdfield's mapping expression open showing theVLOOKUP(...)formula function selected from the function list, and other fields left as plain External Mapping passthrough.
Figure 3: Contact's AccountId field mapping using a VLOOKUP formula expression, overriding External Mapping just for this one field (screenshot to be added).
2.3 Chain the Contact Interface Under the Account Interface
On the InBound/OutBound Setup section of the Contact interface, set Parent Interface to the Account interface (Account_CPI_V2BulkLoad_IN). This is what makes the two interfaces a single chained unit at runtime: the root Account interface processes first (via its own External Mapping, creating/upserting the Account and giving it a real Salesforce Id), and its chained child then processes the Contact portion of the same message (via its hybrid mapping — External Mapping plus the VLOOKUP override on AccountId, §2.2 — which depends on the parent Account already having been upserted) — you don't call the Contact interface separately, and the CPI channel and payload still only ever target the root Account_CPI_V2BulkLoad_IN (§3, §7).
⚠️ [SCREENSHOT NEEDED] Contact interface's InBound/OutBound Setup section, Parent Interface field set to Account_CPI_V2BulkLoad_IN.
Figure 5: Contact Interface chained under the Account Interface via Parent Interface (screenshot to be added).
Note: Connect with Middleware is not required for either interface to be reachable through CPI — it only affects the Parent Interface picklist and External Mapping visibility on the creation screen, not runtime processing.
3. Create the SAP CPI Integration Flow
In SAP CPI, create an integration package and a new integration flow.
Example:
| Item | Example |
|---|---|
| Integration Package | Skyvva Salesforce Adapter Testing |
| Integration Flow | Account Contact Bulk Load via V4 integrate |
E1KNA1M, KUNNR, NAME1, nested E1KNVKM for contacts), not the adapter's expected Account/Contact shape — so a Message Mapping step is required between the Sender and Receiver to transform it. (If your own source already produces XML in the exact shape shown in §7, you can skip straight to a two-component flow instead — HTTPS Sender directly to SkyvvaSalesforce Receiver.)
- HTTPS Sender Adapter
- Message Mapping — transforms the DEBMAS06 IDoc shape into the adapter's expected
Account/ContactXML - SkyvvaSalesforce Receiver Adapter
⚠️ [SCREENSHOT NEEDED] SAP CPI integration flow canvas showing the HTTPS Sender, a Message Mapping step, and the SkyvvaSalesforce Receiver connected in sequence.
Figure 6: Integration flow — HTTPS Sender through Message Mapping to SkyvvaSalesforce Receiver (screenshot to be added).
3.1 Message Mapping — Transform the DEBMAS06 IDoc Shape Into the Adapter's Expected XML
Add a Message Mapping step right after the HTTPS Sender. Open its editor (double-click on the canvas):
- Source: click Select → Add, and upload
DEBMAS06_Account_Contact.xsdfrom this repository — rootDEBMAS06, repeatingIDOC(one per customer), each withEDI_DC40(control record) andE1KNA1M(the Account-bearing segment), which itself nests repeatingE1KNVKM(the Contact-bearing segment). - Target: click Select → Add, and upload
tools/cpi-xsd/tutorial15-istructure-account-contact.xsdfrom this repository — the exactISTRUCTURE_Account_CPI_V2BulkLoad_IN/Account/Contactshape §7's XML examples use (Account directly under the root, no wrapper element), including the nested Contact list per Account.
Account_CPI_V2BulkLoad_IN interface record (§2.1) in Salesforce, click Generate MetaData, and set Format = XSD Schema, API = V2/Integrate — matching this interface's skyvvaApiVersion=V2 channel configuration (§5.2). Picking V3/Integrate or V4/Integrate here generates the wrong schema shape for this V2-based interface (those values are correct for the native-V3 tutorials elsewhere in this series, e.g. Tutorial_06/Tutorial_08/Tutorial_09/Tutorial_10, and for Tutorial_13's MessageType-less V3 case — not for this one). Then download the file.
Context/loop connections (establish repetition before mapping individual fields): connect IDOC (or E1KNA1M — either works, since exactly one E1KNA1M occurs per IDOC) to Account, so one Account is produced per customer record; connect E1KNVKM to Contact, so one Contact is produced per contact segment under that Account.
Field mappings — E1KNA1M (Account) fields:
| Source | Target |
|---|---|
KUNNR | Account/skyvvasolutions__ERP_DEBTOR_ID__c |
NAME1 | Account/Name |
STRAS | Account/BillingStreet |
ORT01 | Account/BillingCity |
PSTLZ | Account/BillingPostalCode |
LAND1 | Account/BillingCountry |
REGIO | Account/BillingState |
TELF1 | Account/Phone |
TELFX | Account/Fax |
BRSCH | Account/Industry |
UMSAT | Account/AnnualRevenue |
E1KNVKM (Contact) fields:
| Source | Target |
|---|---|
PARNR | Contact/skyvvasolutions__ERP_CONTACT_ID__c |
NAMEV | Contact/FirstName |
NAME1 | Contact/LastName |
TELF1 | Contact/Phone |
TELFX | Contact/Fax |
SMTP_ADDR | Contact/Email |
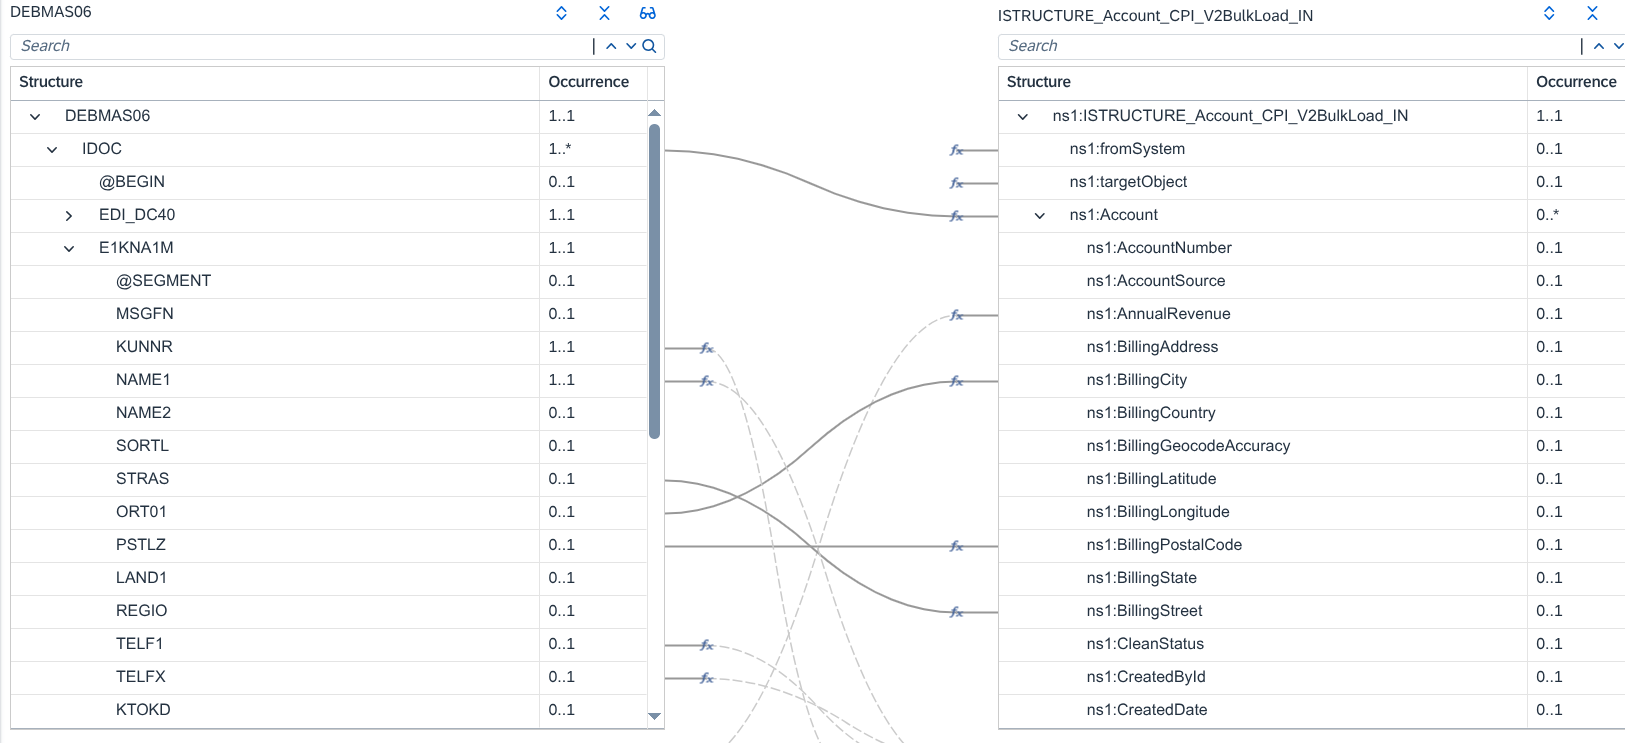
Figure 7: Message Mapping — DEBMAS06 IDoc shape mapped to the adapter's expected Account/Contact XML.
If you build your own Target schema instead of using the provided file, watch for one specific trap: a schema-level
elementFormDefault="qualified" with no per-element override namespace-qualifies every child element in Message Mapping's output (e.g. <nso:fromSystem> instead of <fromSystem>), not just the root. Since the adapter's converter looks for the exact unprefixed keys fromSystem/targetObject, a qualified output fails with "Could not convert v2 xml payload to v2-based json", even though the mapping itself ran without error. The provided XSD sets form="unqualified" explicitly on every child element to avoid this — only the root element carries the namespace, matching the shape shown in §7.
4. Configure the HTTPS Sender Channel
4.1 General
Configure Name/Direction as usual on the General tab.
⚠️ [SCREENSHOT NEEDED] HTTPS sender channel — General tab.
Figure 8: HTTPS sender channel — General tab (screenshot to be added).
4.2 Connection
On the Connection tab, set the Address the source system will POST to (this becomes part of the deployed endpoint URL) and the Authorization/User Role the caller's credential must carry.
⚠️ [SCREENSHOT NEEDED] HTTPS sender channel — Connection tab, with Address and User Role filled in.
Figure 9: HTTPS sender channel — Connection tab (screenshot to be added).
Note: for a payload this size (~30.3 MB), also confirm the sender's request size isn't constrained elsewhere in your landscape (e.g. an API Management policy or load balancer body-size limit in front of CPI) — that's outside this adapter's own settings and easy to overlook when a large-payload test fails with a generic connection error rather than an adapter error.
Note on the 40 MB limit specifically: SAP CPI enforces a hard 40 MB message body size limit on the platform side, independent of any adapter or channel setting. Exceeding it fails with:com.sap.it.rt.adapter.http.api.exception.HttpResponseException: An internal server error occured:
Message body exceeds configured size limit (40.0 MB). Actual body size was <actual size> MB.
5. Configure the SkyvvaSalesforce Receiver Channel
Select SkyvvaSalesforce as the Receiver adapter.
5.1 Connection Tab
Configure the Salesforce connection as usual — Authentication Type OAuth2, your OAuth2 Flow, Login URL, and Credential(s).
⚠️ [SCREENSHOT NEEDED] SkyvvaSalesforce Receiver channel — Connection tab.
Figure 10: SkyvvaSalesforce Receiver channel — Connection tab (screenshot to be added).
5.2 Processing Tab — Skyvva API Version and API
On the Processing tab, set:
| Field | GUI label | Value |
|---|---|---|
processingType | Processing Type | Skyvva (default) |
skyvvaApiVersion | Skyvva API Version | V2 |
apexUrl | Skyvva API | skyvvasolutions/V4/integrate (dropdown option) |
apexMethod | Apex Method | POST |
V2 unlocks these fields and hides the V3-only ones (Integration, Interface, Mode, Processing Behavior, Request/Response Format, Skyvva App Version) — they don't apply on this path, since the target Integration/Interface come from the payload itself (§2), not from channel configuration.
⚠️ [SCREENSHOT NEEDED] SkyvvaSalesforce Receiver channel — Processing tab, Skyvva API Version=V2, Skyvva API=skyvvasolutions/V4/integrate, Apex Method=POST.
Figure 11: Processing tab configured for the V4/integrate path (screenshot to be added).
5.3 Processing Tab — Adapter Settings
Still on the Processing tab, in the Adapter Settings group (always visible, independent of API version):
| Field | GUI label | Recommended value for this test | Why it matters |
|---|---|---|---|
httpClientTimeout | HTTP client timeout (sec) | Increase above the default 60 (e.g. 300) | A ~30.3 MB request with 60,000 Contact-bearing records takes materially longer to transmit and for Salesforce to acknowledge than a small test payload — the default timeout is sized for ordinary calls, not bulk loads. |
loggingOption | Logging option | Debug or Trace for the first run | Makes it easy to confirm in the Message Processing Log that the XML→JSON conversion happened and see the resulting query params, without guessing. |
enableRetry | Enable retry for fatal connectivity errors | Leave off for this test | A large payload is expensive to resend; understand and fix any failure before turning retry on for a load this size. |
⚠️ [SCREENSHOT NEEDED] Processing tab — Adapter Settings group, HTTP client timeout raised, Logging option set to Debug.
Figure 12: Adapter Settings tuned for a large bulk payload (screenshot to be added).
Note on large payloads: this V4/integrate path always runs asynchronously and has no built-in safeguard against a single call creating an extremely large number of records at once. If a run this large produces generic errors on the Salesforce side, treat that as a possible sign of a memory limit rather than a data problem — split the source XML into smaller batches (e.g. a few hundred Accounts per call) rather than sending everything in one request.
5.4 Save and Deploy
Save the integration flow and deploy it.
⚠️ [SCREENSHOT NEEDED] Integration flow deployed successfully, SkyvvaSalesforce Receiver channel visible on the canvas, status "Started".
Figure 13: Integration flow deployed and started (screenshot to be added).
6. Get the SAP CPI Endpoint URL
Navigate to Monitoring > Manage Integration Content, locate the deployed flow, and copy its endpoint URL.
⚠️ [SCREENSHOT NEEDED] Manage Integration Content, showing the deployed flow's endpoint URL.
Figure 14: SAP CPI endpoint URL for the deployed flow (screenshot to be added).
Example:
https://cpi-9t877j31.it-cpi018-rt.cfapps.eu10-003.hana.ondemand.com/http/skyvva/Account/CPI/BulkLoad/v4integrate
Important: Always copy the exact endpoint URL from your own tenant's Manage Integration Content panel rather than assembling it by hand — the exact hostname shape differs between Neo and Cloud Foundry tenants.
7. Prepare the Test Payload
This tutorial's test payload is a real SAP DEBMAS06 customer master IDoc extract: sample-idoc-account6000/DEBMAS_Accounts_6000x10.xml, matching DEBMAS06_Account_Contact.xsd (§3.1's Message Mapping Source):
<?xml version="1.0" encoding="UTF-8"?>
<DEBMAS06>
  <IDOC BEGIN="1">
    <EDI_DC40 SEGMENT="1">
      <TABNAM>EDI_DC40</TABNAM>
      <MANDT>100</MANDT>
      <DOCNUM>0000000000100000</DOCNUM>
      <IDOCTYP>DEBMAS06</IDOCTYP>
      <MESTYP>DEBMAS</MESTYP>
      <!-- ...remaining EDI_DC40 control fields... -->
    </EDI_DC40>
    <E1KNA1M SEGMENT="1">
      <MSGFN>004</MSGFN>
      <KUNNR>0000006000</KUNNR>
      <NAME1>Global Tech Solutions 6000 GmbH</NAME1>
      <NAME2>Munich Branch</NAME2>
      <STRAS>Hauptstrasse 1</STRAS>
      <ORT01>Munich</ORT01>
      <PSTLZ>80000</PSTLZ>
      <LAND1>DE</LAND1>
      <REGIO>BY</REGIO>
      <TELF1>+49-89-1000000</TELF1>
      <TELFX>+49-89-2000000</TELFX>
      <BRSCH>Manufacturing</BRSCH>
      <UMSAT>1000000</UMSAT>
      <E1KNVKM SEGMENT="1">
        <PARNR>0001</PARNR>
        <NAMEV>First name</NAMEV>
        <NAME1>Last name</NAME1>
        <TELF1>+49-89-...</TELF1>
        <SMTP_ADDR>contact@example.com</SMTP_ADDR>
        <!-- ...remaining E1KNVKM contact fields... -->
      </E1KNVKM>
      <!-- ...9 more <E1KNVKM> blocks for this Account... -->
    </E1KNA1M>
  </IDOC>
  <!-- ...5,999 more <IDOC> blocks... -->
</DEBMAS06>
This is the Message Mapping step's Source (§3.1) — it does not go to the Receiver channel as-is; Message Mapping transforms it into the ISTRUCTURE_Account_CPI_V2BulkLoad_IN/Account/Contact shape the adapter expects before it reaches the SkyvvaSalesforce Receiver.
The full file: 6,000 Accounts x 10 Contacts each = 60,000 Contacts, ~30.3 MB — comfortably under the 40 MB practical ceiling (§4.2), while still exercising a realistic bulk-load scale.
fromSystem/targetObject are produced by the Message Mapping step's Target structure, not present in this source file — set them (e.g. via a constant-value function in Message Mapping) to match the Integration/Interface names configured in §2.
8. Send the Request from Postman
8.1 Request Settings
| Setting | Value |
|---|---|
| Method | POST |
| URL | Your deployed SAP CPI endpoint URL (§6) |
| Authorization | According to the HTTPS sender configuration (§4.2) |
| Content-Type | application/xml |
| Body | Raw XML — the DEBMAS06 IDoc bulk file from §7 (DEBMAS_Accounts_6000x10.xml) |
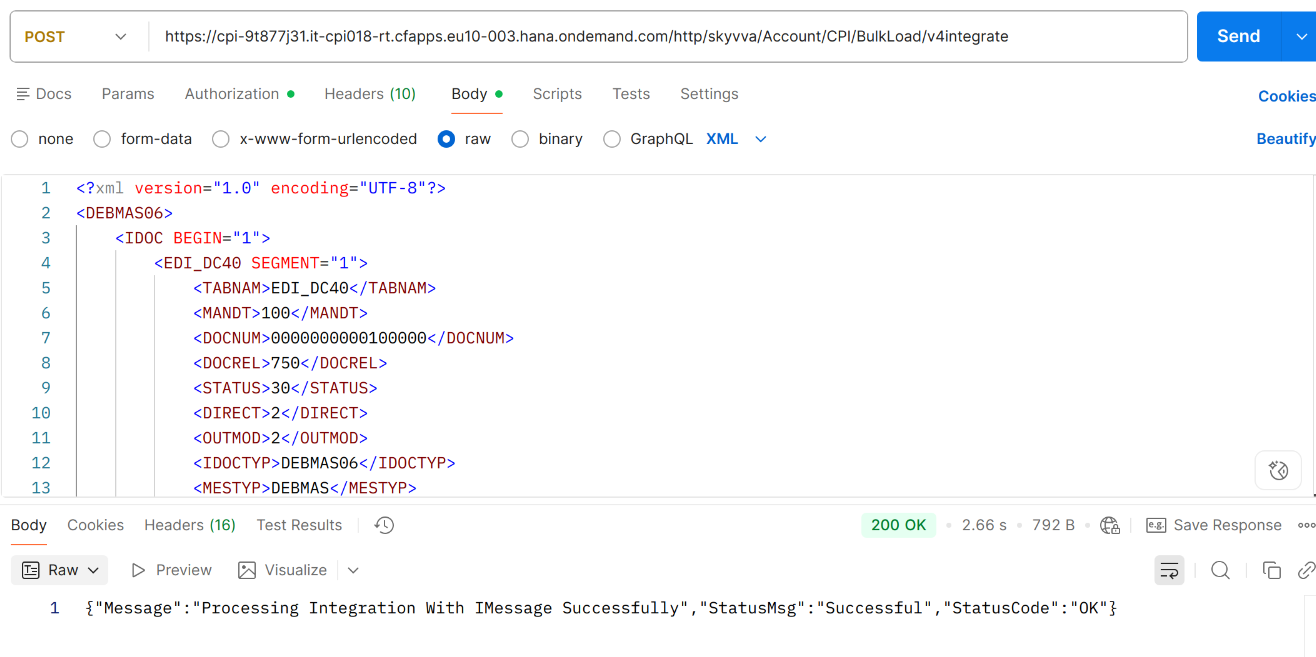
Figure 15: Postman request sending the bulk Account+Contact XML payload (screenshot to be added).
Note: Verification happens in Monitor Message Processing (§9) and Salesforce's own message monitoring (§10), not in the Postman response body.
8.2 Send and Confirm the Call Completed
⚠️ [SCREENSHOT NEEDED] Postman showing the request completed (status 200/202) with timing information, confirming the ~30.3 MB body was accepted.
Figure 16: Postman confirming the bulk request was accepted (screenshot to be added).
9. Monitor the Message in SAP CPI
Navigate to Monitor > Monitor Message Processing and locate the message for this flow.
⚠️ [SCREENSHOT NEEDED] Monitor Message Processing showing the bulk-load message completed, including its processing duration and payload size.
Figure 17: SAP CPI Monitor Message Processing — bulk load message completed (screenshot to be added).
If Logging option was set to Debug/Trace (§5.3), open the Message Processing Log for this message and confirm the XML→JSON conversion trace entry is present, with the expected integration=LegacyERP&interface=Account_CPI_V2BulkLoad_IN query parameters.
⚠️ [SCREENSHOT NEEDED] Message Processing Log detail showing the V4/integrate conversion trace entry and derived query parameters.
Figure 18: Conversion trace entry in the Message Processing Log (screenshot to be added).
10. Monitor the Message in Salesforce
Navigate to SKYVVA Integration Suite → Message Monitoring and locate messages against the Account_CPI_V2BulkLoad_IN interface.
⚠️ [SCREENSHOT NEEDED] SKYVVA Message Monitoring list showing the bulk-load records, with their processing status.
Figure 19: SKYVVA Message Monitoring — bulk Account+Contact records processed (screenshot to be added).
Spot-check a handful of the resulting Account records to confirm their related Contacts were created and linked correctly — since this path's XML flattens Account+Contact into one oneRecord per Account/Contact pair (§7), the External Mapping is what re-associates each Contact back to its parent Account on the Salesforce side.
⚠️ [SCREENSHOT NEEDED] A sample Account record in Salesforce showing its related Contacts list populated from this load.
Figure 20: Sample Account record with related Contacts created by the bulk load (screenshot to be added).
11. Summary
The complete integration flow is:
Postman (DEBMAS06 IDoc XML) → HTTPS Sender → Message Mapping → SAP CPI → SkyvvaSalesforce Receiver (V2, V4/integrate) → Salesforce Account/Contact
Key configuration:
| Component | Configuration |
|---|---|
| SKYVVA Inbound Interface (root) | Account_CPI_V2BulkLoad_IN, Inbound, Asynchronous, Upsert, External Mapping enabled |
| SKYVVA Inbound Interface (chained child) | Contact_CPI_V2BulkLoad_IN, Inbound, Asynchronous, Upsert, hybrid mapping — External Mapping enabled plus a VLOOKUP override on AccountId (§2.2), Parent Interface = Account_CPI_V2BulkLoad_IN |
| Message Mapping (§3.1) | Source = DEBMAS06_Account_Contact.xsd (SAP IDoc shape); Target = tutorial15-istructure-account-contact.xsd (adapter's expected Account/Contact shape) |
| Skyvva API Version | V2 |
| Skyvva API | skyvvasolutions/V4/integrate |
| Apex Method | POST |
| HTTP client timeout | Raised for large-payload calls (e.g. 300s) |
| Request body (raw, from Postman) | DEBMAS06 IDoc XML (§7) — transformed by Message Mapping into fromSystem/targetObject plus nested <Contact> per <Account> before reaching the Receiver |
| Test payload size (this example) | 6,000 Accounts x 10 Contacts, ~30.3 MB |
V4/integrate calls are convenient for master-data migration and bulk sync scenarios because the adapter performs the XML→JSON conversion for you — but because this path has no built-in response-size safeguard the way the native V3 mode does, keep an eye on Salesforce-side processing limits as batch sizes grow, and be ready to split a source extract into smaller calls if a single request starts producing generic errors instead of clean per-record results.