16. SkyvvaSalesforce Receiver Adapter — ERP Customers to Multiple Accounts with CPI Message Mapping
Overview
This tutorial shows how to build an iFlow that receives ERP customer XML, maps it to an Account collection, and creates or updates multiple Salesforce Accounts through the SkyvvaSalesforce receiver adapter.
You will configure the mapping, connect to Salesforce using Client Credentials, and verify the result for each customer.
It covers the following steps:
- Prepare the Salesforce Account external ID and integration user.
- Create an integration flow in SAP Integration Suite.
- Configure the HTTPS sender channel.
- Map ERP customer XML to the Salesforce Account collection.
- Configure the SkyvvaSalesforce receiver and result checker.
- Deploy the integration flow and send a test request from Postman.
- Monitor the message in SAP Integration Suite and verify the Accounts in Salesforce.
In this example:
| Item | Value |
|---|---|
| Salesforce Object | Account |
| Message Source | ERP customer XML sent through Postman |
| Middleware | SAP Integration Suite |
| Processing Type | Salesforce |
| Operation | Salesforce Objects - sObject Collections |
| Method | Upsert |
| Payload Format | Application/XML |
Context Before You Start
The ERP owns customer numbers, company names, phone numbers, and billing addresses. Salesforce needs these customers as Accounts. Upsert updates an Account when its ERP ID exists and creates it otherwise.
| ERP customer number | Sample company |
|---|---|
0000100451 | Elbtal Baustoffhandel GmbH |
0000100452 | Spreeblick Hotelbedarf GmbH |
The customers are fictional, and the source XML is a sample ERP contract.
Why Use Message Mapping?
Use Message Mapping when the ERP export differs from the Salesforce request structure. It changes fields such as CustomerNumber, CompanyName, and Telephone into ERP_Customer_ID__c, Name, and Phone, and creates one Account record for each customer inside <sObjects><records>.
The ERP keeps its customer export format while SAP Integration Suite prepares the Salesforce request. If the source already supplies the required Account collection, this transformation is unnecessary.
1. Salesforce Preparation
- Create Account field
ERP_Customer_ID__cas Text, at least 10 characters, with External ID and Unique enabled. Preserve leading zeros. - Give the integration user API access, Account read/create/update permissions, and access to all mapped fields. Check your org's required fields and validation rules.
- Enable Client Credentials for the Salesforce OAuth application and select its run-as integration user.
Existing Accounts must have the matching ERP ID to be updated; Upsert does not match by Account Name.
The adapter's Salesforce processing option is free to use and requires no SKYVVA Integration or Interface. Direct processing provides no SKYVVA message/record monitoring, alerts, or reprocessing; use SAP Integration Suite monitoring and provide any required recovery process. Salesforce API access and SAP Integration Suite subscriptions remain separate.
2. SAP Integration Suite Development
2.1 Create the Integration Flow
Create ERP Customers to Salesforce Accounts - CPI Mapping with sender ERP and receiver Salesforce.
flowchart LR
    ERP[ERP via HTTPS] --> Start[Receive ERP Customers]
    Start --> Map[Map ERP Customers to Accounts]
    Map --> Save[Save Account Request and Count]
    Save --> RR[Upsert Salesforce Accounts]
    RR --> Check[Check Account Results]
    Check --> End[Return Account Results]
    RR -->|SkyvvaSalesforce| SF[Salesforce]
    SF -->|Collection results| RR
Connect the process steps in this order. Attach the SkyvvaSalesforce adapter to the receiver connection from Request Reply to Salesforce. No Splitter or Gather is needed for the two sample records.
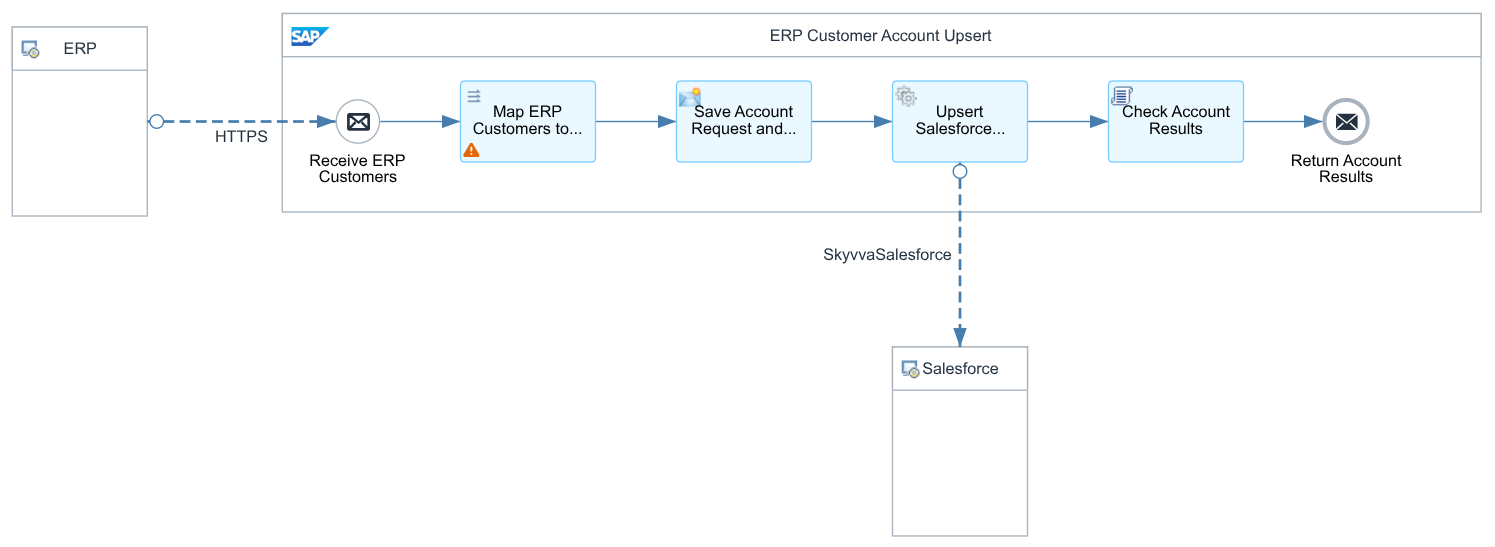
Figure 1. Integration flow for mapping ERP customers and upserting Salesforce Accounts.
2.2 Configure the HTTPS Sender Channel
Select the connection from ERP to Start and choose HTTPS.
| Field | Value |
|---|---|
| Address | /erp/customers/accounts/mapped |
| Authorization | User Role |
| User Role | ESBMessaging.send, or your tenant's assigned inbound role |
| CSRF Protected | Unchecked |
Use an authorized technical caller to send POST with Content-Type: application/xml; charset=UTF-8. The caller's inbound authentication is separate from skyvva-client-credentials, which authenticates the receiver to Salesforce.
Send the authenticated POST directly. With CSRF Protected unchecked, this example does not require a CSRF token-fetch request.
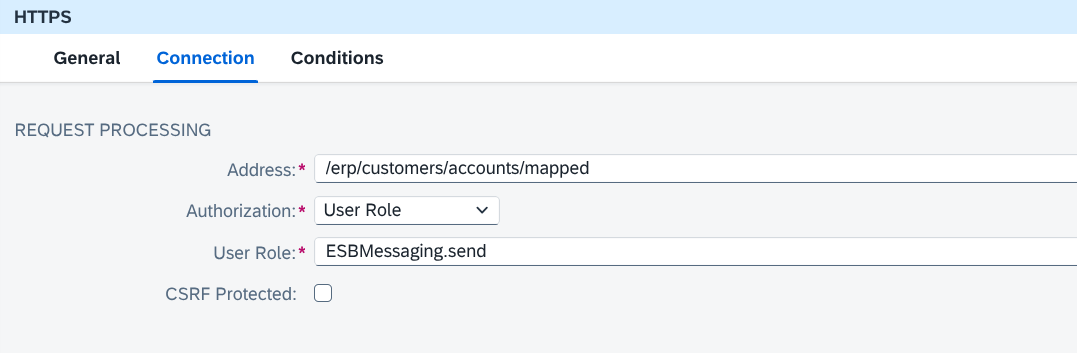
Figure 2. HTTPS sender configuration for receiving ERP customer XML.
2.3 Configure the Message Mapping
The ERP customer message uses the following XML structure:
<Customers>
  <Customer>
    <CustomerNumber>0000100451</CustomerNumber>
    <CompanyName>Elbtal Baustoffhandel GmbH</CompanyName>
    <Telephone>+49 351 555 0451</Telephone>
    <Street>Musterstraße 18</Street>
    <City>Dresden</City>
    <PostalCode>01067</PostalCode>
    <Country>Germany</Country>
  </Customer>
</Customers>
Obtain the source XSD from the ERP interface owner. It must describe the XML sent to this flow, with root Customers, repeating Customer elements, and the fields shown above. If the export has no schema, create one from the agreed XML structure. Keep customer numbers and postal codes as strings.
Prepare the target XSD using the Account field API names and types confirmed by your Salesforce administrator. Define root sObjects, repeating records elements, and attributes/type with the value Account. Add the Account fields listed in the mapping table below. All mapped fields in this example use xs:string to preserve text values and leading zeros. If your project already has a validated Account collection XSD with this structure and field set, reuse it.
For the XML contract shown here, define both schemas without a target namespace. Then configure the mapping:
- Add your source and target XSD files to the iFlow resources.
- Create a Message Mapping resource named
ERP_Customers_to_Account_Collection. - Select your ERP customer schema, root Customers, as the source and your Account collection schema, root sObjects, as the target.
- Connect the fields below, keeping each customer's fields in its own repeating context.
- Assign the resource to the Message Mapping step, named
Map ERP Customers to Accounts.
Source under /Customers | Target under /sObjects | Rule |
|---|---|---|
Customer | records | One record per customer |
| — | records/attributes/type | Constant Account for every record |
Customer/CustomerNumber | records/ERP_Customer_ID__c | Direct; preserve leading zeros |
Customer/CompanyName | records/Name | Direct |
Customer/Telephone | records/Phone | Direct |
Customer/Street | records/BillingStreet | Direct |
Customer/City | records/BillingCity | Direct |
Customer/PostalCode | records/BillingPostalCode | Direct; preserve leading zeros |
Customer/Country | records/BillingCountry | Use values accepted by your org |
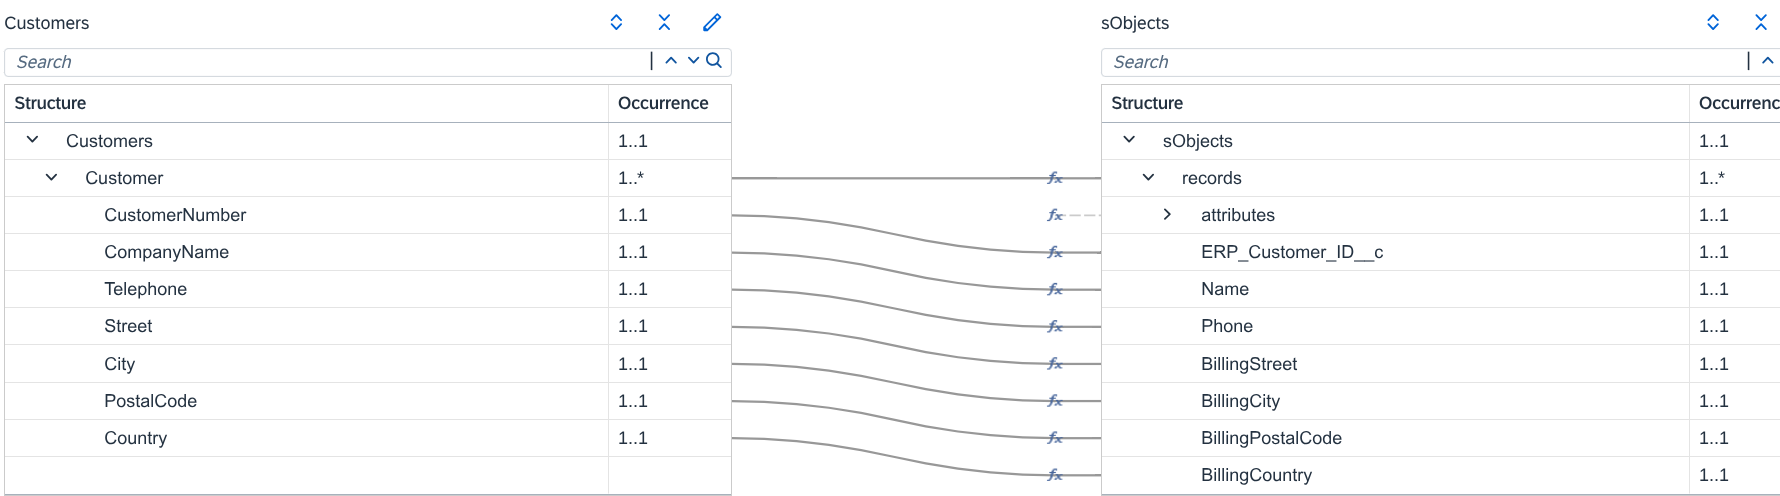
Figure 3. ERP customer fields mapped to Salesforce Account collection fields.
Define required and optional fields according to the agreed ERP message and Salesforce request. If State and Country/Territory Picklists are enabled, use accepted country values or map to the appropriate code fields.
2.4 Configure the SkyvvaSalesforce Receiver Channel
Name the Request Reply step Upsert Salesforce Accounts. On its receiver connection, select SkyvvaSalesforce.
2.4.1 Connection Tab
In SAP Integration Suite, open Monitor → Manage Security → Security Material and deploy a User Credentials entry named skyvva-client-credentials: User = Salesforce Client ID; Password = Client Secret.
| Field | Value |
|---|---|
| Authentication Type | OAuth2 |
| OAuth2 Flow | Client Credential |
| Login Url | Your Salesforce My Domain base URL, for example https://your-domain--uat.sandbox.my.salesforce.com |
| Client Credential | skyvva-client-credentials |
Enter the base URL without /services/oauth2/token.
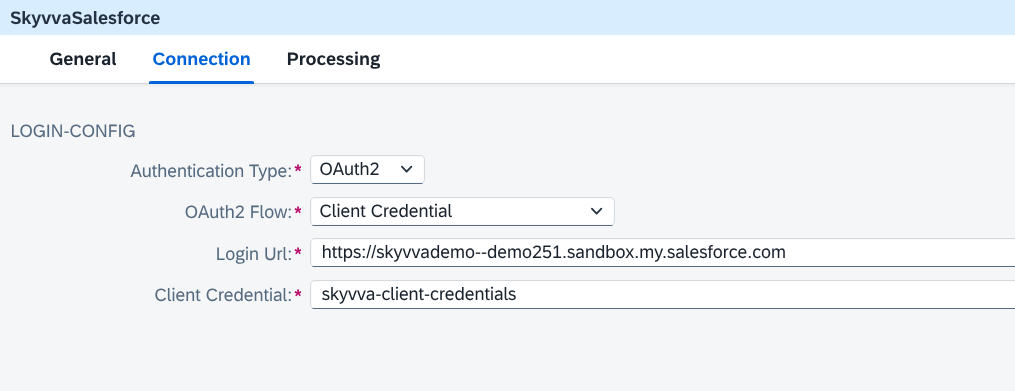
Figure 5. Salesforce receiver connection using Client Credential authentication.
2.4.2 Processing Tab — Request Settings
| Field | Value |
|---|---|
| Processing Type | Salesforce |
| Type | REST |
| Operation | Salesforce Objects - sObject Collections |
| Method | Upsert |
| API Version | 58.0 |
| Salesforce Object | Account |
| External ID Name | ERP_Customer_ID__c |
| Payload Format | Application/XML |
| Treat all XML Payload Values as String | Enabled, if displayed |
| Enable Multiple Batch Processing | Off for the two sample records |
| Enable Lookup Query | Off |
Leave unrelated settings at their defaults. Include ERP_Customer_ID__c in every record and omit Salesforce Id.
Select Method = Upsert explicitly so an existing ERP ID updates its matching Account. Create attempts to insert another record and can fail when the ERP ID already exists. Postman still uses POST to call the iFlow; the receiver's Method setting chooses the Salesforce operation.
The adapter converts the collection XML internally and returns XML results. No XML to JSON Converter is needed. Enable the string setting to preserve customer numbers and postal codes.
The sample omits allOrNone, using Salesforce's default false. With all XML values treated as strings, adding <allOrNone>false</allOrNone> can produce a string instead of a JSON boolean. Review conversion settings if you add numeric or boolean Account fields.
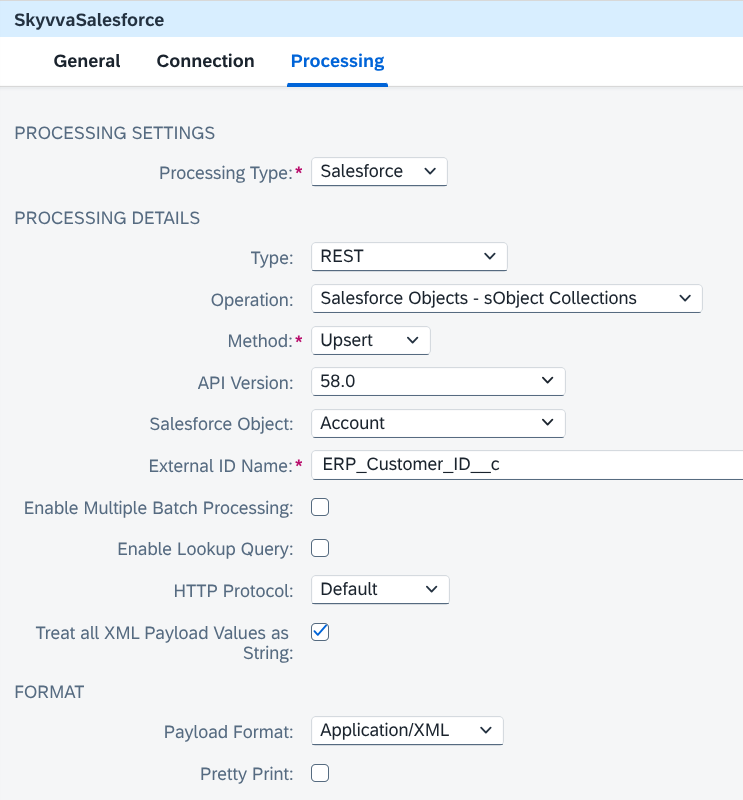
Figure 6. Account collection Upsert configured for mapped XML and external-ID matching.
2.5 Save the Request and Check Results
2.5.1 Content Modifier
Name the Content Modifier after mapping Save Account Request and Count. On Exchange Property, create:
| Action | Name | Source Type | Source Value | Data Type |
|---|---|---|---|---|
| Create | AccountRequest | Expression | ${in.body} | Leave unused |
| Create | ExpectedAccountCount | XPath | count(/sObjects/records) | java.lang.String |
Leave the Message Body unconfigured to preserve the mapped XML. For the two-customer input, ExpectedAccountCount is 2; for one customer, it is 1.
Figure 7. Exchange properties preserve the mapped request and calculate the expected result count.
2.5.2 Groovy Checker and End
Add a Groovy Script step after Upsert Salesforce Accounts to check the returned Account results.
Request Reply supplies the Salesforce response. The script checks that its result count matches ExpectedAccountCount and that every result is successful. When those checks pass, it keeps the response body for End to return to Postman. When either check fails, it raises an exception instead of returning a successful synchronization response.
Connect the checker to an End Message event named Return Account Results, with no additional receiver call. Keep the response body so it reaches the HTTPS caller.
2.5.3 Failure Handling
For this walkthrough, leave exceptions unhandled so transport failures and rejected results fail the SAP Integration Suite message. An HTTP success alone does not mean every Account succeeded.
Some Accounts may already be saved when another fails; a SAP Integration Suite exception does not undo them. Inspect errors, correlate results with the saved request in request order, and correct and resend failed customers using the same ERP IDs.
2.6 Deploy and Get the SAP Integration Suite Endpoint URL
Save and deploy the integration flow. Go to Monitor → Manage Integration Content, locate the deployed flow, and copy its HTTPS endpoint URL.
3. Testing with Postman
In Postman, create a POST request using the endpoint copied in section 2.6. Use the authentication configured for the HTTPS sender and set Content-Type to application/xml.
Select Body → raw → XML and paste this ERP customer payload:
<?xml version="1.0" encoding="UTF-8"?>
<Customers>
  <Customer>
    <CustomerNumber>0000100451</CustomerNumber>
    <CompanyName>Elbtal Baustoffhandel GmbH</CompanyName>
    <Telephone>+49 351 555 0451</Telephone>
    <Street>Musterstraße 18</Street>
    <City>Dresden</City>
    <PostalCode>01067</PostalCode>
    <Country>Germany</Country>
  </Customer>
  <Customer>
    <CustomerNumber>0000100452</CustomerNumber>
    <CompanyName>Spreeblick Hotelbedarf GmbH</CompanyName>
    <Telephone>+49 30 555 0452</Telephone>
    <Street>Beispielstraße 27</Street>
    <City>Berlin</City>
    <PostalCode>10115</PostalCode>
    <Country>Germany</Country>
  </Customer>
</Customers>
Click Send to submit the <Customers> source message. Message Mapping creates the <sObjects> receiver request.
Salesforce returns a result for each Account, and the adapter formats the results as XML. A successful two-record response has this structure; ACCOUNT_ID_1 and ACCOUNT_ID_2 represent the actual IDs returned by Salesforce:
<?xml version="1.0" encoding="UTF-8"?>
<sObjectCollection>
  <element>
    <success>true</success>
    <id>ACCOUNT_ID_1</id>
  </element>
  <element>
    <success>true</success>
    <id>ACCOUNT_ID_2</id>
  </element>
</sObjectCollection>
Each success=true confirms that Account operation succeeded. Upsert creates an Account when its ERP ID does not exist and updates a matching Account when it does. Verify the saved records in Salesforce as described below.
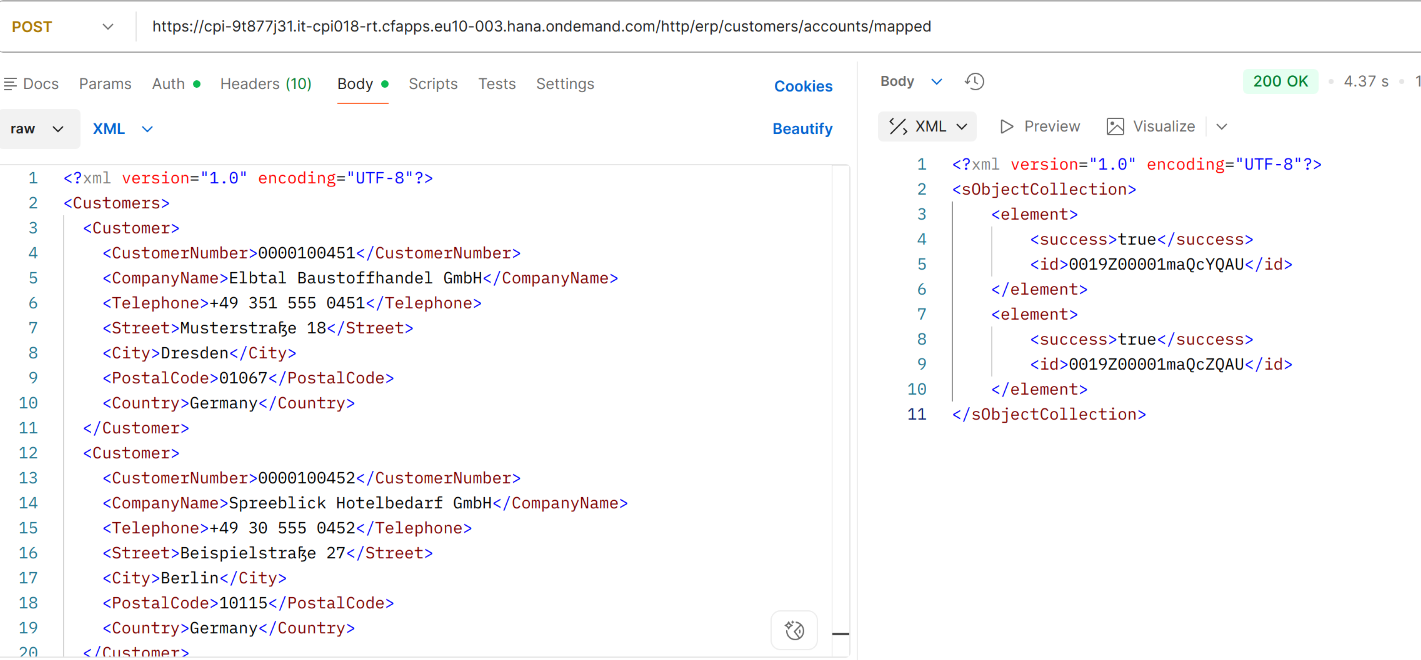
Figure 8. Postman sends ERP customer XML and receives two successful Account results.
4. Monitoring
4.1 SAP Integration Suite
Go to Monitor → Monitor Message Processing and inspect the message status. Confirm two successful results in the returned collection response. The Groovy checker fails the message if any result is unsuccessful or the result count differs from the request count.
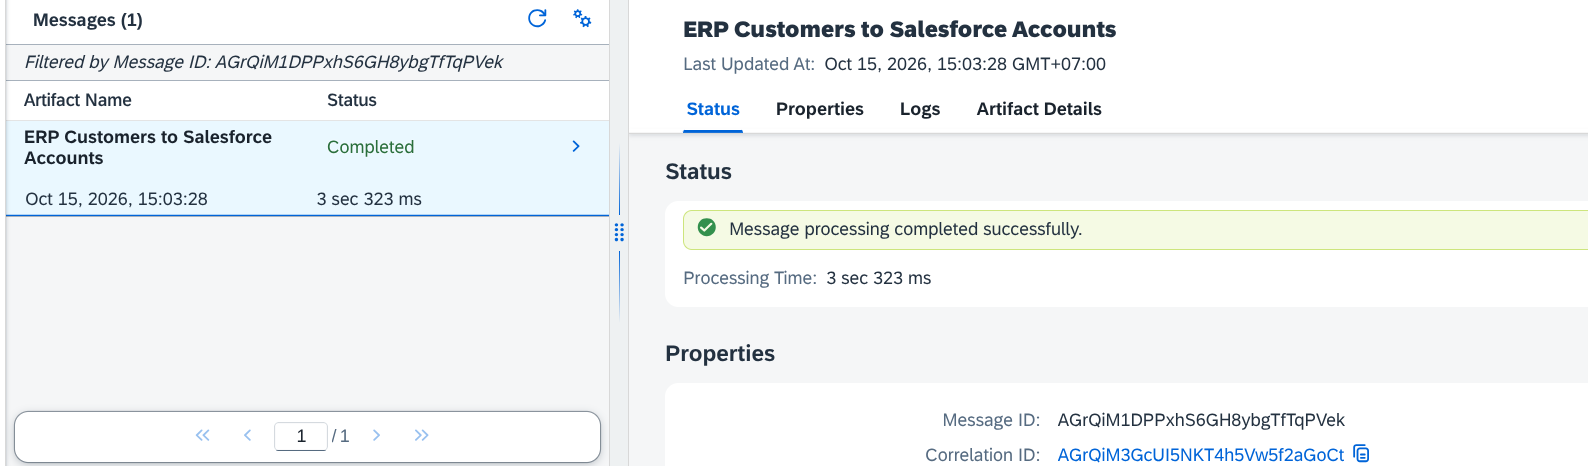
Figure 9. SAP Integration Suite monitoring shows the completed customer synchronization message.
4.2 Salesforce
Query the Accounts using the sample ERP IDs:
SELECT Id, ERP_Customer_ID__c, Name, Phone, BillingCity, BillingPostalCode
FROM Account
WHERE ERP_Customer_ID__c IN ('0000100451', '0000100452')
Confirm names, phones, and addresses match the source and that customer IDs and postal codes retain leading zeros.
Change the first customer's Telephone to +49 351 555 0999 and resend. Confirm the same Account ID has the changed phone and there are still only two Accounts for these ERP IDs.
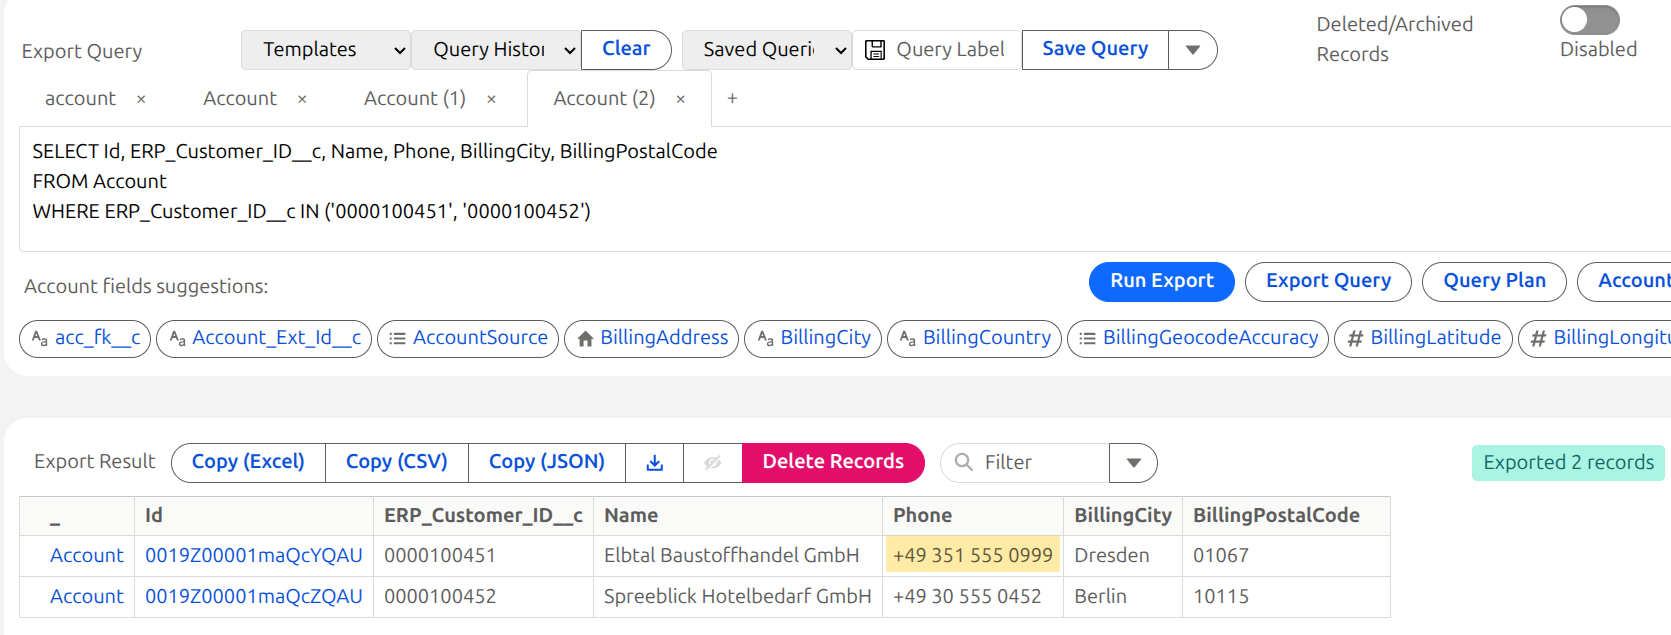
Figure 10. Salesforce Accounts retain their ERP IDs and leading zeros after a repeat update.
Summary
SAP Integration Suite maps ERP customer XML into an Account collection. The SkyvvaSalesforce receiver upserts each Account using ERP_Customer_ID__c, and the Groovy checker validates every result before the response reaches Postman.
Configuration Summary
| Component | Configuration |
|---|---|
| HTTPS Sender | /erp/customers/accounts/mapped, authorized SAP Integration Suite caller, CSRF unchecked |
| Message Mapping | ERP_Customers_to_Account_Collection |
| Receiver | Salesforce → REST → sObject Collections → Upsert |
| Salesforce Object / External ID | Account / ERP_Customer_ID__c |
| API Version | 58.0 |
| Authentication | OAuth2 → Client Credential → skyvva-client-credentials |
| Payload Format | Application/XML; text values preserved as strings |
| Result Checker | Check the result count and success of every Account operation |