18. SkyvvaSalesforce Receiver — Publish ERP Posted-Invoice Notifications to Salesforce Using Platform Events
1. Overview
This tutorial uses the SkyvvaSalesforce receiver adapter → Skyvva → Platform Event - Publishing to send a posted-invoice notification to Salesforce. CPI maps the invoice; a Salesforce Flow receives the event and creates an Invoice Notice.
Postman represents ERP in this tutorial: use it to send the sample invoice and view CPI's response. No real ERP connection is required.
The example uses JSON for input/output and XML for Message Mapping, with standard CPI steps.
2. Context Before You Start
2.1 Business situation and why use it
A distributor manages invoicing in ERP and customer relationships in Salesforce. Sales representatives need to see posted invoices without waiting for a nightly export. The ERP sends the customer number, invoice number, amount, currency, and posting time after its invoice transaction has committed.
| Business value | Example |
|---|---|
| ERP customer number | 0000100451 |
| Invoice number | 90001067 |
| Invoice amount | USD 1250.75 |
| Business message ID | ERP-INVOICE-90001067-POSTED-01 |
This is a fictional invoice-notification example. ERP remains responsible for accounting; the event tells Salesforce that posting has already occurred.
Use events for asynchronous follow-up work. Use a record operation when the caller needs an immediate Salesforce record result.
2.2 How the flow works
Test scenario: Postman sends a notification that ERP invoice 90001067 has been posted. CPI translates the ERP field names into Salesforce event field names and publishes one event. A Salesforce Flow then saves an Invoice Notice so you can verify the received data.
ERP → Receive Posted Invoice → InvoiceJsonToXml
    → MapInvoiceToEvent → SetEventContentType
    → PublishInvoice → SetResponseHeaders → Return Publication Confirmation → ERP

PublishInvoice ⇄ SKYVVA receiver: Platform Event - Publishing ⇄ Salesforce event bus

Salesforce event bus → Platform Event–Triggered Flow → Invoice Notice
Each iFlow step has a specific purpose:
| Step | Why it is used in this test |
|---|---|
| Receive Posted Invoice | Accepts the invoice JSON sent from Postman through HTTPS. |
| InvoiceJsonToXml | Converts JSON to the XML structure used by this example's XSD-based Message Mapping. ERP field names and values stay the same. |
| MapInvoiceToEvent | Renames ERP fields to Salesforce event fields, such as customerNumber → ERP_Customer_ID__c. |
| SetEventContentType | Sets Content-Type = application/xml to match the mapped body sent to the receiver. It does not convert the body. |
| PublishInvoice | Calls the SkyvvaSalesforce receiver and waits for the publication acknowledgement. The SKYVVA Integration and Interface identify the target event. |
| SetResponseHeaders | Sets the caller's response Content-Type to JSON and HTTP status to 200 on the successful path, keeping the adapter acknowledgement body. |
| Return Publication Confirmation | Returns that acknowledgement to Postman. |
The Salesforce subscriber Flow runs separately from this iFlow. Check both results: the publication acknowledgement in Postman and the matching Invoice Notice in Salesforce.
ERP receives a response after publication. It does not wait for the Salesforce subscriber to finish. status = SUCCESS acknowledges event publication; it does not confirm that an Invoice Notice exists.
3. Prerequisites
- A Salesforce org with SKYVVA installed, Pub/Sub access, and sufficient event allocations.
- A SkyvvaSalesforce receiver adapter version exposing Skyvva → Platform Event - Publishing.
- An OAuth application with Client Credentials enabled and an authorized run-as integration user.
- Integration-user API access, read access to the selected SKYVVA Integration/Interface and queried metadata fields, and Create permission for the Platform Event.
- Network access for Salesforce login/metadata queries and Pub/Sub at
api.pubsub.salesforce.com:7443. - An authorized Postman caller for the CPI HTTPS endpoint and a Salesforce administrator to configure the subscriber.
4. Create the Salesforce event
Create a Platform Event for posted-invoice notifications, or reuse a suitable existing one. Keep its API name and fields consistent across the SKYVVA Interface, CPI mapping and subscriber Flow.
- In Salesforce Setup, search Platform Events and select New Platform Event.
- Enter Label
ERP Invoices Posted, Plural LabelERP Invoices Posted, and Object NameERP_Invoices_Posted. - Confirm API name
ERP_Invoices_Posted__e, high-volume event support, and Deployment Status Deployed. - Keep Publish Behavior = Publish Immediately and save. This setting does not coordinate the Pub/Sub call with ERP; send only after ERP commits the invoice.
- Add the custom fields below through the event's Custom Fields & Relationships → New action.
| Label | API name | Type and size |
|---|---|---|
| Message ID | Message_ID__c | Text(80) |
| ERP Customer ID | ERP_Customer_ID__c | Text(30) |
| Invoice Number | Invoice_Number__c | Text(30) |
| Gross Amount | Gross_Amount__c | Number: Length 16, Decimal Places 2 |
| Currency Code | Currency_Code__c | Text(3) |
| Invoice Status | Invoice_Status__c | Text(20) |
| Posted At | Posted_At__c | Text(30), UTC ISO timestamp contract |
Supply all seven fields for this example, using a positive USD amount and status POSTED. The simplified CPI flow maps these values without enforcing the complete input contract.
Grant the integration user Create access to the event and configure the subscriber's access to its destination object.
5. Configure the SKYVVA Integration and Interface
- In Salesforce, open your SKYVVA application from the App Launcher, then open Integration. Create or open the Integration named
SAP Cloud Integration. - Within that Integration, create an Interface with Interface Name =
ERP Invoice Posted. Use the business interface name, not the generated Salesforce record number. - Select Interface Direction = InBound because the notification enters Salesforce.
- Select Operation Type = Publish Platform Event.
- Set Source/Target Name to
ERP_Invoices_Posted__e. Depending on the screen, this field can appear as Source Name or Salesforce Object. Confirm its saved value is the event API name. - Save the Interface and make it available to the integration user.
- Confirm this Interface name is unique within the named Integration and that its Integration relationship points to
SAP Cloud Integration.
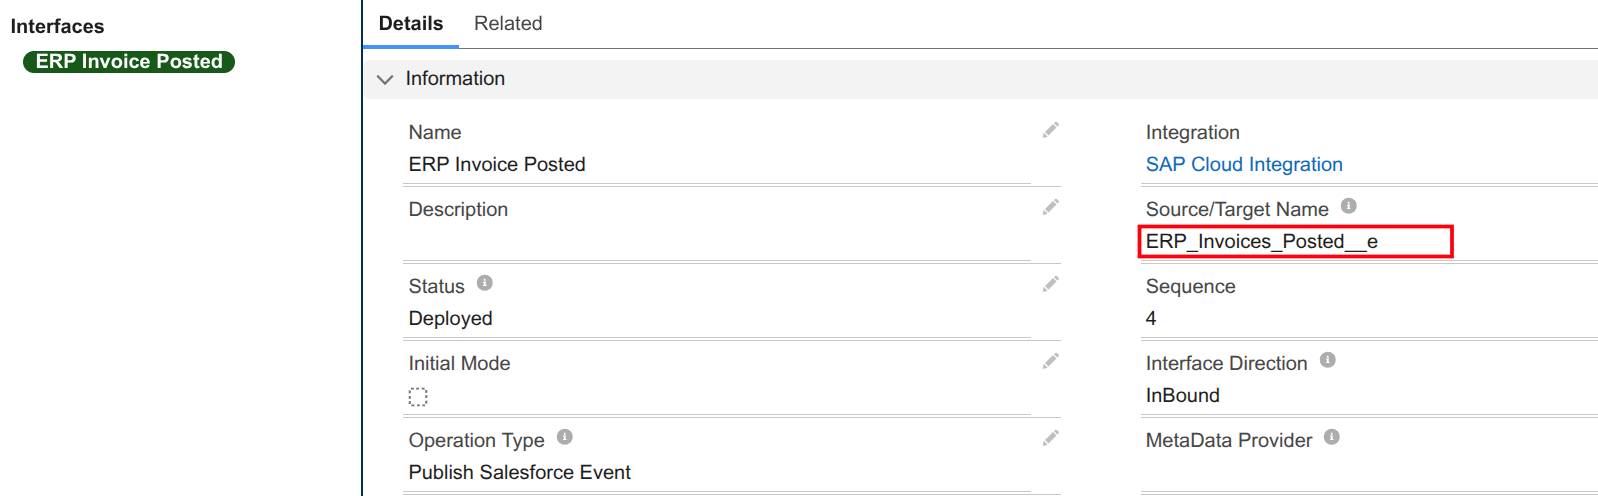
Figure 1. SKYVVA Interface identifying the invoice event.
CPI finds the Interface using the Integration name and Interface name, then reads its Source/Target Name to identify the event. For event API name ERP_Invoices_Posted__e, the channel address is /event/ERP_Invoices_Posted__e. With Processing Type = Skyvva, CPI derives this address automatically; no Channel Name entry is needed. With Salesforce → Event - Publishing, you enter the Channel Name directly instead of using a SKYVVA Interface.
In CPI, select Processing Type = Skyvva → Operation = Platform Event - Publishing on the receiver. This setting tells CPI to publish the event.
In the Salesforce SKYVVA Interface, select Operation Type = Publish Platform Event and set Source/Target Name to the event API name. CPI Message Mapping prepares the event fields. CPI returns after Salesforce acknowledges publication; it does not wait for the subscriber Flow to create the Invoice Notice.
If you change the event API name on an existing Interface, restart or redeploy the iFlow to refresh its cached selection.
6. Create a simple Salesforce subscriber
Complete this section in Salesforce, in the same org where you created the Platform Event and SKYVVA Interface. Open the gear icon → Setup. Create a Platform Event–Triggered Flow that saves an Invoice Notice so users can view the received event:
Start: ERP Invoices Posted → Create Invoice Notice
6.1 Create the destination object
The subscriber Flow stores invoice information in an Invoice Notice record for users to view and report on. You can reuse a suitable existing object and adjust the mappings instead.
In Salesforce Setup → Object Manager → Create → Custom Object, create Invoice Notice (Plural Label Invoice Notices, Object Name Invoice_Notice). Set its Record Name to Invoice Notice Number, Type to Auto Number, Display Format to IN-{00000}, and Starting Number to 1, then save.
On the saved Invoice Notice object's page in Object Manager, select Fields & Relationships → New. Create and save each field below, returning to New for the next field. Reuse the object and fields if you already created them.
| Field API name | Type |
|---|---|
Message_ID__c | Text(80), Unique |
ERP_Customer_ID__c | Text(30) |
Invoice_Number__c | Text(30) |
Gross_Amount__c | Number: Length 16, Decimal Places 2 |
Currency_Code__c | Text(3) |
Posted_At__c | Text(30) |
Processing_Status__c | Text(30) |
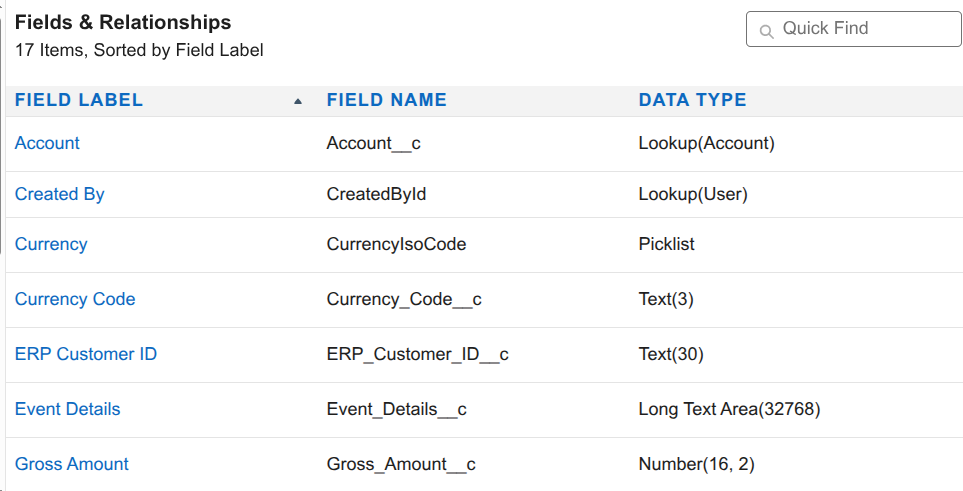
Figure 2. Invoice Notice fields in Salesforce Object Manager (partial list).
Give the users verifying the result access to Invoice Notice and its fields, and make its records available through a custom tab or your Salesforce application.
6.2 Configure the Flow
- Stay in Salesforce Setup. Enter Flows in Quick Find, open Flows, then select New Flow → Platform Event–Triggered Flow to open Flow Builder.
- In Start, select the invoice event created in section 4. Its API name must match the Interface's Source/Target Name in section 5.
- Add Create Records with Label
Create Invoice Noticeand API NameCreate_Invoice_Notice. - Choose One record. Under How to set record field values, select Manually ("Select an object and configure the record values manually"), then choose Invoice Notice as the object. Select the incoming
$Recordfields through the value resource picker for each mapping. Add these mappings:
| Invoice Notice field | Value resource or literal |
|---|---|
Message_ID__c | {!$Record.Message_ID__c} |
ERP_Customer_ID__c | {!$Record.ERP_Customer_ID__c} |
Invoice_Number__c | {!$Record.Invoice_Number__c} |
Gross_Amount__c | {!$Record.Gross_Amount__c} |
Currency_Code__c | {!$Record.Currency_Code__c} |
Posted_At__c | {!$Record.Posted_At__c} |
Processing_Status__c | Literal text Recorded |
- Leave the auto-number Name and any existing optional Account lookup unmapped.
- Connect Start → Create Invoice Notice. In Auto-Layout, add the element using + beneath Start; in Free-Form, draw the connection. The successful branch ends after Create Records.
- Save as Record ERP Invoice Notice, API Name
Record_ERP_Invoice_Notice, resolve validation errors, and activate the Flow.
Ensure only the intended subscriber version is active for the test.
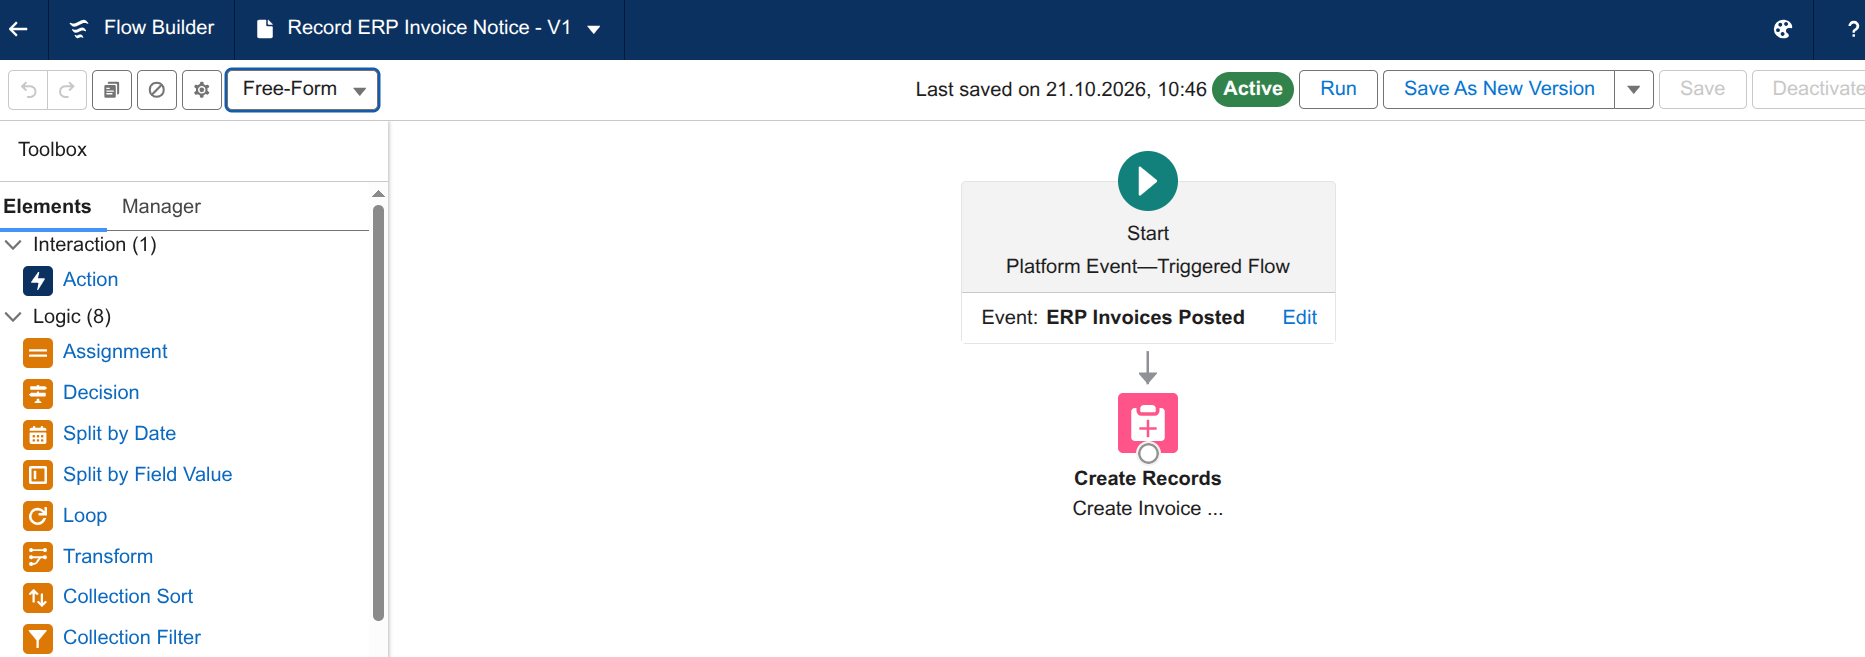
Figure 3. Activated Salesforce subscriber Flow for the invoice event.
6.3 Verify receipt
After publishing the valid sample in section 10, allow time for asynchronous processing. In Salesforce, leave Setup and open the Invoice Notices tab in the application configured in section 6.1. Find the notice by Message ID and open it. Verify invoice 90001067, customer 0000100451, amount 1250.75, currency USD, posting time 2026-10-22T07:30:00Z, and status Recorded.
Use a new Message ID for each new test notification. Reusing one can fail notice creation because its Message ID field is unique.
7. Create the SAP Integration Suite iFlow and connection
Switch to SAP Integration Suite → Design and open the Skyvva Salesforce Adapter Testing package. Create an integration flow named ERP Invoice Event Publisher using the diagram in section 2.2. Configure its sender and receiver below, then add the processing steps from section 8 and section 9.
Open the iFlow in Edit mode. Name the sender participant ERP and the receiver participant Salesforce. Connect ERP to Start using the HTTPS sender adapter. Add a Request Reply step named PublishInvoice, connect it to the Salesforce participant, and select SkyvvaSalesforce as the receiver adapter. Section 8 and section 9 describe the conversion, mapping and Content Modifier steps around Request Reply.
7.1 HTTPS sender
On the iFlow canvas, select the HTTPS connection from ERP to Start. Configure its General and Connection tabs:
| Setting | Example configuration |
|---|---|
| General | Name ReceivePostedInvoice |
| Connection → Address | /erp/invoices/events |
| Authorization | User Role; tenant-approved caller role, commonly ESBMessaging.send |
| Incoming method/body | Caller sends POST with Content-Type application/json |
| CSRF and other optional settings | Follow the tenant's approved inbound policy; if CSRF is enabled, the caller obtains and sends token/cookies |
Use the deployed CPI endpoint and caller authentication, separate from Salesforce receiver credentials. Set Integration Process Transaction Handling to Not Required.
7.2 Receiver credentials and Connection tab
In SAP Integration Suite → Monitor → Manage Security → Security Material, create and deploy a User Credentials artifact named skyvva-client-credentials. Set User to the Salesforce application Client ID and Password to its Client Secret. This adapter reads that artifact type for Client Credential authentication.
Return to Design → Skyvva Salesforce Adapter Testing → ERP Invoice Event Publisher → Edit. Select the SkyvvaSalesforce receiver connection from PublishInvoice to Salesforce, then configure its General and Connection tabs:
| Tab/field | Value |
|---|---|
| General | Receiver channel name PublishInvoiceEvent; SkyvvaSalesforce adapter |
| Connection → Authentication Type | OAuth2 |
| Connection → OAuth2 Flow | Client Credential |
| Connection → Login Url | Your Salesforce My Domain base address, for example https://your-domain.my.salesforce.com |
| Connection → Client Credential | skyvva-client-credentials |
Do not append /services/oauth2/token to Login Url. The administrator must enable the application flow and configure its run-as user before you test.
7.3 Receiver Processing tab
Keep the receiver connection selected and open its Processing tab:
| Field/group | Value | Why |
|---|---|---|
| Processing Type | Skyvva | Uses SKYVVA Interface metadata to locate the event |
| Operation | Platform Event - Publishing | Selects the event publisher |
| Integration | SAP Cloud Integration | Must match the saved Integration name |
| Interface | ERP Invoice Posted | Must match Interface Name within that Integration |
| Format → Request Format | Application/XML | Matches the graphical mapping output |
| Format → Response Format | Application/JSON | Supplies the acknowledgement returned unchanged to ERP |
| Adapter Settings → Logging option | Default | Normal SAP Integration Suite adapter logging |
| Enable retry for fatal connectivity errors | Disabled | This HTTP setting does not supply a complete Pub/Sub business-retry procedure |
| HTTP client timeout (sec) | Keep default 60 | HTTP login/metadata setting; it is not a Pub/Sub publish deadline |
The Interface supplies the event name. Leave unrelated API Version/Mode settings unchanged. Reconcile an uncertain publication before retrying.
Keep Response Format = Application/JSON for this example. Request Format matches the mapped XML sent to the receiver; Response Format controls the acknowledgement returned to Postman. These settings are independent. Changing a Content-Type header does not convert an XML response body into JSON.
8. Map the ERP invoice to one event
Convert the invoice to XML, then map its fields to the Salesforce event. Connect InvoiceJsonToXml → MapInvoiceToEvent directly.
Use the supplied valid sample in Postman. This flow does not enforce the complete invoice contract; production callers must validate required fields, amounts, currency, status and timestamps before sending. Message Mapping alone does not perform that validation.
8.1 Agree the input contract
Send one invoice object with text identifiers, a numeric amount and a UTC timestamp ending in Z. ERP must convert timestamps to UTC before sending; this route does not perform timezone conversion.
Copy the following JSON into Postman. You can also save it locally as erp-invoice-utc.json:
{
  "messageId": "ERP-INVOICE-90001067-POSTED-01",
  "customerNumber": "0000100451",
  "invoiceNumber": "90001067",
  "grossAmount": 1250.75,
  "currency": "USD",
  "status": "POSTED",
  "postedAt": "2026-10-22T07:30:00Z"
}
The screenshots use postedAt = 2026-10-22T07:30:00Z. Repository fixtures may use a different illustrative posting date; use the same date in your request, mapping simulation and result comparison.
Keep identifiers quoted to preserve leading zeros. Enforce JSON types in ERP/API input validation: after XML conversion, the original JSON number/string distinction is lost.
8.2 Convert ERP JSON to XML
Postman sends JSON, while the source and target schemas selected for this graphical mapping are XSDs, which describe XML. This converter prepares the invoice for that mapping. For example, JSON "customerNumber": "0000100451" becomes XML <customerNumber>0000100451</customerNumber>. The field is still named customerNumber; the next step changes it to the Salesforce field name. The converter does not publish the event or create an Invoice Notice.
Add a JSON to XML Converter named InvoiceJsonToXml after Start:
| Processing setting | Value |
|---|---|
| Add XML Root Element | Selected |
| Name | Invoice |
| Root namespace | Empty |
| Use Namespace Mapping | Disabled |
Its output should contain one Invoice root and the seven ERP field names. Save the following sample as erp-invoice.xml for mapping simulation; Postman sends the JSON above.
<?xml version="1.0" encoding="UTF-8"?>
<Invoice>
  <messageId>ERP-INVOICE-90001067-POSTED-01</messageId>
  <customerNumber>0000100451</customerNumber>
  <invoiceNumber>90001067</invoiceNumber>
  <grossAmount>1250.75</grossAmount>
  <currency>USD</currency>
  <status>POSTED</status>
  <postedAt>2026-10-22T07:30:00Z</postedAt>
</Invoice>
8.3 Create the graphical Message Mapping
The ERP and Salesforce use different field names. This step translates the invoice into the event's field structure; converting JSON to XML alone does not perform that translation.
Have your integration developer prepare the two mapping XSDs from the field table below. In the CPI iFlow editor, add Message Mapping → MapInvoiceToEvent after InvoiceJsonToXml and before PublishInvoice. Open the step and create/select its mapping resource. In the mapping editor, use Source → Select → Add to upload the source XSD, then Target → Select → Add to upload the target XSD. Select these root elements:
| Side | Schema | Root |
|---|---|---|
| Source | ERPInvoice.xsd | Invoice |
| Target | InvoiceEvent.xsd | InvoiceEvent |
Use no target namespace. Both are custom schemas prepared for this CPI mapping; they are not exported from SKYVVA. Create the Salesforce event fields separately in section 4.
Connect each ERP field to the matching Salesforce field:
| ERP field | Salesforce event field | Value type |
|---|---|---|
| messageId | Message_ID__c | Text |
| customerNumber | ERP_Customer_ID__c | Text; preserve leading zeros |
| invoiceNumber | Invoice_Number__c | Text |
| grossAmount | Gross_Amount__c | Decimal number |
| currency | Currency_Code__c | Text |
| status | Invoice_Status__c | Text |
| postedAt | Posted_At__c | UTC date/time input → text event field |
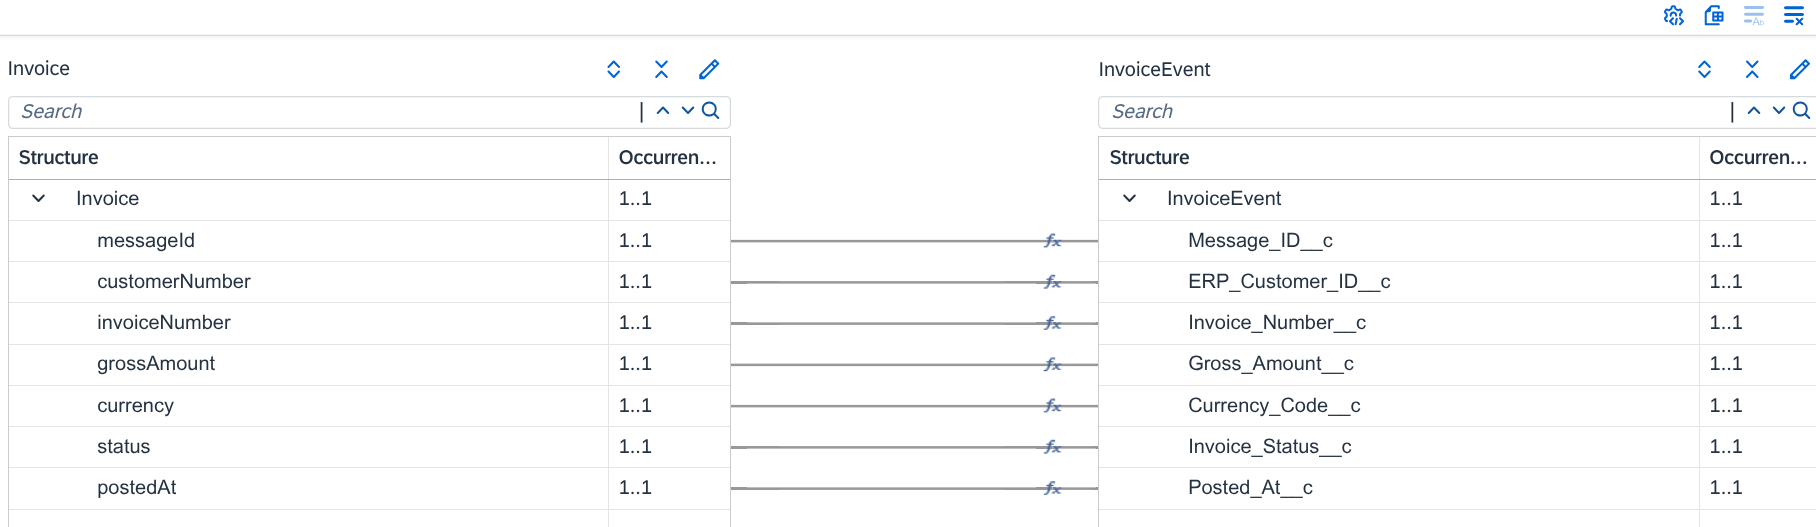
Figure 4. Message Mapping from ERP invoice fields to Salesforce event fields.
Save and select the mapping. Run Simulation with erp-invoice.xml from section 8.2 and compare with this expected output:
<InvoiceEvent>
  <Message_ID__c>ERP-INVOICE-90001067-POSTED-01</Message_ID__c>
  <ERP_Customer_ID__c>0000100451</ERP_Customer_ID__c>
  <Invoice_Number__c>90001067</Invoice_Number__c>
  <Gross_Amount__c>1250.75</Gross_Amount__c>
  <Currency_Code__c>USD</Currency_Code__c>
  <Invoice_Status__c>POSTED</Invoice_Status__c>
  <Posted_At__c>2026-10-22T07:30:00Z</Posted_At__c>
</InvoiceEvent>
Confirm all seven fields, preserved leading zeros, amount and UTC timestamp in the simulation output.
8.4 Publish the mapped XML
Add a Content Modifier named SetEventContentType after mapping. In Message Header create a Constant Content-Type header with value application/xml; leave the body unchanged. Connect to PublishInvoice, the Request Reply step using the PublishInvoiceEvent SkyvvaSalesforce receiver channel from section 7. Set Request Format = Application/XML and Response Format = Application/JSON.
Send one InvoiceEvent root with its seven field children, without an extra envelope or records array. No XML-to-JSON Converter is needed before publishing.
9. Return publication confirmation to ERP
The response returns to the caller—Postman in this tutorial.
After PublishInvoice, add a Content Modifier named SetResponseHeaders. In Message Header create these Constant entries, leaving the Message Body unchanged:
| Name | Value |
|---|---|
| Content-Type | application/json |
| CamelHttpResponseCode | 200 |
Connect it to the normal End, Return Publication Confirmation, on the successful path.
Return the adapter acknowledgement unchanged:
{"status":"SUCCESS","message":"Platform event published","replayId":"AQID"}
| Response item | Meaning |
|---|---|
| status = SUCCESS | The adapter reports acknowledged event publication. |
| message | The adapter's publication-result description. |
| replayId | Opaque event replay identifier represented as Base64. AQID is illustrative; actual values vary. It is not an invoice or ERP Message ID. |
| HTTP 200 | The request completed under this publication contract; it does not confirm subscriber business processing. |
Keep the acknowledgement body unchanged. Retain the request's original messageId for business reconciliation.
Verify subscriber processing separately by finding the matching Invoice Notice, as described in section 6.3.
On the CPI iFlow canvas, check the complete route: InvoiceJsonToXml → MapInvoiceToEvent → SetEventContentType → PublishInvoice → SetResponseHeaders → End, with the SkyvvaSalesforce receiver connection from PublishInvoice to Salesforce. The screenshot retains the default Sender, Receiver, Start and End labels for the corresponding participants and message events.
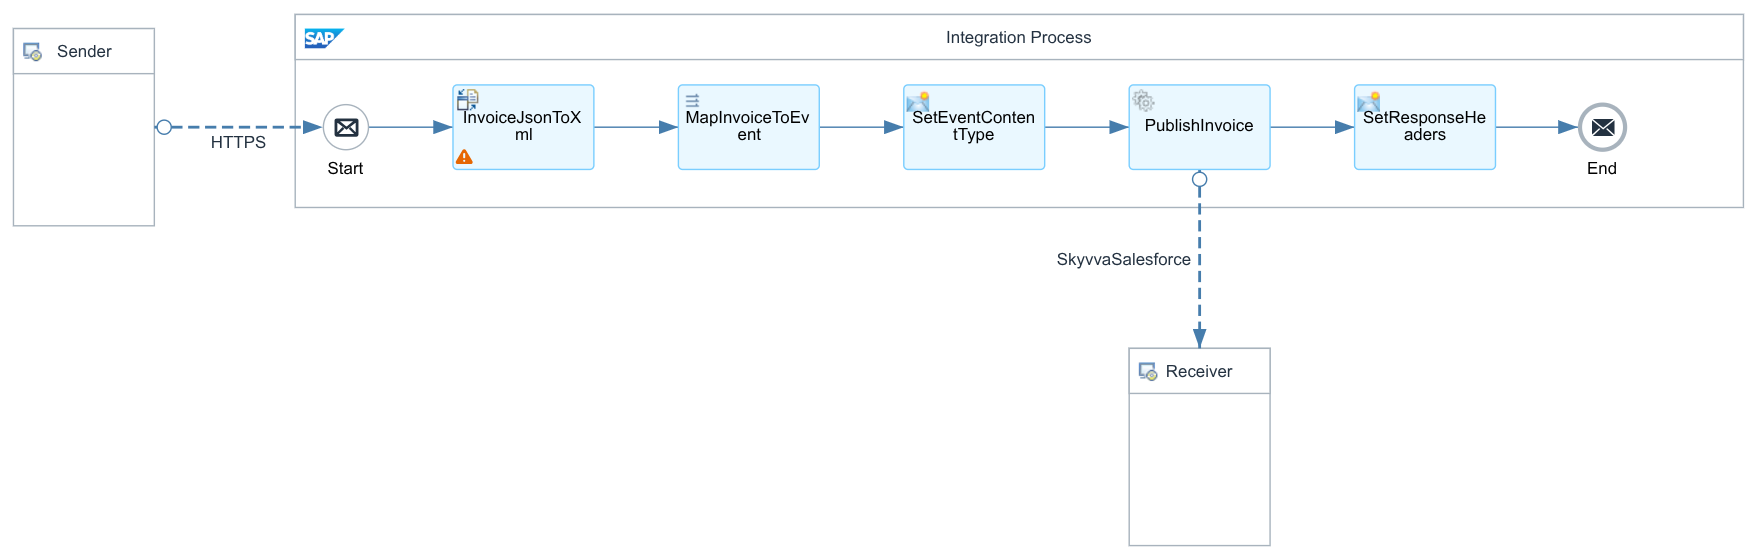
Figure 5. Complete CPI iFlow for invoice conversion, mapping and publication.
10. Testing with Postman
10.1 Send the request and check Postman
- Save and deploy the iFlow in SAP Integration Suite. Confirm that the Salesforce subscriber from section 6 is active.
- In SAP Integration Suite → Monitor → Manage Integration Content, select the deployed iFlow and copy its HTTPS endpoint.
- Switch to Postman, select POST, enter that URL and configure the HTTPS sender's required authentication.
- Set Content-Type = application/json. Choose Body → raw → JSON, paste the section 8.1 sample and send.
- Stay in Postman. Check that the response shows HTTP 200,
status = SUCCESS,message = Platform event publishedand a nonemptyreplayId. This confirms publication; it does not confirm that the Salesforce subscriber created a notice.
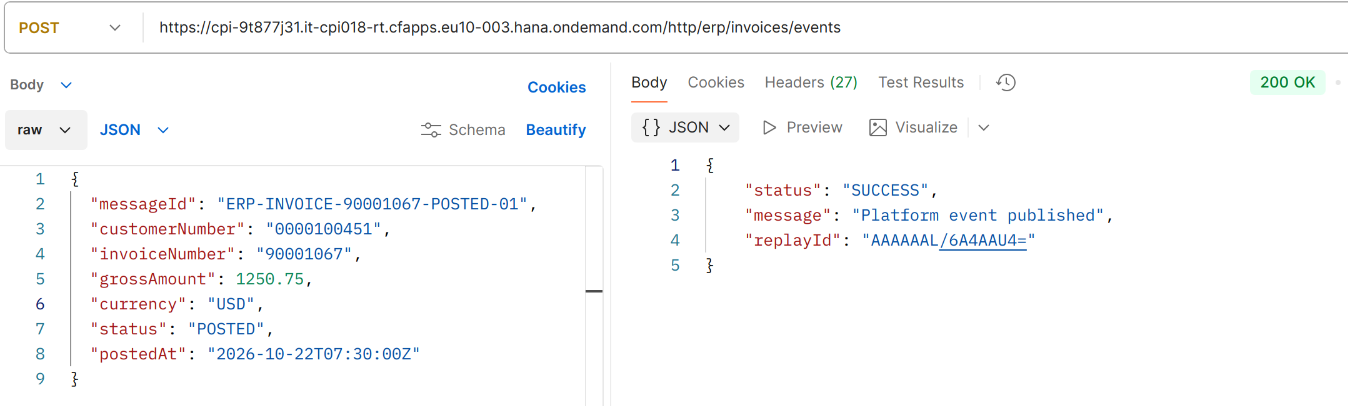
Figure 6. Publication acknowledgement displayed in Postman.
10.2 Check the CPI execution
Switch to SAP Integration Suite → Monitor → Monitor Message Processing. Find the execution for this request and check its status and error details. A Completed CPI execution confirms that the publisher flow completed; it does not confirm subscriber success.
10.3 Verify the Salesforce Invoice Notice
Switch to Salesforce and allow time for the subscriber Flow to run. Find the Invoice Notice by the same business Message ID sent from Postman, not by replayId. Check invoice 90001067, amount 1250.75, currency USD, the request's posting time and Processing Status Recorded, following section 6.3.
For the query-results view shown below, run a SOQL query on Invoice_Notice__c and find the row with the same Message ID. The screenshot shows the saved notice and its posting timestamp.
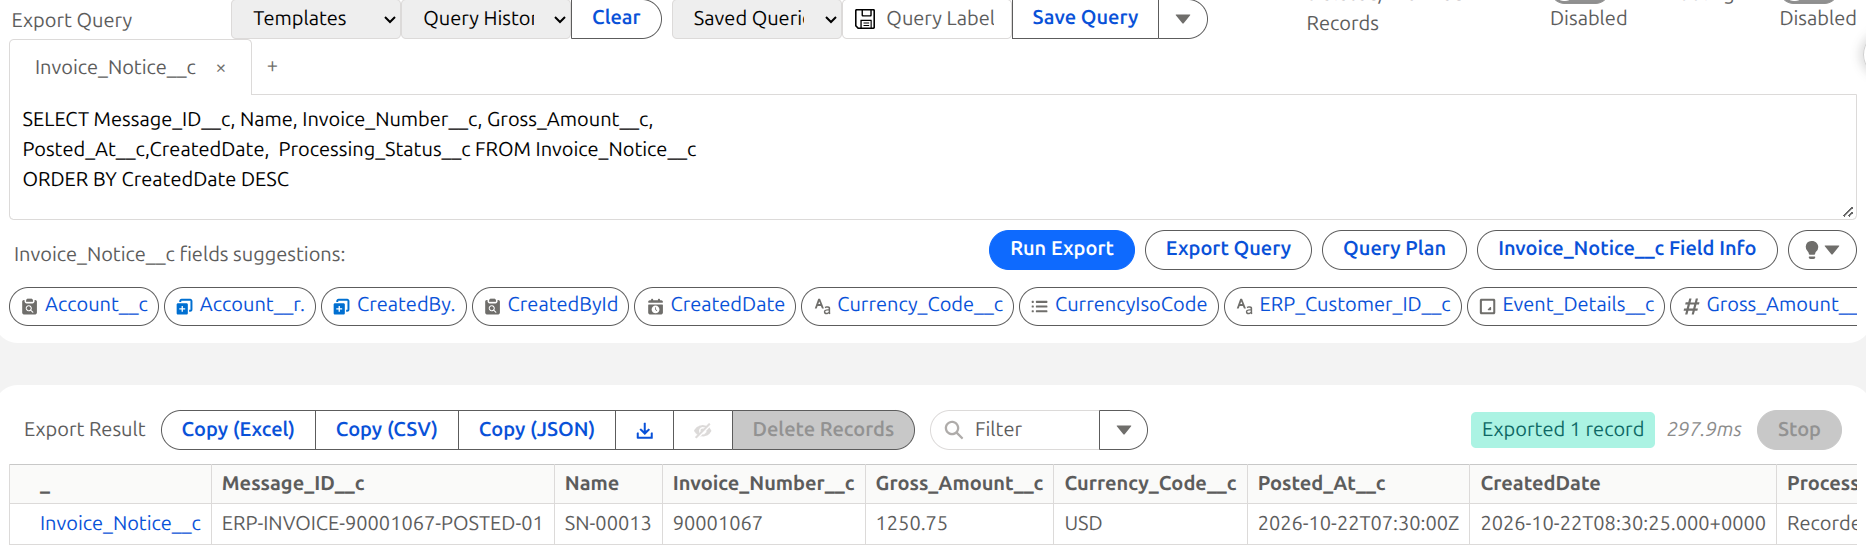
Figure 7. Salesforce query results showing the Invoice Notice created by the subscriber.
10.4 Additional test cases
| Test | Expected result |
|---|---|
| Valid UTC sample invoice | HTTP 200 with adapter status SUCCESS, message Platform event published and a nonempty replayId; verify the Invoice Notice separately |
| Wrong Integration/Interface, blank source name, or Account as source | Topic resolution fails; no success response |
| Event publishing permission absent | Publication fails; investigate integration-user access |
| Publish or caller timeout | Result can be uncertain; reconcile before resend using the stable Message ID |
11. Monitoring and recovery
Check publisher failures in SAP Integration Suite → Monitor → Monitor Message Processing. If publication succeeds but the Invoice Notice is missing, check the Salesforce subscriber Flow's activation, selected event, and record-creation errors. This direct publishing route does not create normal SKYVVA messages for monitoring or reprocessing. Before resending, search for the original Message ID to avoid duplicate processing.
12. Summary
SAP Integration Suite converts ERP invoice JSON to XML and maps it to the Salesforce event fields. The SkyvvaSalesforce receiver publishes the event identified by the SKYVVA Interface and returns a JSON publication acknowledgement to Postman. A Salesforce subscriber Flow creates the Invoice Notice separately; the acknowledgement confirms publication, not notice creation.
| Component | Configuration |
|---|---|
| Receiver | Skyvva → Platform Event - Publishing |
| Integration / Interface | SAP Cloud Integration / ERP Invoice Posted |
| SKYVVA Interface Operation Type | Publish Platform Event |
| Event | ERP_Invoices_Posted__e |
| Formats | ERP input JSON; receiver request Application/XML; receiver response Application/JSON |
| Publication verification | Check the publication acknowledgement |
| Subscriber verification | Find the Invoice Notice by Message ID (section 6.3) |