5.1 Using Salesforce CDC change event
Learning Objectives
A Change Data Capture event, or change event, is a notification that Salesforce sends when a change to a Salesforce record occurs as part of a Create, update, delete, or undelete operation. User has to create Account in SalesForce, it should trigger an event and send this Account Information to MS SQL Server DB of our organization. Once it's inserted in our SQL DB, it will create particular AccountID and give it back to SalesForce. The notification includes all new and changed fields and header fields that contain information about the change.
Introduction
The reason users need to accomplice this is our Account creation process used to start from Our own SKYVVA product so it was creating AccountID (Auto Generated) from DB and used from Primary identification for Account across the system. Now we want to create Account from SalesForce but need to keep AccountId generated from SQL DB. For example, header fields indicate the type of change that triggered the event and the origin of the change. Change events support all custom objects and a subset of standard objects.
[su_box title="Note" box_color="#2a8af0" title_color="#000000"]User have to click on link below through which user get configuration about, How to Consume the change events using an apex trigger.[/su_box]
So here we will learn How to Consume the change events using an apex trigger and do local action e.g. update an account:-
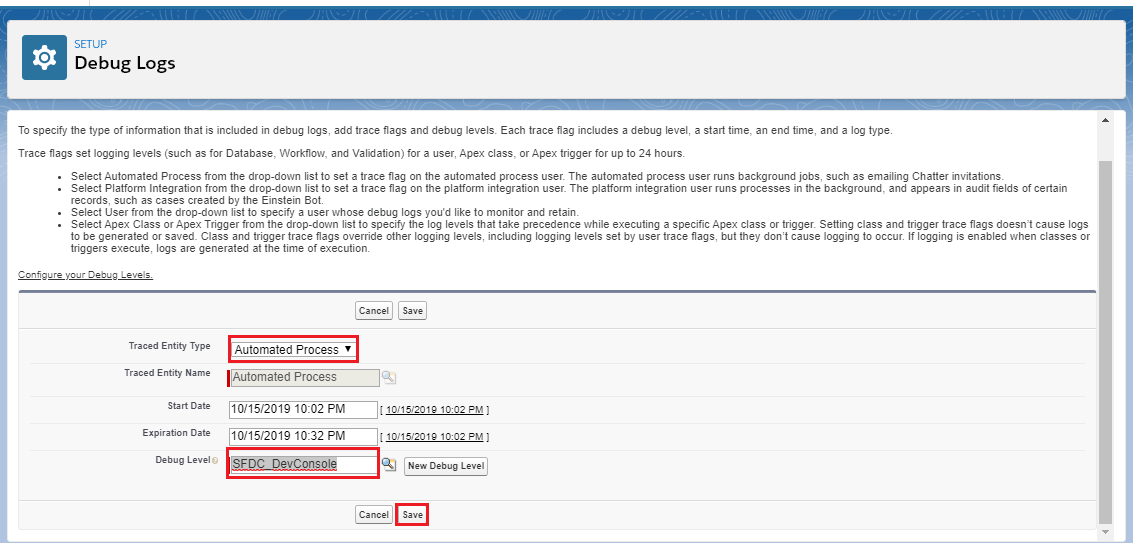
How to use it? Follow the given steps:- Step 1:- Subscribing to platform events:-
- Set up debug logs for event Subscriptions.
- From Setup, enter Debug Logs in the Quick Find box, then click Debug Logs.
- Click New.
- For Traced Entity Type, select Automated Process.
- Select the time period to collect logs and the debug level.
- Click on Save.
 [su_box title="Note" box_color="#2a8af0" title_color="#000000"] Using the Event PlatForm for use the Salesforce CDC change event to send data out with the SKYVVA API ,The user type is Automated Process.[/su_box]
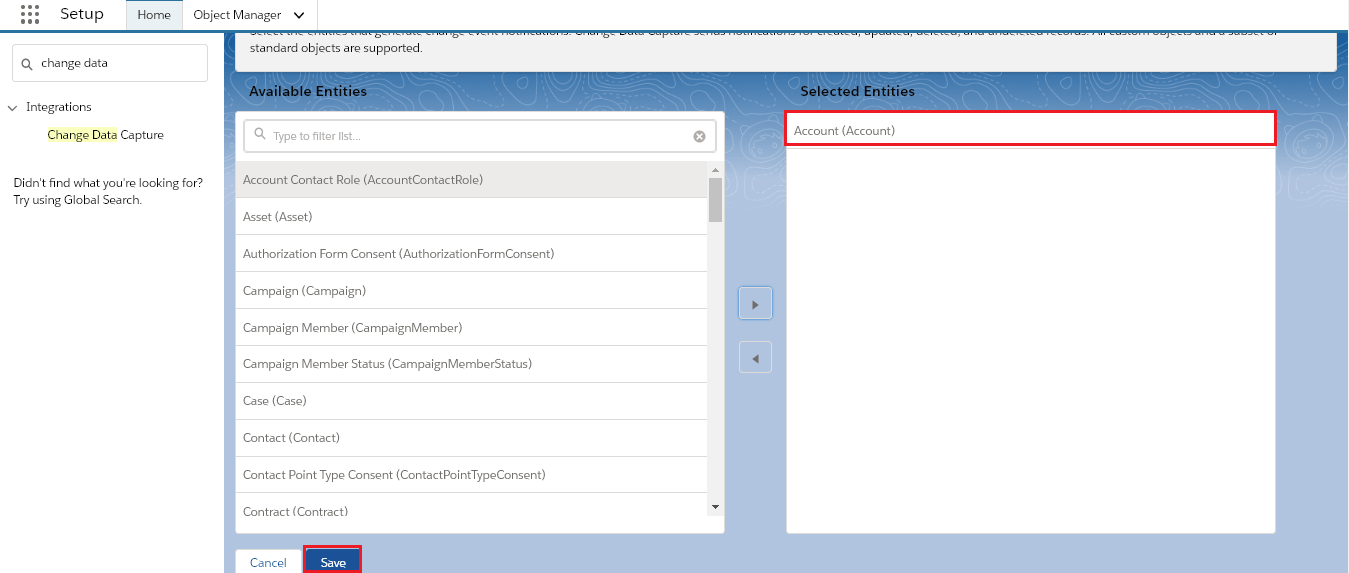
Step 2:- Select Object for Change data capture:-
[su_box title="Note" box_color="#2a8af0" title_color="#000000"] Using the Event PlatForm for use the Salesforce CDC change event to send data out with the SKYVVA API ,The user type is Automated Process.[/su_box]
Step 2:- Select Object for Change data capture:-
- From Setup, enter Change data capture in the Quick Find box.
- Select-Object.
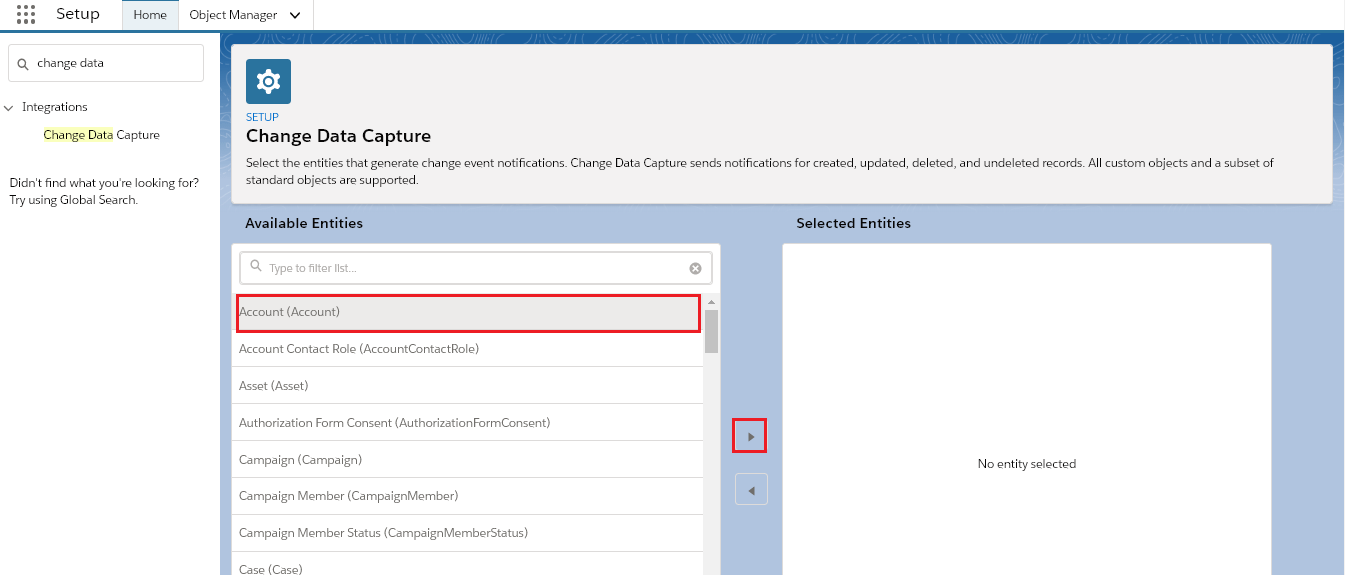
- Save it.
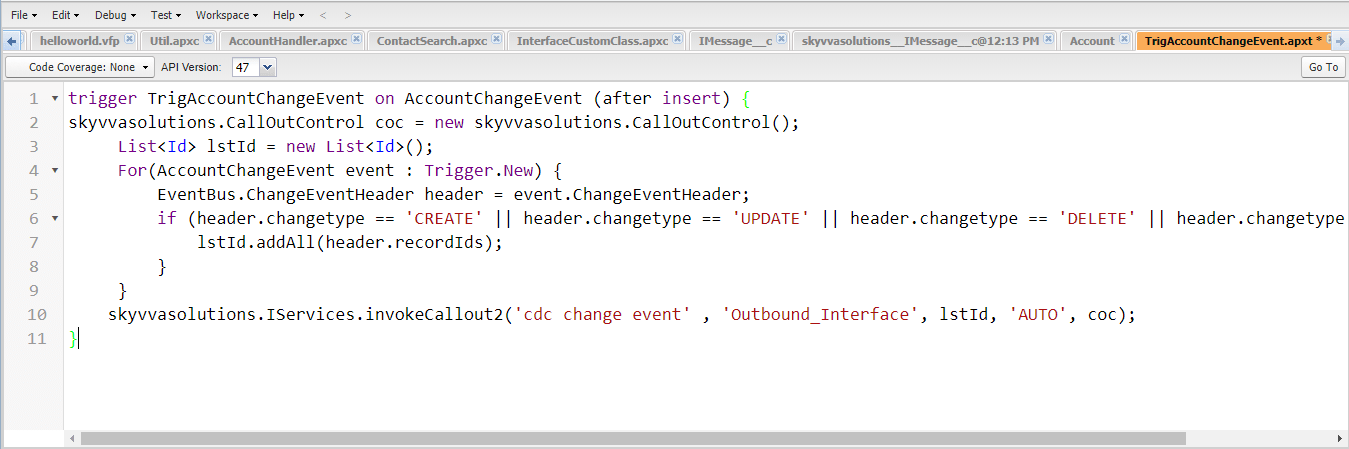
 Step 4:- Create an Apex trigger:-
- Open Developer console.
- Click on File=>New=>Apex Trigger.
- Enter Name and sObject as shown in the picture given below.
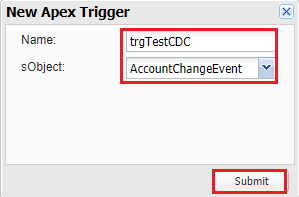
- Click on the Submit button to generate a header script.
- After clicking on the submit button.
- We will add the code as shown in the picture given below.
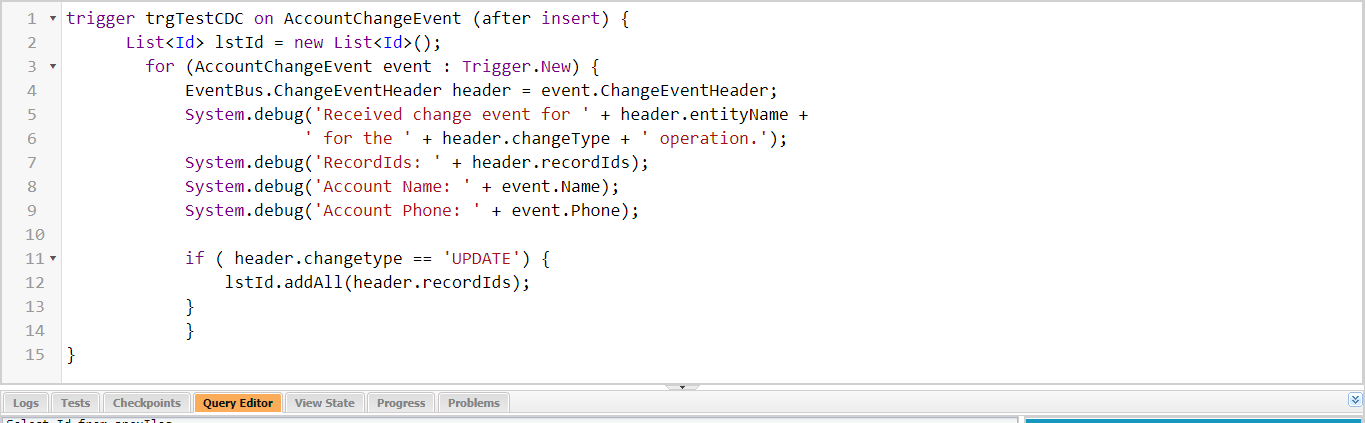
We can use this code:- [aux_code language="javascript" theme="tomorrow" title="" extra_classes=""]trigger trgTestCDC on AccountChangeEvent (after insert) { List
Check the result on Debug logs:-
- From Setup, enter Debug Logs in the Quick Find box, then click Debug Logs.
- We can check result in debug logs.
 Now you might be thinking why our chapter name is "How to use the Salesforce CDC change event to send data out with the SKYVVA API?" So here is the reason. The salesforce CDC change event to send data out with the SKYVVA API means, that we are using a combination of the real-time capability of salesforce change data capture and callout capability of SKYVVA. The callout capability of SKYVVA is best as we have different adapters that connect to many external systems for this our user doesn't need a programmer. This is the benefit of using SKYVVA invoke Callout2().
We provide these two modes to our user:-
- Real-time with we invoke callout. The combination of the Salesforce CDC change event and SKYVVA callout.
- Batch processing with we invoke callout. Using SKYVVA CDC with SKYVVA callout.
When to use which mode:-
- If there is a lot of changes and updations it will impact the system change during real-time. Where we don't need real-time in some cases, sometimes real-time block the resources. It is a resource-consuming blocking of the connecting systems in terms of integration technology. In this case, SKYVVA CDC with SKYVVA callout is the best option, because of its scheduler.
- The combination of Salesforce CDC and SKYVVA callout is used when we want an updated record in real-time. As the callout capability of SKYVVA is best as we have different adapters that connect to many external systems for this our user doesn't need a programmer. This is the benefit of using SKYVVA invoke Callout.
So here we will learn how to consume the event using an apex trigger and sending out data using Invoke callout2.
How to use it? Pre-requisite:-
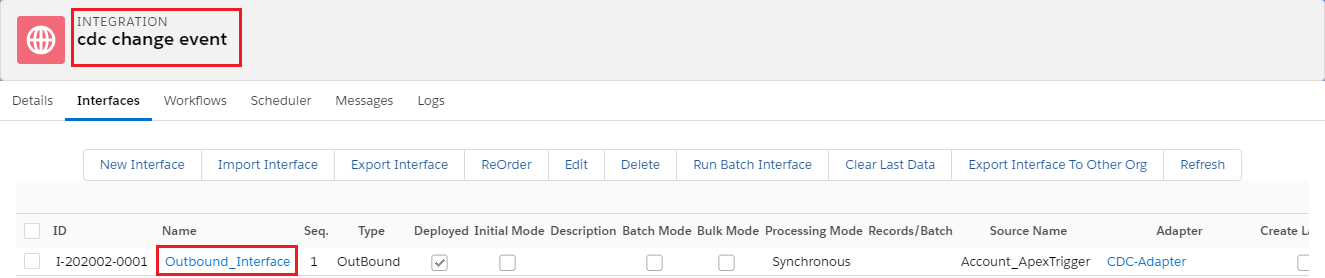
- Create Integration.
- Create Interface (Outbound).
Follow the given steps:- Step 1:- Subscribing to platform events:-
- Set up debug logs for event Subscriptions.
- From Setup, enter Debug Logs in the Quick Find box, then click Debug Logs.
- Click New.
- For Traced Entity Type, select Automated Process.
- Select the time period to collect logs and the debug level.
- Click on Save.
[su_box title="Note" box_color="#2a8af0" title_color="#000000"] Using the Event PlatForm for use the Salesforce CDC change event to send data out with the SKYVVA API ,The user type is Automated Process.[/su_box]
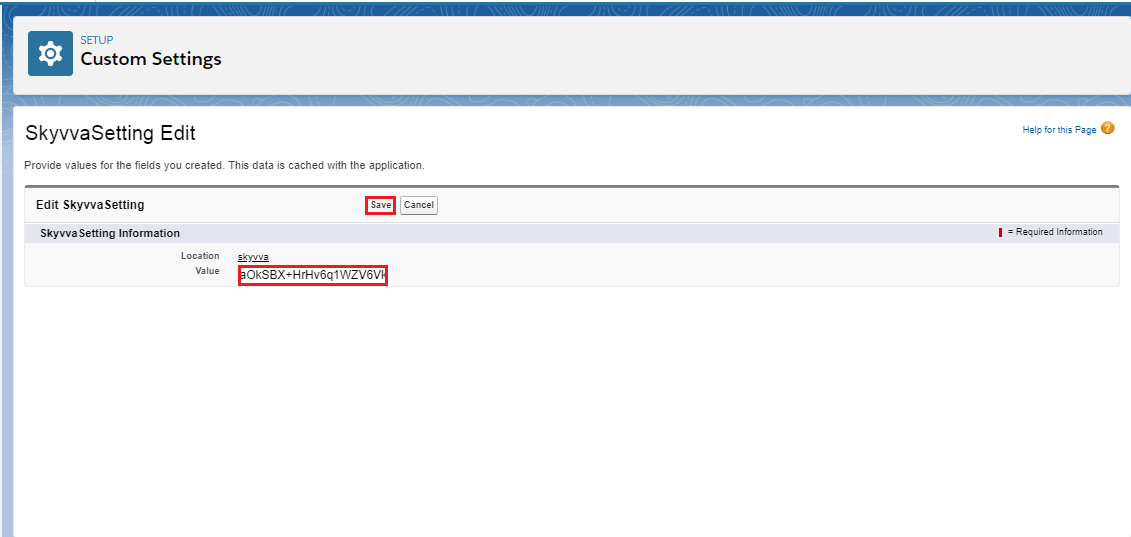
Step 2:- Register Licence key for Automated Process user:-
- From Setup, enter custom settings in the Quick Find box.
- Click on the Manage option.

- Click on the "NEW" button at the top.
- Enter the SKYVVA license key in the value block.
- Save it.
Step 3:- Select Object for Change data capture:-
- From Setup, enter Change data capture in the Quick Find box.
- Select-Object.
- Save it.
Step 4:- Create an Apex trigger:-
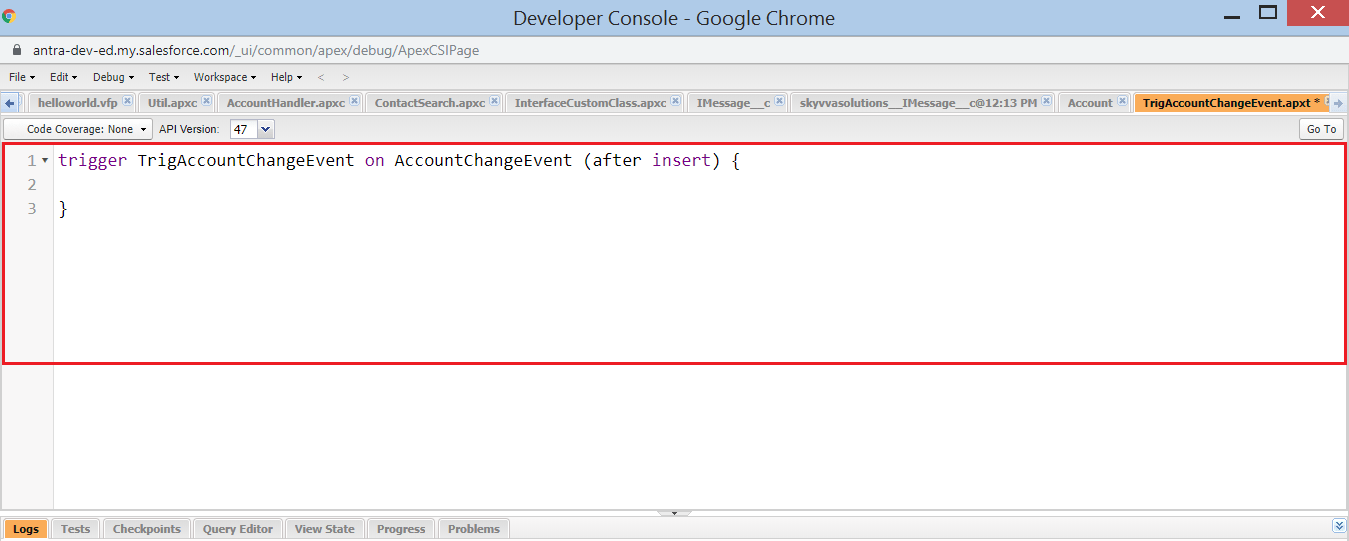
- Open Developer console.
- Click on File=>New=>Apex Trigger.
- Enter Name and sObject as shown in the picture given below.

- Click on the Submit button to generate a header script.
- After clicking on the submit button.
- It will show the screen as shown in this picture given below.
Step 5:- Generate Trigger script by following steps given below:-
- Navigate to SKYVVA Trigger tab.
- Select Change Event Trigger in Trigger Type picklist.
- Checkbox After insert.
- Select your integration in Integration Name.
- Select your Interface in Interface Name.
- Select object change event in Select-Object.
- Select any Mode in Trigger Mode e.g. AUTO.
- Click the Generate Script tab to generate script Trigger.
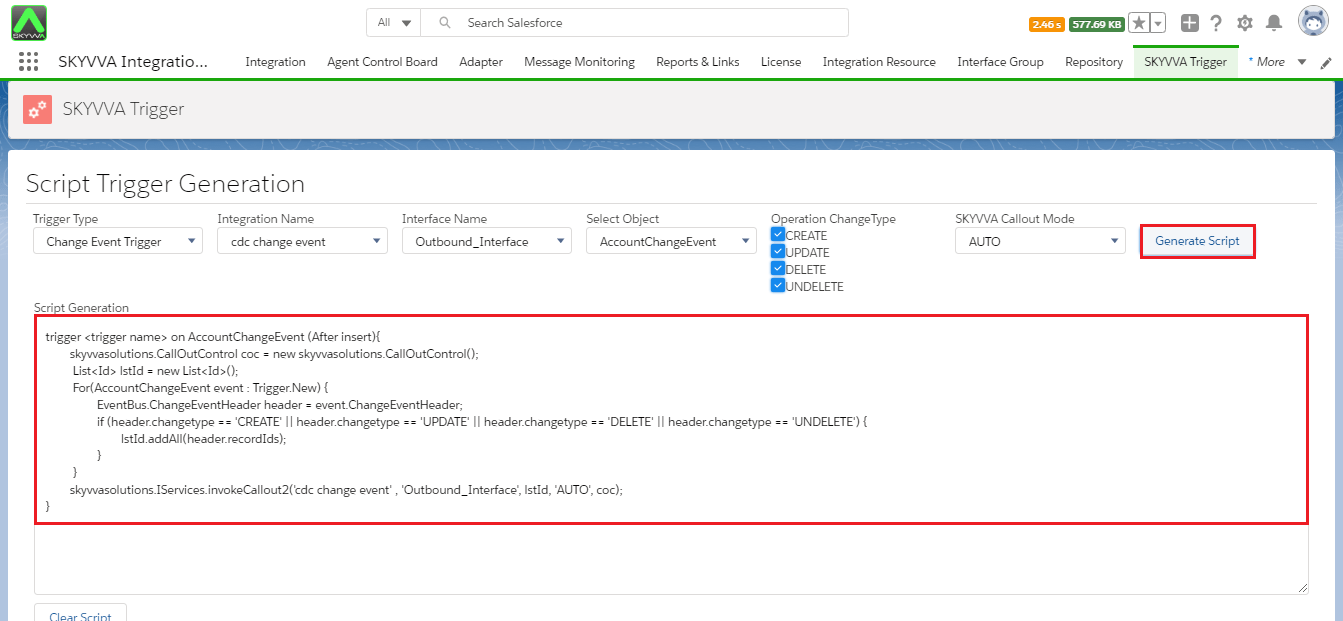
- Select and copy the generated script and paste it in the apex trigger which we created in step 4.
- Do it as shown in the picture given below.
[su_box title="Note" box_color="#2a8af0" title_color="#000000"]For trigger after delete it is working when query selection with keyword "ALL ROWS". E.g SELECT BillingCity,BillingCountry,Name,Id,Description From Account ALL ROWS[/su_box]
When to use which mode:-
- If there is a lot of changes and updations it will impact the system change during real-time. Where we don't need real-time in some cases, sometimes real-time block the resources. It is a resource-consuming blocking of the connecting systems in terms of integration technology. In this case, SKYVVA CDC with SKYVVA callout is the best option, because of its scheduler.
- The combination of Salesforce CDC and SKYVVA callout is used when we want an updated record in real-time. As the callout capability of SKYVVA is best as we have different adapters that connect to many external systems for this our user doesn't need a programmer. This is the benefit of using SKYVVA invoke Callout.
Now Users can be configured how SKYVVA Change Events to synchronize changes to the Salesforce records in your SQL server Db Management system. SKYVVA can Change/Update events the same way you subscribe to other events. Connect to Server
- Click on Databases
- Create Column Name, BillingCity, BillingStreet, BillingCountry
- Select Data Type “nvarchar(Max)”or”nvarchar(50)”
- Allow Nulls checked by default
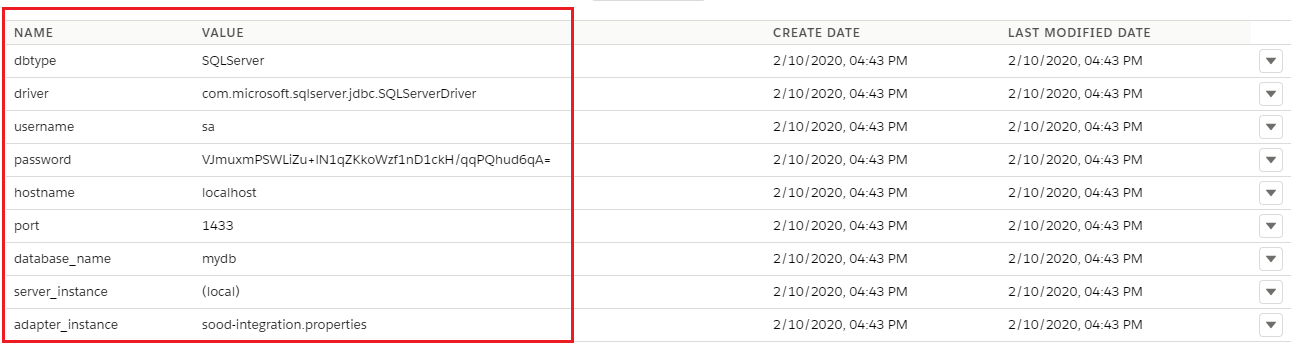
Now go to Salesforce Click on Adapter Tab
- Create Adapter Type JDBC
- Click on Ping Connection

- Adapter property made a connection successfully with Agent and SQL Server called jdbcSQLServerDriver
- Database Type SQL Server
- Database Name mydb
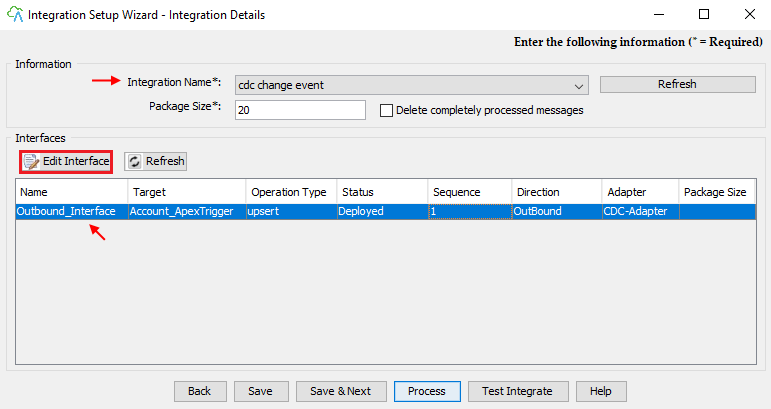
- Create Integration
- Create Interface
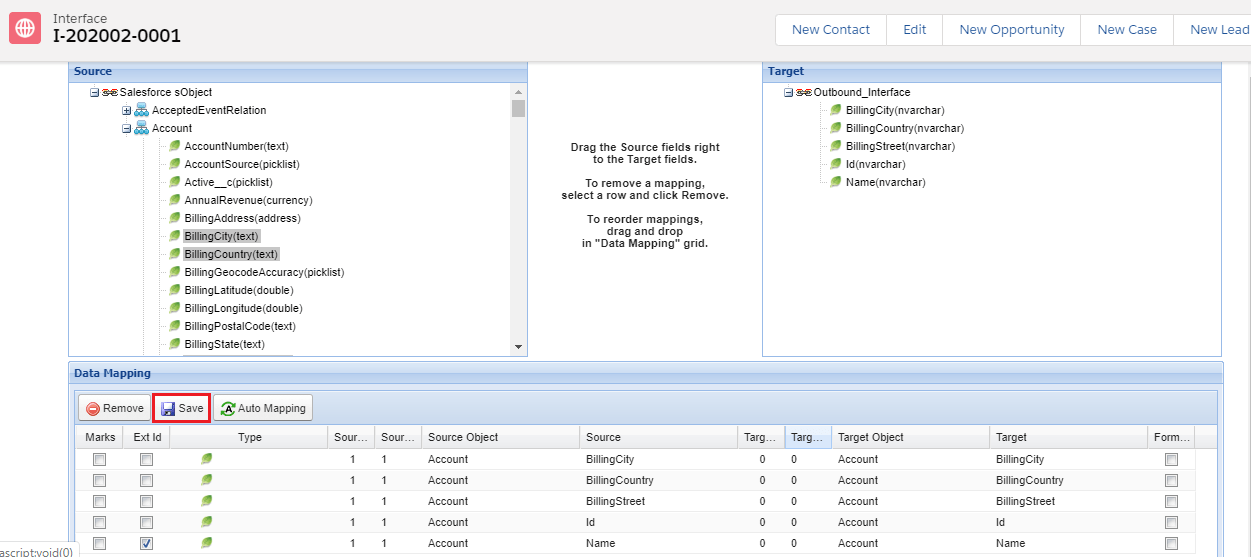
- Click on Interface
- Scroll down to mapping Section
- Select Ext id
- Save
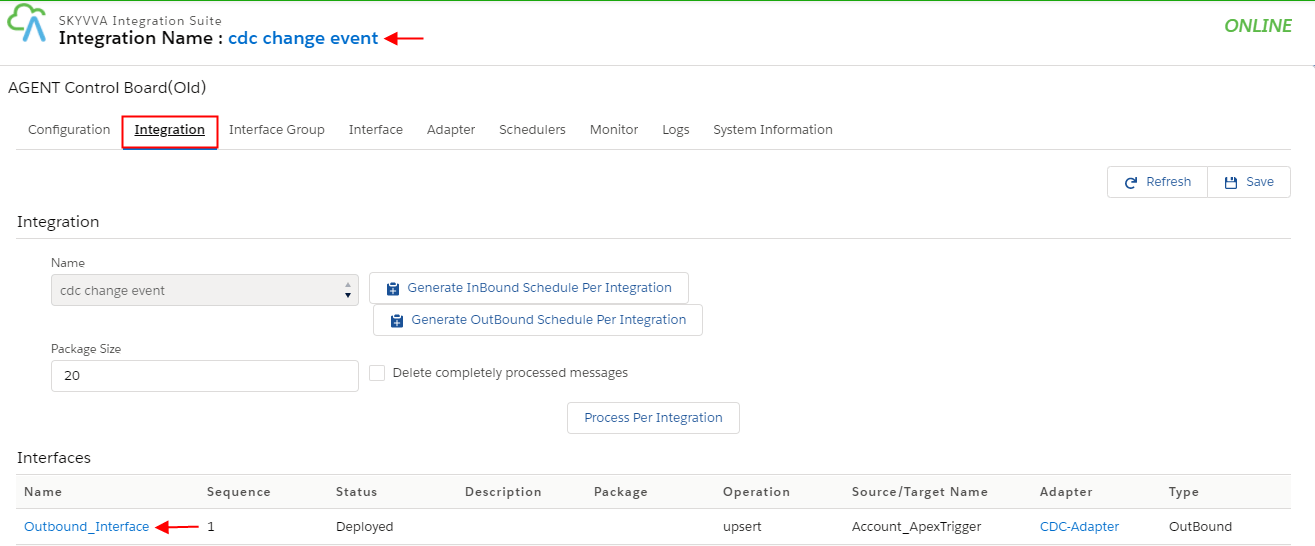
Now go to the Agent and Select your Integration which you just created
- Select your Interface
- Click on Edit Interface Button
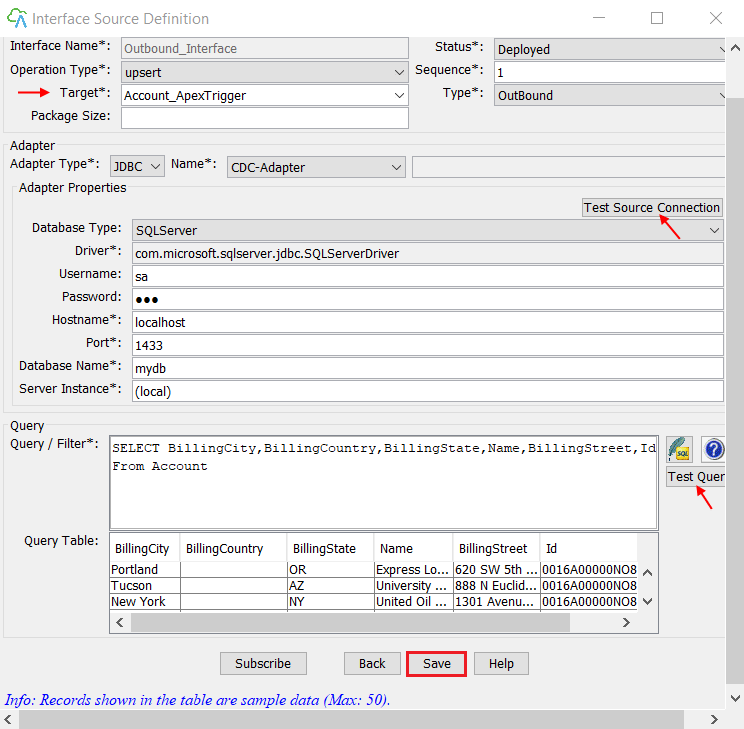
Now see Interface Source Definition
- Test Source connection with SQL Server Database
- Write Query in Query/Filter section
- Click on Test Query button
- Records are fetching from Salesforce Org in Query table successfully
- Save
- Select Your Interface
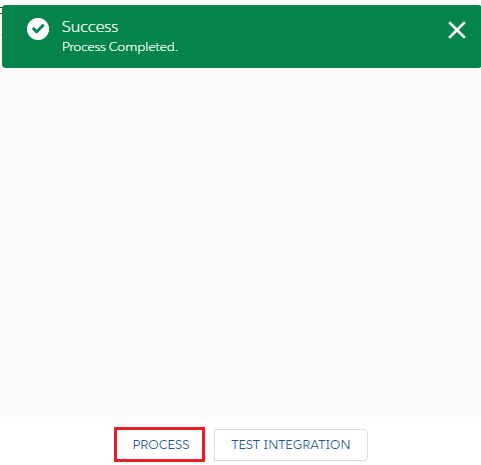
- Click on the Process button
Go to Salesforce Org and click on Message Monitoring
- Select Integration Name
- Select Interface
- ok
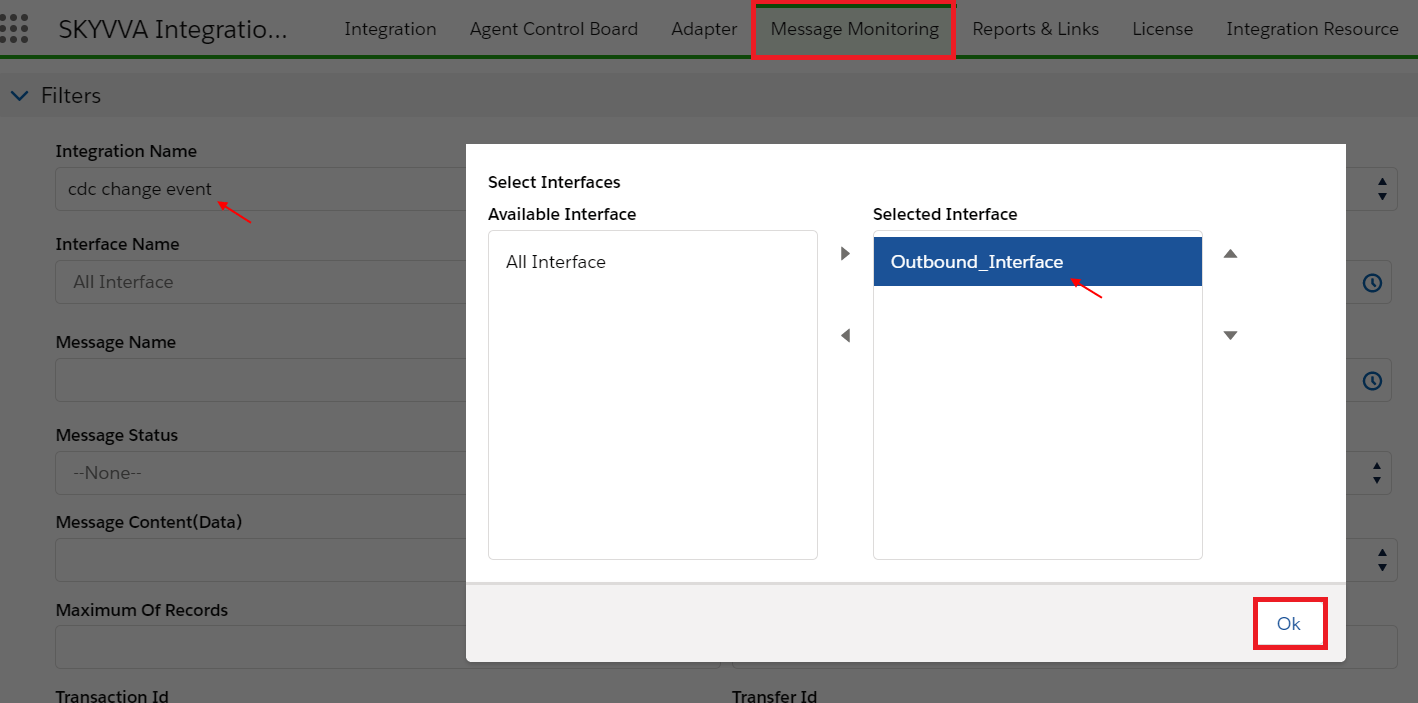
- Scroll Down to Messages section
- Click on the search button

- Records upsert successfully
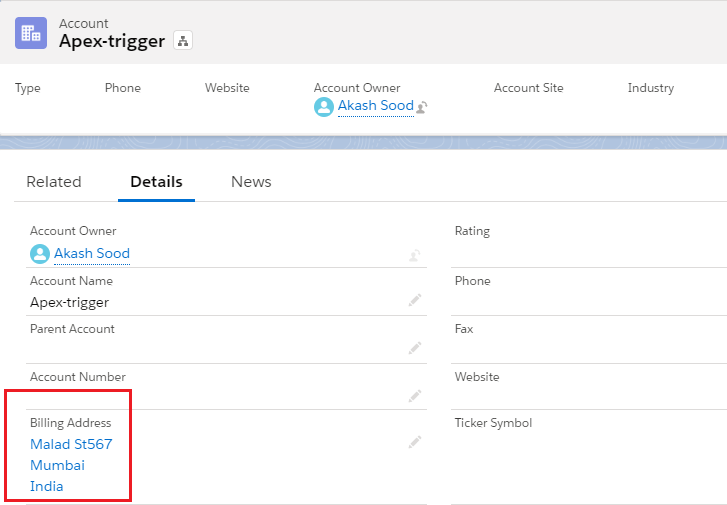
- Now click on Account Object
- Click on Record user just created

- Click on Related list Detail
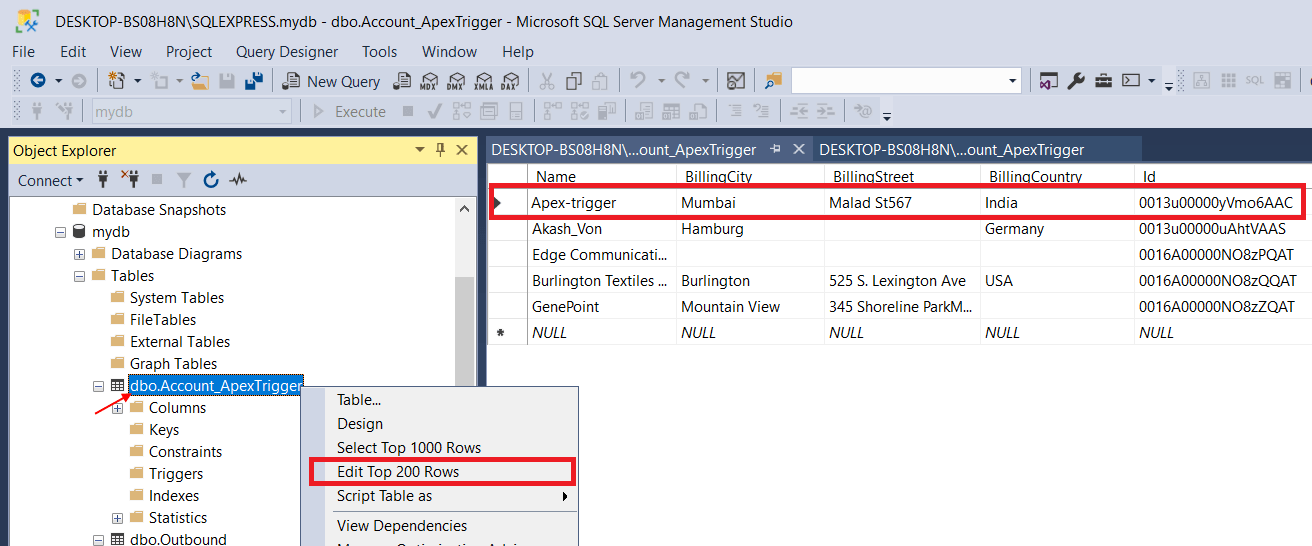
Open SQL Server Now
- Right, Click on Account.ApexTrigger
- Click on Edit Top 200 Rows
- Now records are open
- Now we have to update
Now Change/Update on Salesforce Org.
- Billing Street
- Billing City
- Billing Country
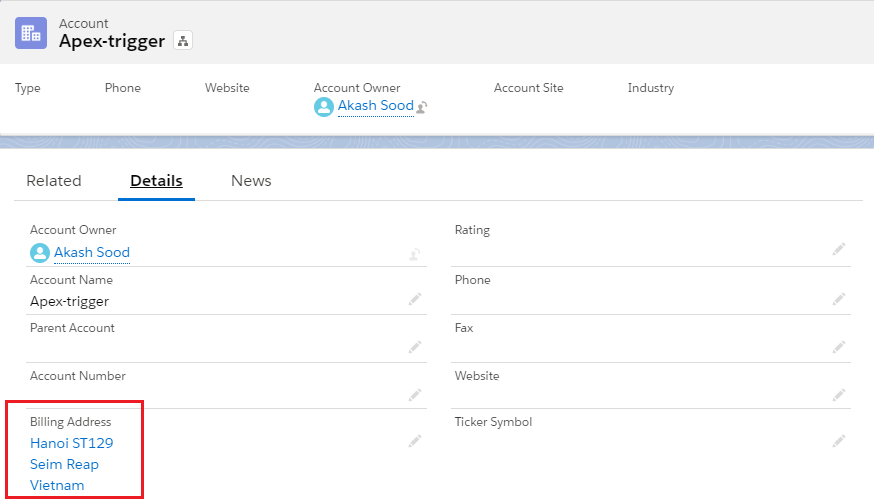
Open SQL Server Now
- Right-click anywhere in Records Section
- Click on Execute SQL
- Congratulation See User Record field is Change/Updated Automatically
