6. How to create an inbound interface using Asynchronous mode with SkyvvaSalesforce Adapter
Overview
This document explains how to create a SKYVVA Inbound Interface in Salesforce that processes incoming record sets through Asynchronous mode — the SkyvvaSalesforce receiver channel's Mode = Asynchronous setting. The adapter sends the whole request to Salesforce in a single call. Salesforce creates one or more IMessage__c records for the payload — one root message plus one child message per node in the hierarchical tree — and, depending on how the interface itself is configured (§1.3), either processes them into Account/Contact records immediately or hands the work to a background job and returns a JobId you can track.
Note:Mode = Asynchronousis not the same thing asProcessing Mode = Asynchronouson the interface record — the two fields share a name but control different things. The CPI channel'sModevalue is what actually selects this processing path; the interface's ownProcessing Modefield is set toAsynchronoushere mainly for consistency with the other tutorials in this series, not because it's what drives dispatch through this channel.
It covers the following steps:
- Create and configure a SKYVVA Inbound Interface in Salesforce, including the field that controls how the request is processed.
- Create an integration flow in SAP CPI.
- Configure the HTTPS sender channel.
- Configure the SKYVVA Salesforce receiver channel with
Skyvva API Version = V3andMode = Asynchronous. - Deploy the integration flow.
- Send a test request from Postman through SAP CPI.
- Monitor the message in SAP CPI.
- Verify the resulting records in Salesforce.
| Item | Value |
|---|---|
| Salesforce Object | Account / Contact (nested) |
| Message Source | Postman |
| Middleware | SAP CPI |
| SKYVVA API Version | V3 |
| Mode | Asynchronous |
| Processing Mode | Asynchronous |
| Inbound Processing Behavior (Interface — the field that actually controls this, §1.3) | (left blank) |
Context Before You Start
In short: Asynchronous mode sends the whole request to Salesforce in one call. Salesforce creates the IMessage__c record(s) for it — one root message plus one child message per node in the hierarchical tree — and then decides how to turn them into Account/Contact records based on the interface's own Inbound Processing Behavior field (§1.3): left blank, it queues a background job and returns a JobId right away, before the records are actually created. Set to Create Message Only, the messages are created and left for separate processing instead.
Reasons to pick this path:
- You want the request itself tracked as its own visible record (
IMessage__c) — useful for auditing/troubleshooting an individual submission — rather than only seeing it inside a shared basket alongside other requests, as Batch and Bulk mode do. - Nothing extra to configure beyond the one field in §1.3 — this is the simplest of the four V3 modes covered across this tutorial series.
- Moderate-volume inbound traffic where per-request traceability matters more than raw throughput.
- Hierarchical (parent-child) payloads too — this tutorial uses the same
Account-with-nested-Contactexample as the Bulk, Auto-Switch, and Batch tutorials, since External Mapping and the Hierarchical Mapping Tool are V3-interface-level features, independent of whichModethe receiver channel uses.
Note: The whole payload is sent through to Salesforce as one call — there's no CPI-side package-size setting for this mode. Processing Package Size on the interface itself still matters, though, since it sizes the background reprocessing job — see §1.3.
End-to-end sequence: the steps below — create and configure the Interface (including the field that controls processing behavior) in Salesforce, build the CPI iFlow (HTTPS sender → SkyvvaSalesforce receiver with Mode = Asynchronous), deploy, send a test payload from Postman, then confirm the resulting records in Salesforce.
POSTMAN
   ↓
SAP CPI (HTTPS Sender → SkyvvaSalesforce Receiver, Mode = Asynchronous)
   ↓
SKYVVA Inbound Interface
   ↓
IMessage__c record(s) created (root + hierarchical children)
   ↓
Background job processes the messages (unless Inbound Processing Behavior = Create Message Only)
   ↓
Salesforce Account / Contact
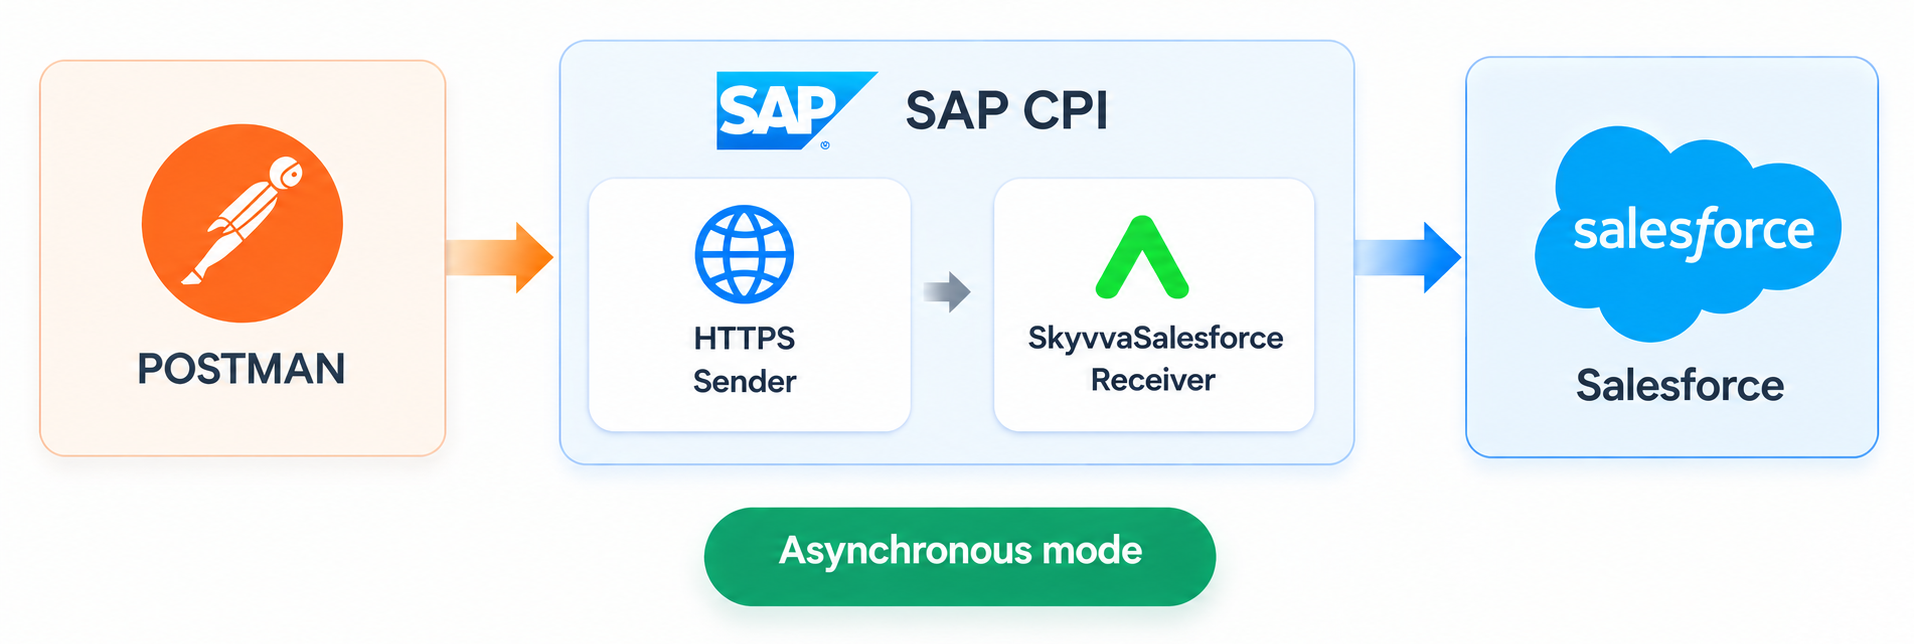
Figure 1: End-to-end message flow using Asynchronous mode.
1. Salesforce Interface Development
1.1 Create the Interface
Create a SKYVVA Inbound Interface under Integration in Salesforce (create the parent Integration record first if you don't already have one).
For this example, create the interface AccountContactAsync_IN. Leave the Message Type field blank. For a V3 Inbound interface, leaving Message Type unset is what triggers Hierarchical Mapping — there is no MetaData Provider/Repository/Message Type hierarchy to build first; the Mapping Tool derives the parent/child tree directly from Salesforce's own schema instead.
Configure the interface:
| Setting | Value |
|---|---|
| Interface Name | AccountContactAsync_IN |
| Integration | Your SAP CPI Integration App record |
| Source/Target Name | Account |
| Status | Deployed |
| Interface Direction | Inbound |
| Processing Mode | Asynchronous |
| Operation Type | Upsert |
| Message Type | (leave blank) |
| External Mapping | Enabled |
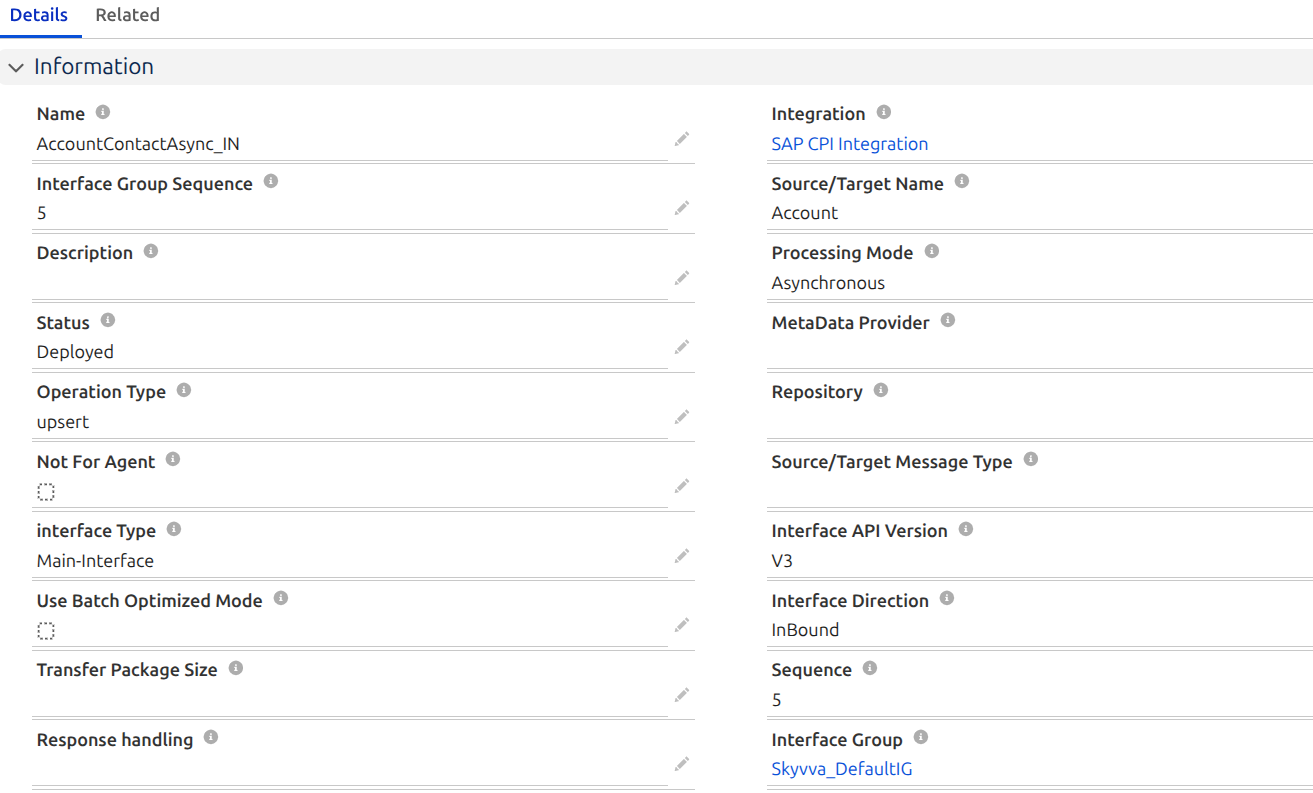 Figure 2: SKYVVA Inbound Interface
 AccountContactAsync_IN, no Message Type linked.
This is the main interface's own Inbound Setup section — with
External Mapping enabled, set Salesforce External ID = skyvvasolutions__ERP_DEBTOR_ID__c, the Account-level external key used to match/upsert Account records:
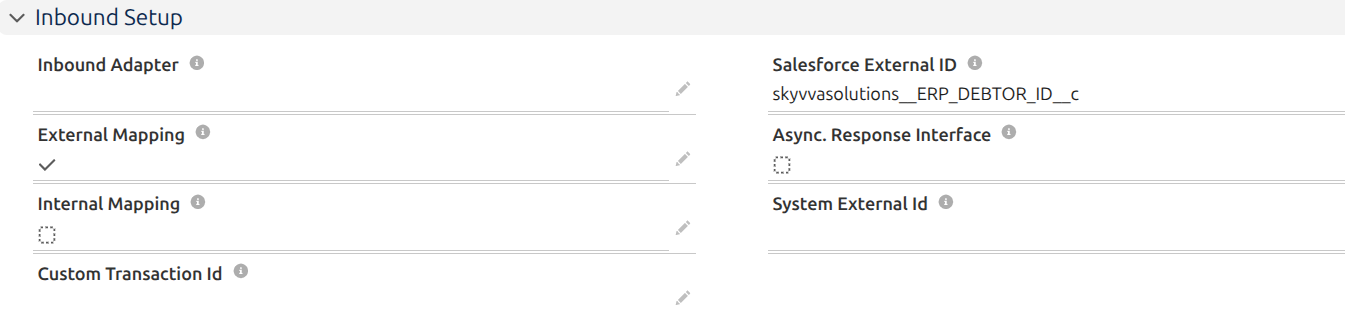 Figure 3: Main interface
 AccountContactAsync_IN — Inbound Setup, External Mapping enabled with Salesforce External ID skyvvasolutions__ERP_DEBTOR_ID__c (Account).
1.2 Map Account → Contact in the Hierarchical Mapping Tool
Open the interface's Mapping Tool (Interface detail page → Open Mapping). Because Message Type is blank on a V3 Inbound interface, the Source tree is built live from the Account object's own schema rather than from a predefined Message Type — including its child relationships. Expand the tree down to the Contact(AccountId) child-relationship node to reach it.
With External Mapping enabled on the interface (§1.1), field-level mapping is not needed — External Mapping auto-maps fields by name on its own. All this step has to do is drag the two relationship nodes, top-down, to generate the chained sub-interface:
- Drag the
Accountroot node onto the targetAccountroot first. This is required, not optional — the target tree doesn't display aContact(AccountId)node at all untilAccountitself has been mapped. Expanding the targetAccountnode beforehand shows only Account's other child relationship nodes (no individual fields are ever listed here — with External Mapping enabled, the tree doesn't expose fields for manual dragging at all), neverContact(AccountId), so there is nothing to drag the child relationship onto until the root mapping is done. - Expand
Contact(AccountId)and drag it onto the targetContact(AccountId)node. No individual field needs to be dragged in either step — this is a node-to-node mapping, not a field-to-field one.
Important — this step is not optional and cannot be replaced by External Mapping alone. Dragging the Contact(AccountId) node auto-creates a chained sub-interface behind the scenes (internal, engine-managed — you don't create or configure it yourself), and that's the actual mechanism that makes the Account+Contact hierarchy work at runtime. External Mapping only flat-maps fields on an interface that already exists; it doesn't create this chained structure or walk into child relationships on its own. Skip this step, and posting nested Contact data will not produce Contact records, no matter how the payload is shaped.
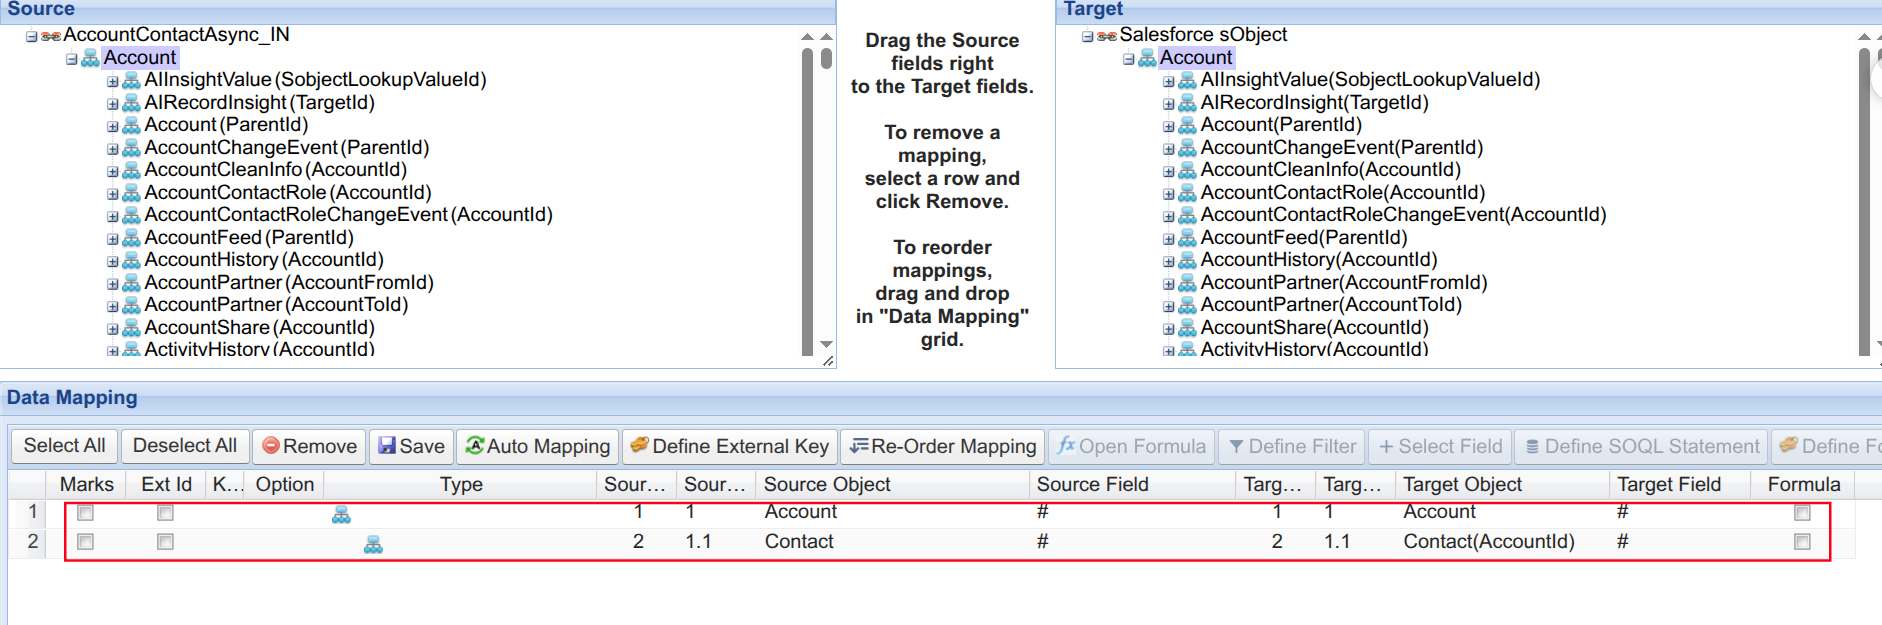
Figure 4: Hierarchical Mapping Tool — Account → Contact(AccountId) node mapping, External Mapping handles field-level mapping.
Save the mapping. Doing so auto-generates the chained sub-interface for the child
Contact object mentioned in the note above. That sub-interface has its own, separate Inbound Setup, with its own External Mapping keyed on the Contact-level external ID — skyvvasolutions__ERP_CONTACT_ID__c, not the Account-level ERP_DEBTOR_ID__c used on the main interface (§1.1). Don't confuse the two: they identify different objects, and the sub-interface's External Mapping has to be checked here independently — it is not inherited from the main interface just because External Mapping is enabled there.
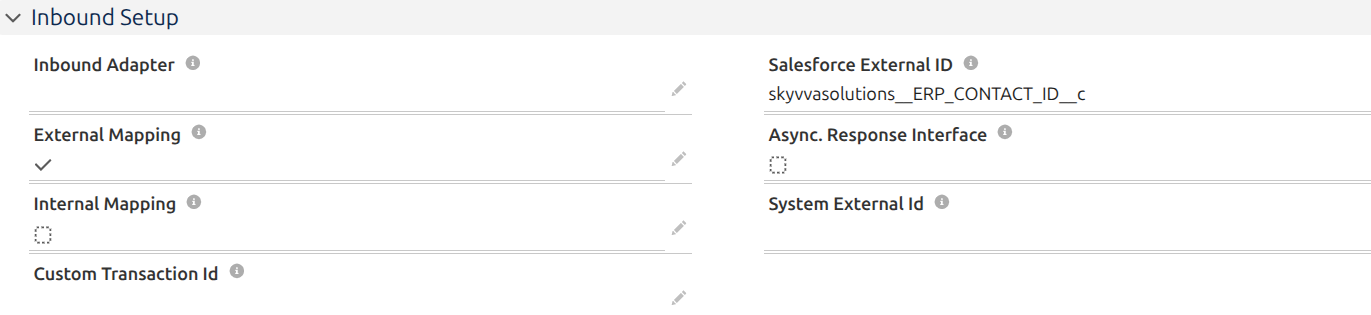
Figure 5: Auto-generated sub-interface (Contact) — Inbound Setup, External Mapping enabled with Salesforce External ID skyvvasolutions__ERP_CONTACT_ID__c (Contact).
1.3 Configure Processing Behavior
In the Basket Setting section of the interface, set the field that controls how this request is processed once the messages are created:
| Field | Value | Why it matters |
|---|---|---|
Inbound Processing Behavior | (leave blank) | This is the field Salesforce actually reads to decide what happens next — it is not overridden by anything on the CPI channel for this mode. Left blank, the request is handed to a background job that processes it after the response is returned, and the response includes a JobId to track it. Set to Create Message Only if you want the messages created but not processed further, left for separate/later handling. |
Note:Processing Package Sizecontrols the batch execution's scope size whenever the background job actually runs as Batch Apex — which is the default execution path for nearly everyInbound Processing Behaviorvalue, including leaving it blank as this tutorial does. Only selectingQueueable Apexspecifically avoids Batch Apex;Create Message Onlyis the only value that skips the background job entirely (see §1.3's table above). SoProcessing Package Sizeis not a niche setting that only matters for one specific selection — it applies to this tutorial's own blank setting too, and is worth configuring deliberately rather than leaving at whatever default your interface template has.
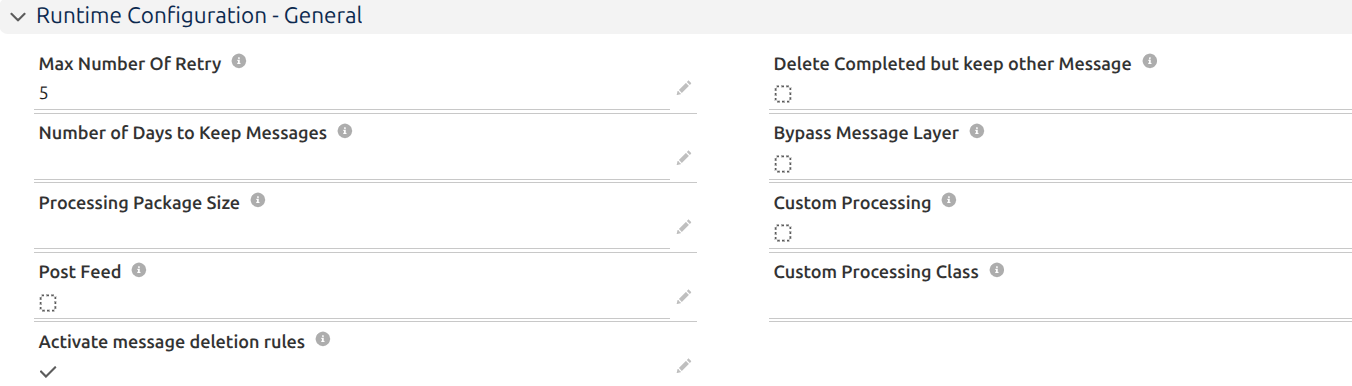
Figure 6: Interface Basket Setting — Inbound Processing Behavior.
After completing the configuration and mapping in Skyvva, save the interface.
2. SAP CPI Development
2.1 Create the Integration Flow
Create the package in SAP CPI under Design and add the integration flow.
Example:
| Item | Example |
|---|---|
| Integration Package | Skyvva Salesforce Adapter Testing |
| Integration Flow | AccountContact_Skyvva_Asynchronous |
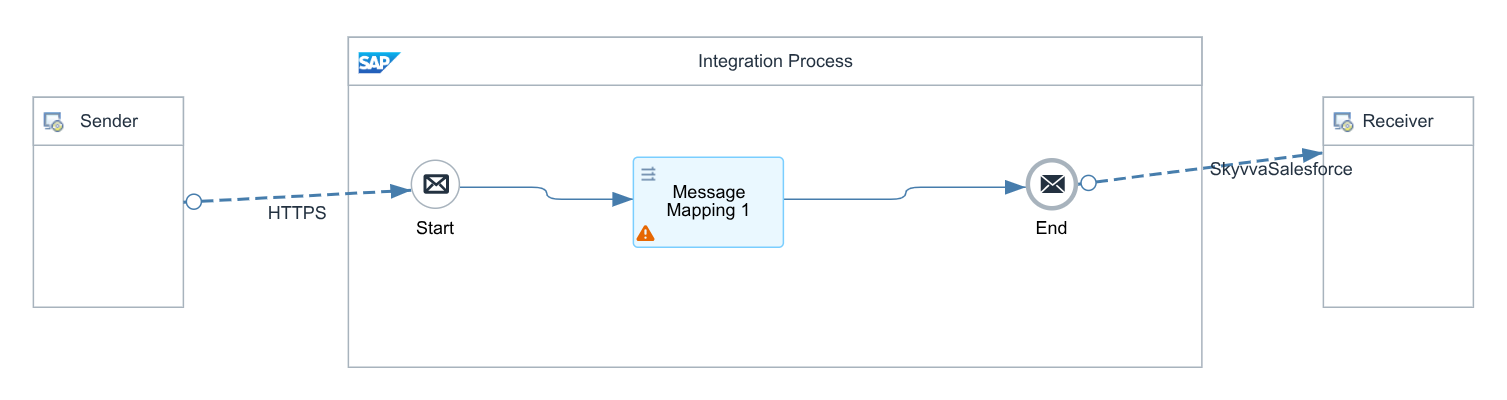
Figure 7: Integration flow for the Asynchronous mode example.
Important: the Message Mapping step may show a warning icon. Hovering it reveals: "Http Sender Component may not pass XML or JSON message to Message Mapping. Message Mapping supports XML or JSON input only." This is CPI's design-time validator flagging that it can't statically prove the HTTPS Sender's output is XML/JSON — the standard HTTPS Sender adapter has no fixed content-type contract, so CPI can't guarantee it at design time. It's not about incomplete field mapping, and it doesn't block deployment: this exact flow deploys and runs successfully despite it. Safe to leave as-is as long as callers actually send XML/JSON matching Request Format, as this tutorial's Postman example does.
Where the target schema comes from: export it via the Interface record's Generate MetaData button — Format = XSD Schema, API = V3/Integrate. Then, inside the Message Mapping step's own editor (double-click it on the iFlow canvas), go to the Target panel → Select → Add → upload the downloaded .xsd → pick its root element as the Target Message Type. The file is stored as a resource on this specific integration flow, not somewhere interface/adapter-level or CPI-wide — any other iFlow needing it has to import its own copy.
Note: this interface uses External Mapping withMessage Typeleft blank, so the exported schema comes from a live object describe rather than a curated tree — confirm it reflects the nestedAccount→Contactstructure before relying on it.
2.2 Configure the HTTPS Sender Channel
Select the standard SAP HTTPS sender adapter.
General tab: Direction Sender, Adapter Type HTTPS, Transport Protocol HTTPS, Message Protocol None — fixed values, identical in every tutorial that uses this sender.
Connection tab:
| Field | Example value |
|---|---|
| Address | /skyvva/AccountContactIntegrateAsynchronousV3 |
| Authorization | User Role |
| User Role | ESBMessaging.send |
| CSRF Protected | Unchecked |
Important: The configured User Role must already exist and be assigned to the CPI user/credential that Postman authenticates as, or the sender rejects the request with 403 Forbidden.
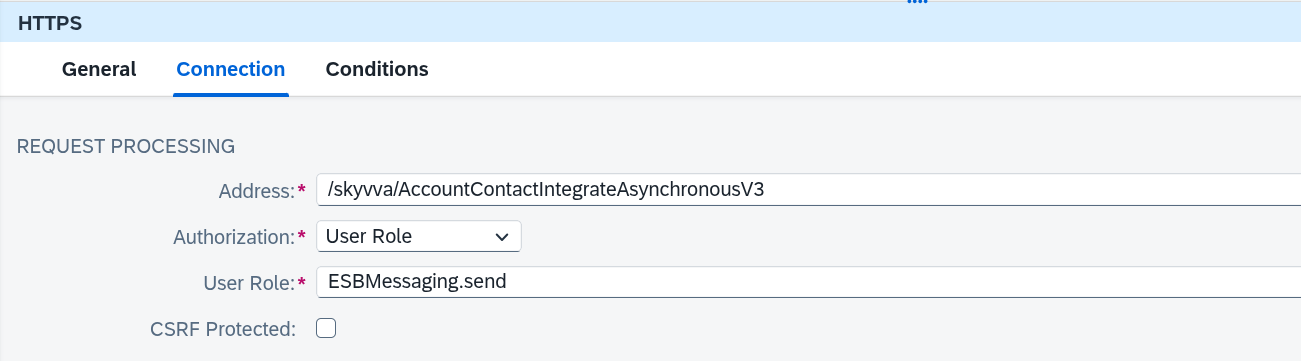
Figure 8: HTTPS sender channel — Connection tab.
2.3 Configure the SkyvvaSalesforce Receiver Channel
Select SkyvvaSalesforce as the receiver adapter. The receiver channel has three tabs: General, Connection, Processing.
General tab: Direction Receiver, Adapter Type SkyvvaSalesforce, Transport Protocol https, Message Protocol skyvva — fixed values, identical for every SkyvvaSalesforce receiver channel.
2.3.1 Connection Tab
| Field | Example value |
|---|---|
| Authentication Type | OAuth2 |
| OAuth2 Flow | Username-Password Credential (or Client Credential) |
| Login Url | https://test.salesforce.com |
| User Credential | Your CPI Security Material alias for the Salesforce user (shown only for the Username-Password flow) |
| Client Credential | Your CPI OAuth2 Client Credentials artifact (required for either flow) |
Note: There is no separate "Client Id"/"Client Secret" pair on the current adapter — both are held inside the single Client Credential OAuth2 artifact deployed in the CPI keystore. For the full field reference see 1. SKYVVA CPI Salesforce Receiver Adapter in SAP Cloud Integration.md §3.
2.3.2 Processing Tab — Request Settings
This tab opens with Processing Type, set to Skyvva by default — leave it as-is. It switches between this tutorial's field set and a separate, license-free "Salesforce" processing mode (native REST/Bulk/Streaming APIs, no Skyvva managed package required), which this tutorial doesn't cover. With Processing Type = Skyvva, the rest of this section's fields appear below it:
| Field | Value |
|---|---|
| Skyvva API Version | V3 |
| Integration | Your SKYVVA Integration |
| Interface | AccountContactAsync_IN |
| Mode | Asynchronous |
| Processing Behavior | None (leave at default — see note below) |
| Request Format | XML |
| Response Format | XML |
| Skyvva App Version | your Salesforce package version, e.g. 2.51.0 |
| Salesforce Api Version | 59.0 (or your org's current API version) |
Note:Processing Behavioron this channel has no effect on this mode — the field that actually controls processing is the interface's ownInbound Processing Behavior(§1.3). LeaveProcessing Behaviorat its default here.
Note: enter your org's actual installed package version inSkyvva App Version— don't copy the example2.51.0literally unless that really is your package version.
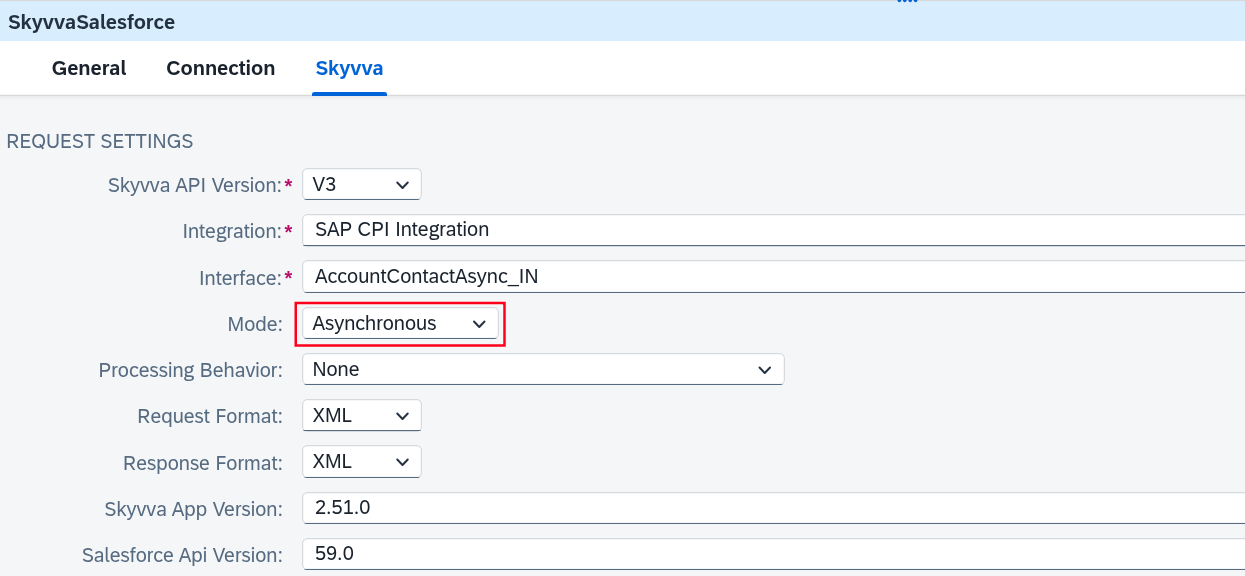
Figure 9: SkyvvaSalesforce receiver channel — Processing tab, Mode = Asynchronous.
2.3.3 Processing Tab — Adapter Settings
| Field | Value |
|---|---|
| Logging option | Default |
| Enable retry for fatal connectivity errors | Unchecked (leave disabled for this test) |
| HTTP client timeout (sec) | 60 |
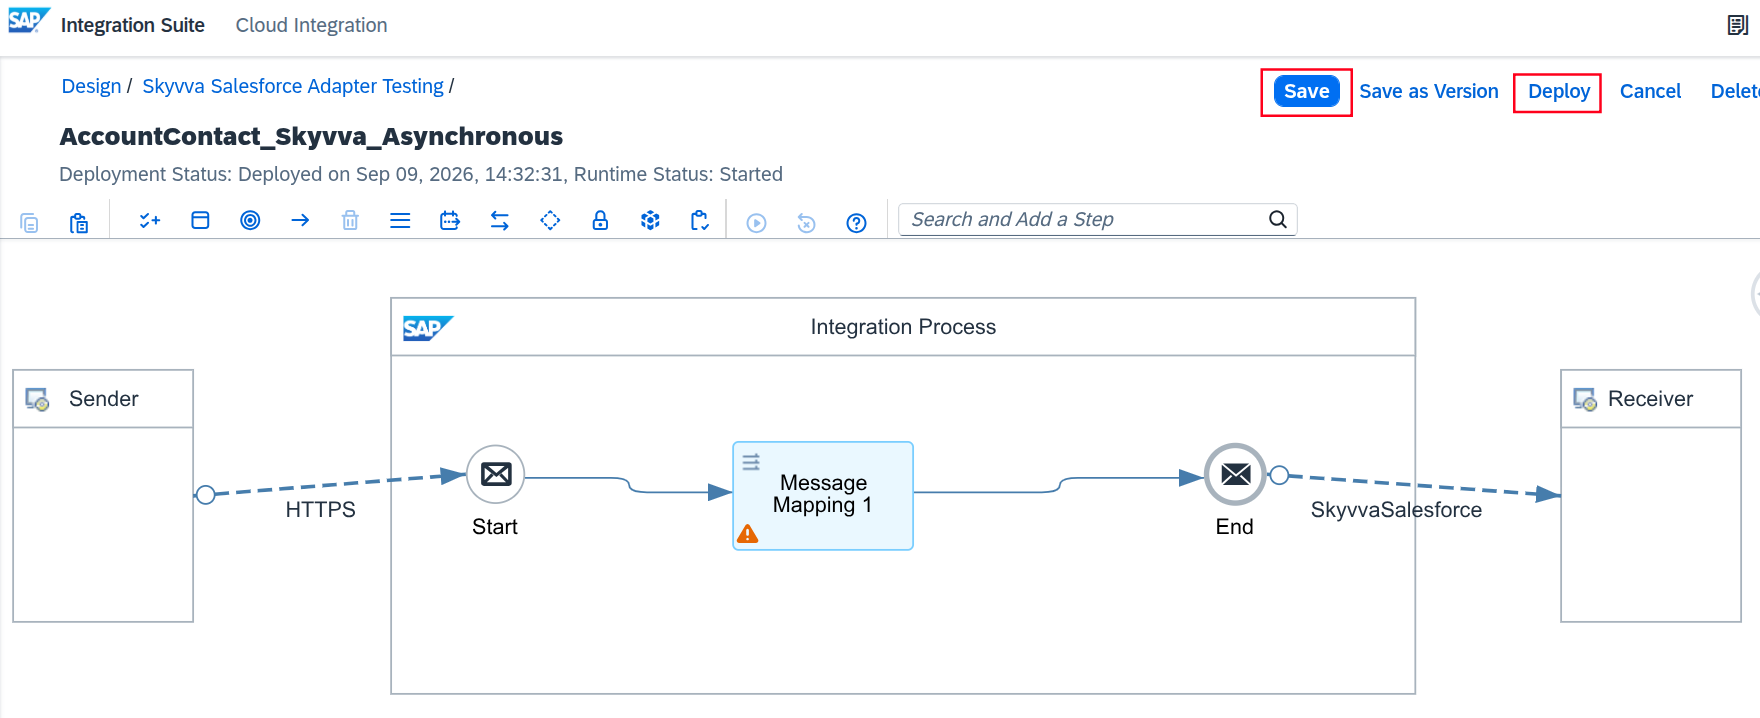
Figure 10: Integration flow deployed.
2.4 Get the SAP CPI Endpoint URL
Go to CPI → Monitoring → Manage Integration Content, locate the deployed integration flow, and copy its endpoint URL.
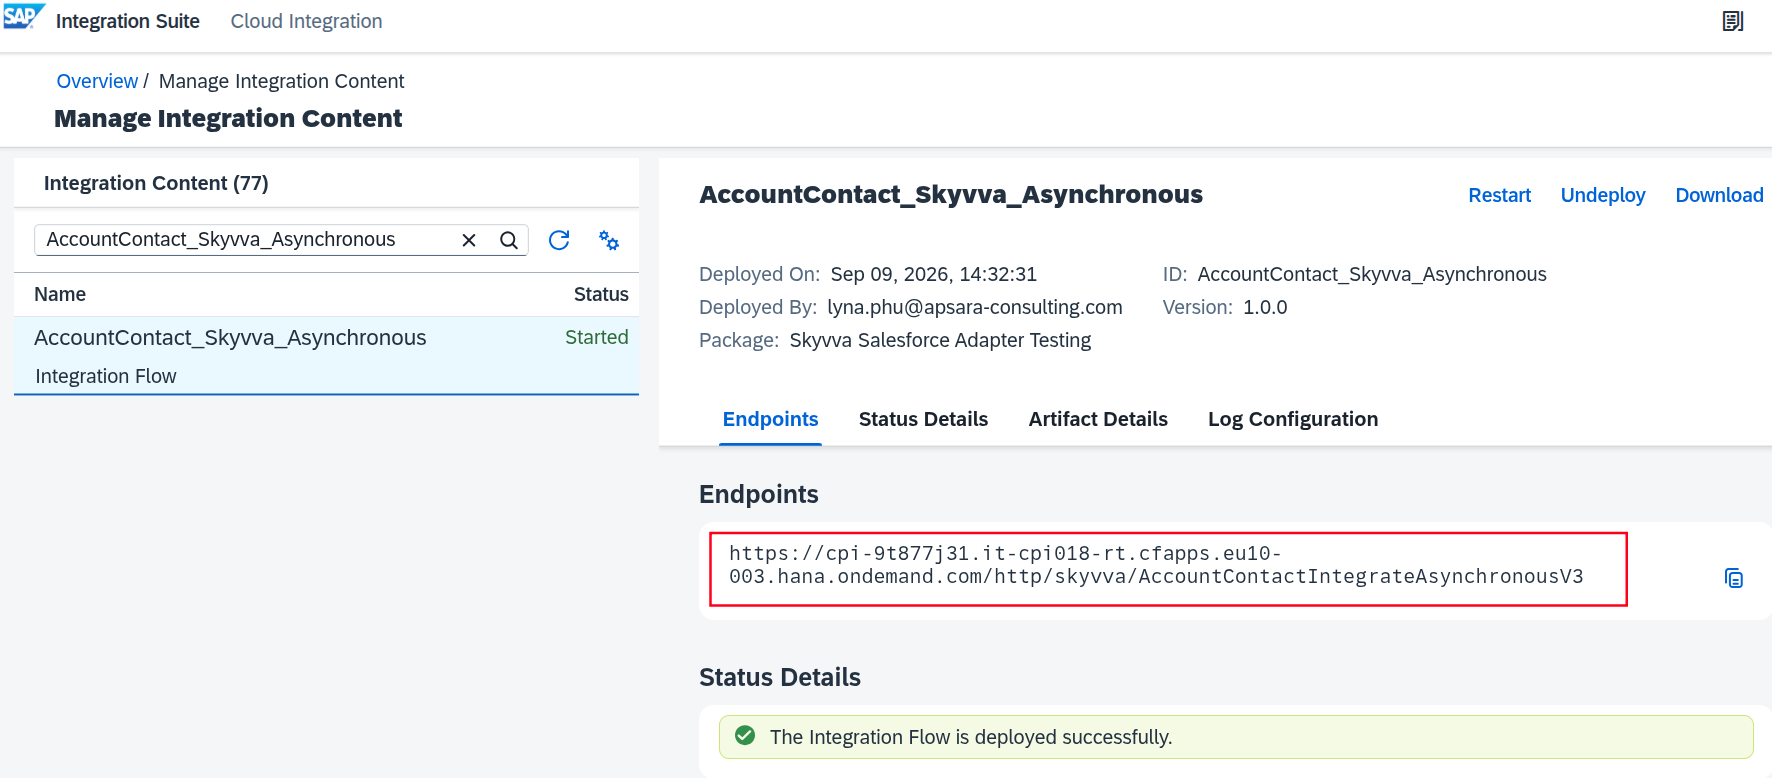
Figure 11: Manage Integration Content — endpoint URL.
Note: The endpoint URL shape depends on the tenant generation — Neo tenants usehttps://{{TenantId}}-iflmap.hcisbp.<region>.hana.ondemand.com/http/<Address>, current SAP BTP Integration Suite (Cloud Foundry) tenants usehttps://{{TenantId}}.<runtime-cluster>.cfapps.region>.hana.ondemand.com/http/<Address>. Always copy the exact URL from your own tenant's Manage Integration Content panel rather than assembling it by hand.
3. Testing with Postman
Use the endpoint URL from step 2.4.
Create a new request with the following configuration:
| Setting | Value |
|---|---|
| Method | POST |
| URL | Your SAP CPI endpoint URL |
| Authorization | Authentication configured for the HTTPS Sender |
| Content-Type | Match the configured Request Format |
Request Format = XML
configure the header as:
Content-Type: application/xml
Note: For a small test payload, use Postman's raw body mode and paste the XML directly — the dropdown next toraw(Text/JSON/XML/…) sets theContent-Typeheader for you automatically. For a large payload, pasting that much text into the raw editor isn't practical; use Body → binary instead, select the XML file from disk, and set theContent-Type: application/xmlheader yourself on the Headers tab — binary mode has no type dropdown of its own, so nothing sets it for you. The file content sent is identical either way; only how you attach it to the request differs.
Because this interface's hierarchical shape (Account with nested Contact records, external IDs skyvvasolutions__ERP_DEBTOR_ID__c/skyvvasolutions__ERP_CONTACT_ID__c) is the same shape used in the Bulk, Auto-Switch, and Batch tutorials, the same sample payload works here too — the only difference is which interface it's addressed to, resolved on the CPI side via the receiver channel's Interface field (§2.3.2), not from anything in the body itself:
<?xml version="1.0" encoding="UTF-8"?>
<Accounts>
  <Account>
    <ERP_DEBTOR_ID__c>ACC-000001</ERP_DEBTOR_ID__c>
    <Name>CPI Test Account 1</Name>
    <Phone>+49-89-2867825</Phone>
    <BillingStreet>CPI Test Street</BillingStreet>
    <BillingCity>Frankfurt</BillingCity>
    <BillingPostalCode>42098</BillingPostalCode>
    <BillingCountry>DE</BillingCountry>
    <Contact>
      <ERP_CONTACT_ID__c>ACC-000001-C01</ERP_CONTACT_ID__c>
      <FirstName>Max</FirstName>
      <LastName>Mueller</LastName>
      <Email>max.mueller.1.1@example.com</Email>
      <Phone>+49-89-2719583</Phone>
    </Contact>
    <!-- ... more Contact elements for this Account ... -->
  </Account>
  <!-- ... more Account elements, same shape ... -->
</Accounts>
With Inbound Processing Behavior left blank (§1.3), a successful call returns a response listing the message(s) this request created, with a JobId you can use to track the background job.Captured below testing this tutorial with 150 Account records, each with 10 nested Contact records, sent via Body → binary:
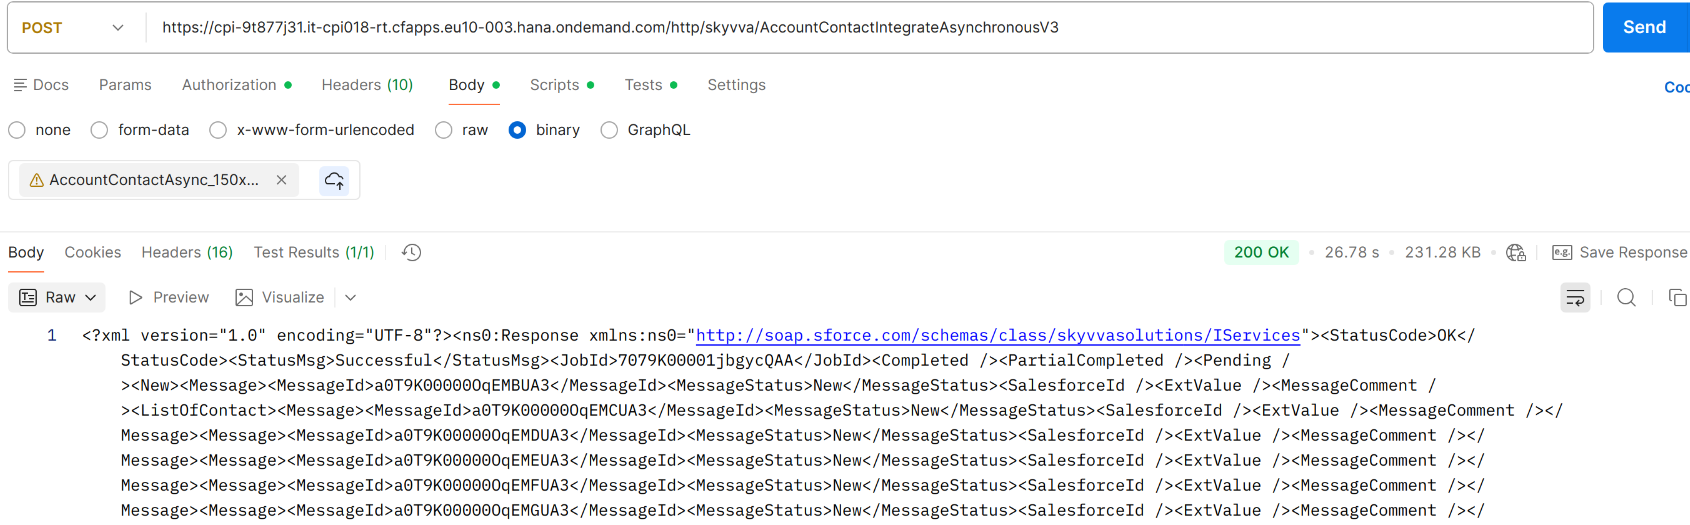
Figure 12: POSTMAN request (150 Accounts × 10 Contacts, binary body) and response.
<?xml version="1.0" encoding="UTF-8"?>
<ns0:Response xmlns:ns0="http://soap.sforce.com/schemas/class/skyvvasolutions/IServices">
  <StatusCode>OK</StatusCode>
  <StatusMsg>Successful</StatusMsg>
  <JobId>7079K00001jbgycQAA</JobId>
  <Completed/>
  <PartialCompleted/>
  <Pending/>
  <New>
    <Message>
      <MessageId>a0T9K000000qEMBUA3</MessageId>
      <MessageStatus>New</MessageStatus>
      <SalesforceId/>
      <ExtValue/>
      <MessageComment/>
    </Message>
    <ListOfContact>
      <Message><MessageId>a0T9K000000qEMCUA3</MessageId><MessageStatus>New</MessageStatus><SalesforceId/><ExtValue/><MessageComment/></Message>
      <!-- ... one Message element per created record ... -->
    </ListOfContact>
    <!-- ... one such group per created IMessage__c record (root + hierarchical children) ... -->
  </New>
</ns0:Response>
JobId identifies the background job the messages were queued under; every message is still listed under <New> because the HTTP response returns as soon as the job is queued, before it has actually run. Confirm the real outcome in SAP CPI → Monitor Message Processing (§4.1) and Salesforce → Message Monitoring (§4.2) rather than relying on the response body alone.
4. Monitoring
4.1 SAP CPI
Go to CPI → Monitor → Monitor Message Processing and verify the message completed successfully.
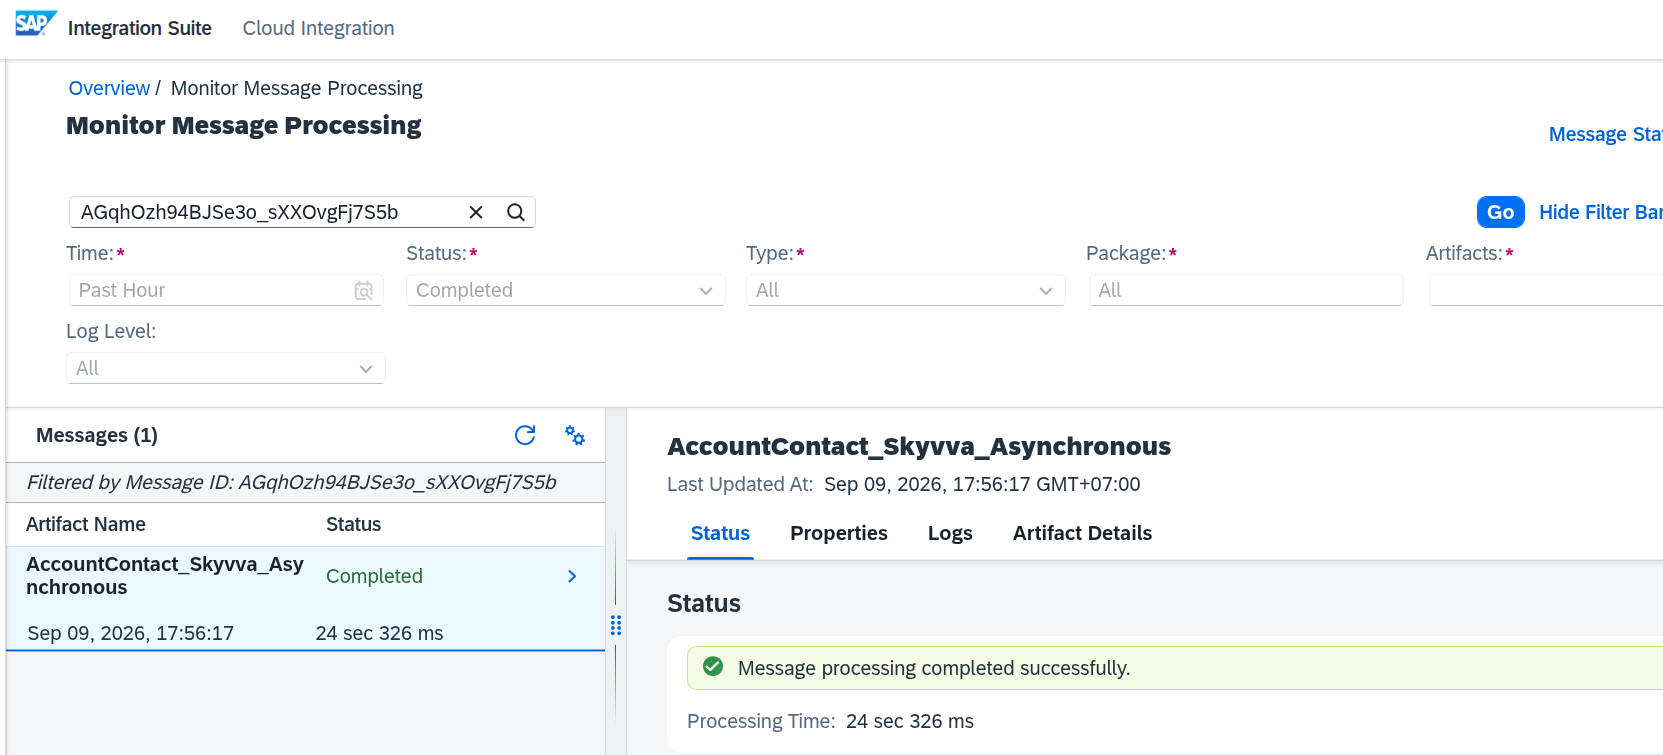
Figure 13: CPI Monitor Message Processing.
4.2 Salesforce
Go to Salesforce → Message Monitoring to confirm the message and resulting Account/Contact records.
Unlike Batch and Bulk mode, Asynchronous mode doesn't queue a basket in the Batch Control Board or Bulk Control Board at all — the underlying IMessage__c record(s) are created right away, and Salesforce processes them via the background job described above. This tutorial doesn't trace a dedicated Salesforce-side UI specifically for browsing IMessage__c records beyond Message Monitoring — if your org has one, use it, but its existence isn't verified here.
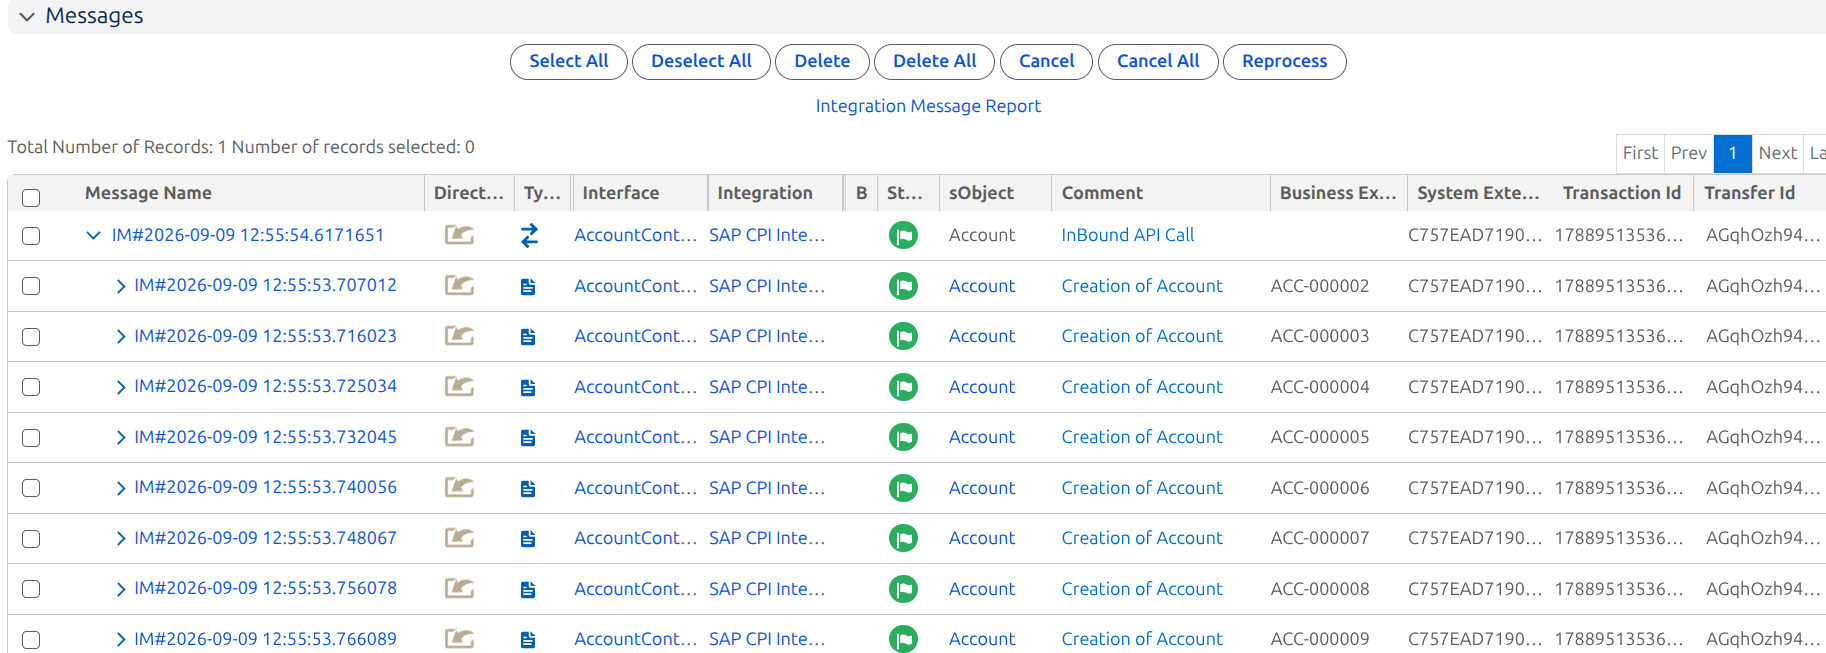
Figure 14: Salesforce Message Monitoring — processed message.
After confirming the message, verify that the Account and Contact records were created or updated successfully.
Summary
The complete integration flow is:
POSTMAN
   ↓
HTTPS Sender
   ↓
SAP CPI Integration Flow
   ↓
SkyvvaSalesforce Receiver (Mode = Asynchronous)
   ↓
SKYVVA Inbound Interface
   ↓
IMessage__c record(s) created (root + hierarchical children)
   ↓
Background job processes the messages (unless Inbound Processing Behavior = Create Message Only)
   ↓
Salesforce Account / Contact
Configuration Summary
| Component | Configuration |
|---|---|
| SKYVVA Interface | Inbound, Asynchronous, Upsert |
| Inbound Processing Behavior (Interface) | (left blank — this is what actually controls processing, see §1.3) |
| Processing Behavior (CPI channel) | None — no effect on this mode, leave at default |
| SKYVVA API Version | V3 |
| Mode | Asynchronous |
| Request/Response Format | XML |
IMessage__c record rather than folding it into a shared basket. Whether that record is processed
immediately or handed to a trackable background job (returning a JobId) is controlled entirely by the interface's own Inbound Processing Behavior field — not by anything on the CPI channel.