68. Different ways to add custom logic for the inbound processing.
Learning Objective: After completing this unit, you’ll be able to:
- Describe custom apex class.
- Comfortably use the apex class to implement the custom processing integration.
Introduction
There are different possibilities for inbound custom processing. To process structured, unstructured,raw data we can use custom processing.
What are the different way to use custom processing?
Apex class is used for custom processing. There are four different ways to inbound custom processing:
- Custom Processing Apex Class with old way.
- Pass raw data to custom class for processing.
- Operation type - apex class
- Custom Processing with very flexible way to add custom logic at any place.
Basic Processing Steps:
[aux_code language="javascript" theme="tomorrow" title="" extra_classes=""] Message -> Workflow -> Mapping -> Operation
[/aux_code] In Custom Processing with old way: we always response to give back the message type structure which contain the Salesforce Id and SKYVVA message Id. Customer need to write the complete code for all processing steps Pass raw data to custom class for processing: When we get unstructured data which are not xml, csv or json at that time we need to create custom class . The data can be raw text and do not follow any format. Therefore we cannot parse and create messages. In this case, we pass the raw data to the customer class and the custom class will do everything itself e.g. parse the data, create and post messages. Operation type - apex class: In new version we added new Operation type = Apex class. which is to execute the posting processing after the mapping step Custom Processing with new way: This replace the old way completely and we are very flexible to add custom logic at any place. Customer has the possibility to plug-in between the step or replace the different SKYVVA step. Difference between processing ways:
- In old way, we can process structured data whereas in pass raw data we can process Boolean, unstructured, word data.
- In old way, we can map the field (it is not mandatory) whereas in pass raw data we can't map the fields as it has no structured data.
- In custom class in old way need t have code for all step himself where in operation type - apex class, need t have code only for operation step. for example replace our standard CRUD operation by apex class.
- Custom processing in v3 is very flexible. This replaced the old way completely and we are very flexible to add custom logic at any place.
1. Inbound custom processing implementation with apex class
To extend some functions of integrate inbound processing extends skyvvasolutions.IProcessCustomAbs and implements skyvvasolutions.GisOdbgIntegration.IProcess Methods are order process integration of custom processing and could be overridden if required
- void init(String interfaceId) – Select interface based on interfaceId, It can be optional.
- void doMap(skyvvasolutions.IServicesUtil.IMessageResult iResult) – Manage apex mapping data available in iResult which order list of skvva messages and list Map
- List
upsert2() – DML operation, upert business record and update status of message based on result of upsert business record (ie. Upsert Account).
follow the given steps to use apex class: Step1: Create apex class
- Go to set up-> Search for apex class in quick search box-> Click on new button
[su_box title="Warning" box_color="#F7DC6F" title_color="#000000"]“Custom Processing Class”: provide full name of your custom processing class (including namespace if any). Format: [namespace.]classname eg: namespaceX.ClassX (if there is namespace in the salesforce instance) or ClassX (if no namespace)[/su_box] Step 2: Create Integration Step3 : Create Interface
- Go to integration
- select interface tab and click on new Interface button.
- Scroll down the page to Runtime Configuration- general section.
- Check custom processing flag
- Select custom processing class. Here class is SKYVva_CustomIntegration

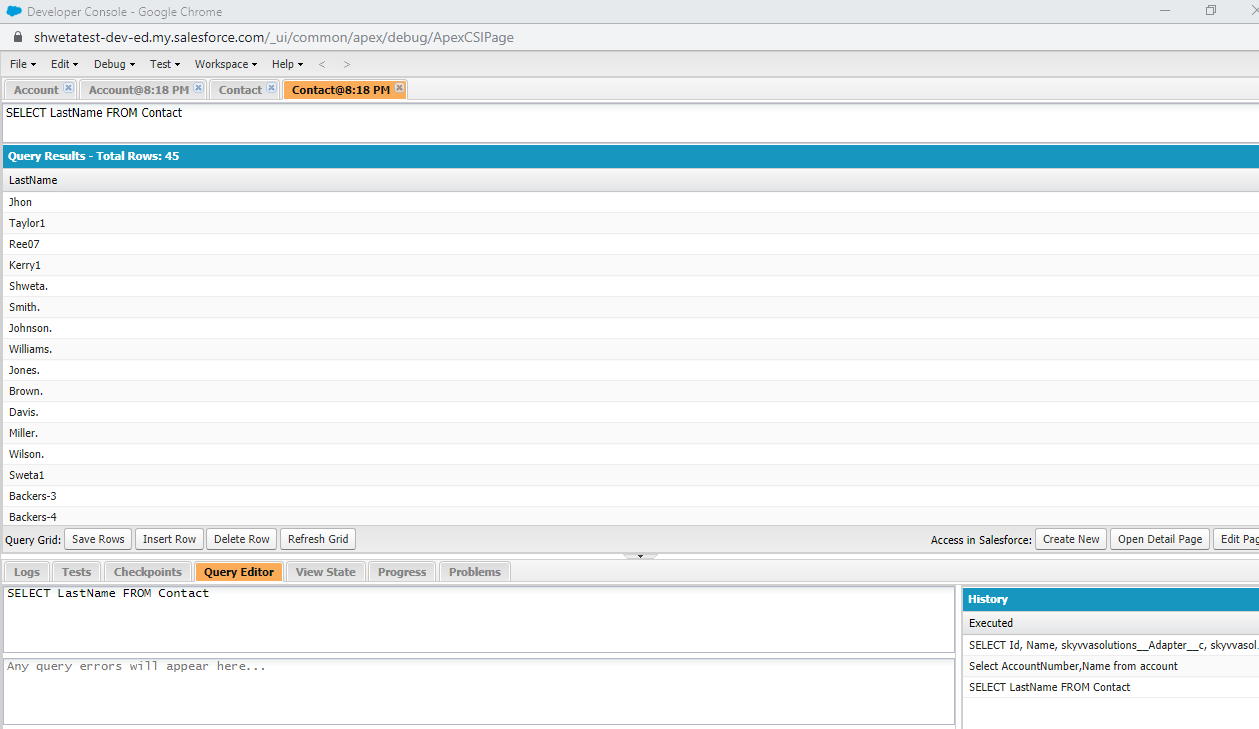
[su_box title="Note" box_color="#2a8af0" title_color="#000000"]“Custom Processing” checkbox: indicates if the interface uses the custom-processing implementation[/su_box] Step4 : Do mapping. Step5: upload data manually Step6: Check result on message board You can not see related to link here to check detail as this interface is used custom processing. Step7: Check uploaded record and its details on dev console.
2. Pass raw data to custom class for processing with custom code
When we get unstructured data which are not xml, csv or json at that time we need to create custom class . The data can be raw text and do not follow any format. Therefore we cannot parse and create messages. In this case, we pass the raw data to the customer class and the custom class will do everything itself e.g. parse the data, create and post messages. The unstructured data are for example binary data, windows ini file etc. Step1: Create Integration Step2: Create Interface
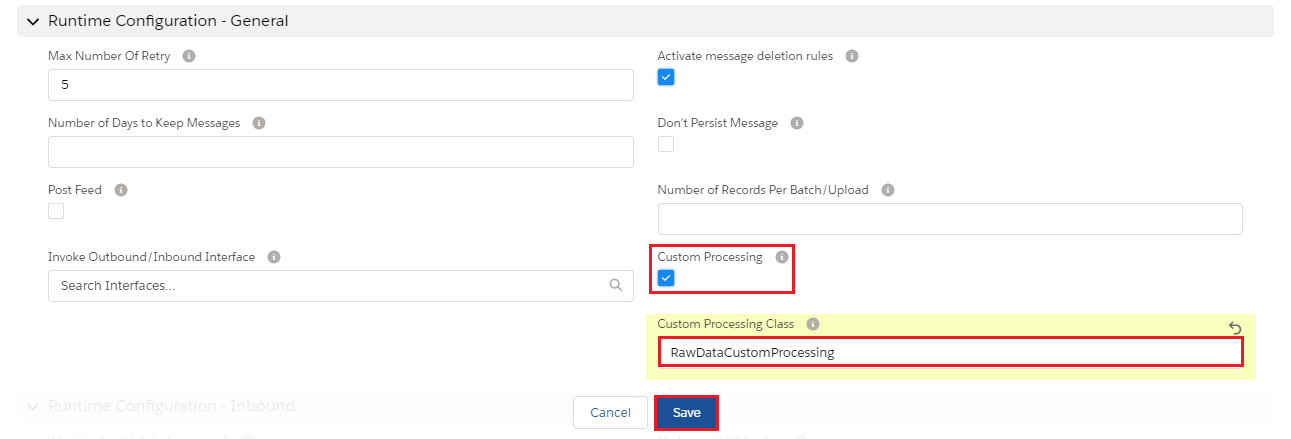
- In Runtime Configuration Section of Interface page we need to select two things which are shown in picture given below :-
- We need to tick Custom Processing.
- And need to enter Custom Processing class.
 Step3. Create custom class
- The custom code is given below to pass raw data to custom class:-
[aux_code language="javascript" theme="tomorrow" title="" extra_classes=""] **public with sharing class RawDataCustomProcessing extends AbstractIntegrationV3 { public override String messageProcessing(){ System.debug('>>>>>>RawDataCustomProcessing>messageProcessing>dtoRequestBody: '+dtoRequestBody); //do raw data in dtoRequestBody return 'ok'; } public override IServicesUtil.IMessageResult createMessage(AbstractIntegrationV3.DtoRequestBody dtoRequestBody, AbstractIntegrationV3.DtoStructure dtoStr){ return null; } } **[/aux_code]
4. Call Webservice:
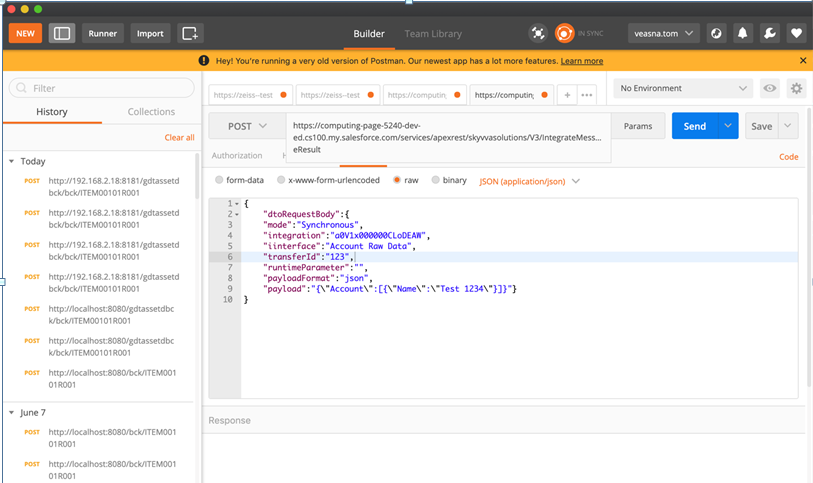
- After call Webservice, it will pass raw data to messageProcessing method.
- After that, user can use this raw data to do with their complex logic that they want.
3. How to use Operation type = Apex class to custom processing ?
In Apex, user can define top-level classes (also called outer classes) as well as inner classes, that is, a class defined within another class. You can only have inner classes one level deep. follow the given steps to use apex class: Step 1: Create Integration Step 2: Create interface
- Select operation Type: Apex class from drop down -> Save
Step 3: Create this class is used for Apex Custom class on Interface and Click on wrench icon and click on Setup.
- Create this class is used for testing operation type Apex
- Go to Interface Detail Page -> Select TestCustomApexClass -> Save
- Scroll down to Mapping Section -> Select Ext ID -> Save
Step4: Upload data manually.
- Go to Integration Detail Page -> Select Manual Load
- Select all records -> Press Push button
- Go to Message Board -> Search for result
- Scroll down to Message section
- See status Green Flag which means user inbound apex class operation successfully
- All records are integrated with Salesforce Org.
