9. How to create an inbound interface using Salesforce Bulk mode with SkyvvaSalesforce Adapter
Overview
This document explains how to create a SKYVVA Inbound Interface in Salesforce that loads high-volume flat record sets through Salesforce Bulk mode — the SkyvvaSalesforce receiver channel's Mode = Salesforce Bulk setting. Unlike Skyvva Bulk mode (covered in an earlier tutorial in this series), which uses SKYVVA's own basket engine, this mode routes records directly through Salesforce's own native Bulk API — the same mechanism tools like Salesforce Data Loader use for large data loads.
Note:Salesforce BulkandSkyvva Bulkare the two bulk-capable values on the receiver channel'sModefield, and they are not interchangeable.Skyvva Bulkroutes records into SKYVVA's own basket/mapping engine;Salesforce Bulkhands them directly to Salesforce's native Bulk API job for the target object, with no SKYVVA basket step in between. PickSalesforce Bulkspecifically when you want Salesforce's own Bulk API to own the load.
Note: This mode loads one Salesforce object per interface (for example, Account on its own) — it does not support the parent-child hierarchical mapping (Account with nested Contact records) used elsewhere in this series, since Salesforce's Bulk API processes one object type per job.
It covers the following steps:
- Create and configure a SKYVVA Inbound Interface in Salesforce for Salesforce Bulk processing.
- Create an integration flow in SAP CPI.
- Configure the HTTPS sender channel.
- Configure the SKYVVA Salesforce receiver channel with
Skyvva API Version = V3andMode = Salesforce Bulk. - Deploy the integration flow.
- Send a test request with a large record set from Postman through SAP CPI.
- Monitor the Bulk job and message in SAP CPI and Salesforce.
- Verify the resulting records in Salesforce.
In this example:
| Item | Value |
|---|---|
| Salesforce Object | Account (flat, no nested records) |
| Message Source | Postman |
| Middleware | SAP CPI |
| SKYVVA API Version | V3 |
| Mode | Salesforce Bulk |
| Processing Mode | Asynchronous |
| Bulk Processing Mode (Interface) | Parallel |
Context Before You Start
In short: Salesforce Bulk mode hands the incoming records to Salesforce's own Bulk API as a job, split into batches automatically. Salesforce processes that job on its own schedule — this isn't instant the way a normal request/response call is. A background process in the adapter keeps checking the job's status, and once Salesforce finishes it, writes back one Message record per processed record — not a single aggregate summary — by submitting its own Bulk API job against the Message object.
Reasons to pick this path:
- You're loading a large, flat record set (thousands of records) and want Salesforce's own Bulk API — the same one Salesforce Data Loader uses — to own the load, rather than SKYVVA's own bulk engine.
- You don't need SKYVVA's own mapping/workflow engine involved in how the batch gets uploaded — just a direct load into the target object.
Good fit for:
- Large, flat (single-object) data loads where per-record synchronous confirmation isn't needed.
- Cases where you specifically want the load to show up as a native Salesforce Bulk Data Load Job, not inside SKYVVA's own Bulk Control Board.
Note: Because completion depends on a background process continuously checking the job, a request going through this mode should not be expected to finish by the time the CPI response comes back — always confirm the final result in Monitoring rather than assuming the initial response means the records already exist.
End-to-end sequence: the steps below — create and configure the Interface in Salesforce, build the CPI iFlow (HTTPS sender → SkyvvaSalesforce receiver with Mode = Salesforce Bulk), deploy, send a test payload from Postman, then confirm the resulting records in Salesforce.
POSTMAN
   ↓
SAP CPI (HTTPS Sender → SkyvvaSalesforce Receiver, Mode = Salesforce Bulk)
   ↓
SKYVVA Inbound Interface
   ↓
Salesforce Bulk API job (batched automatically)
   ↓
Background job checker confirms completion
   ↓
Salesforce Account records + one Message record per processed record
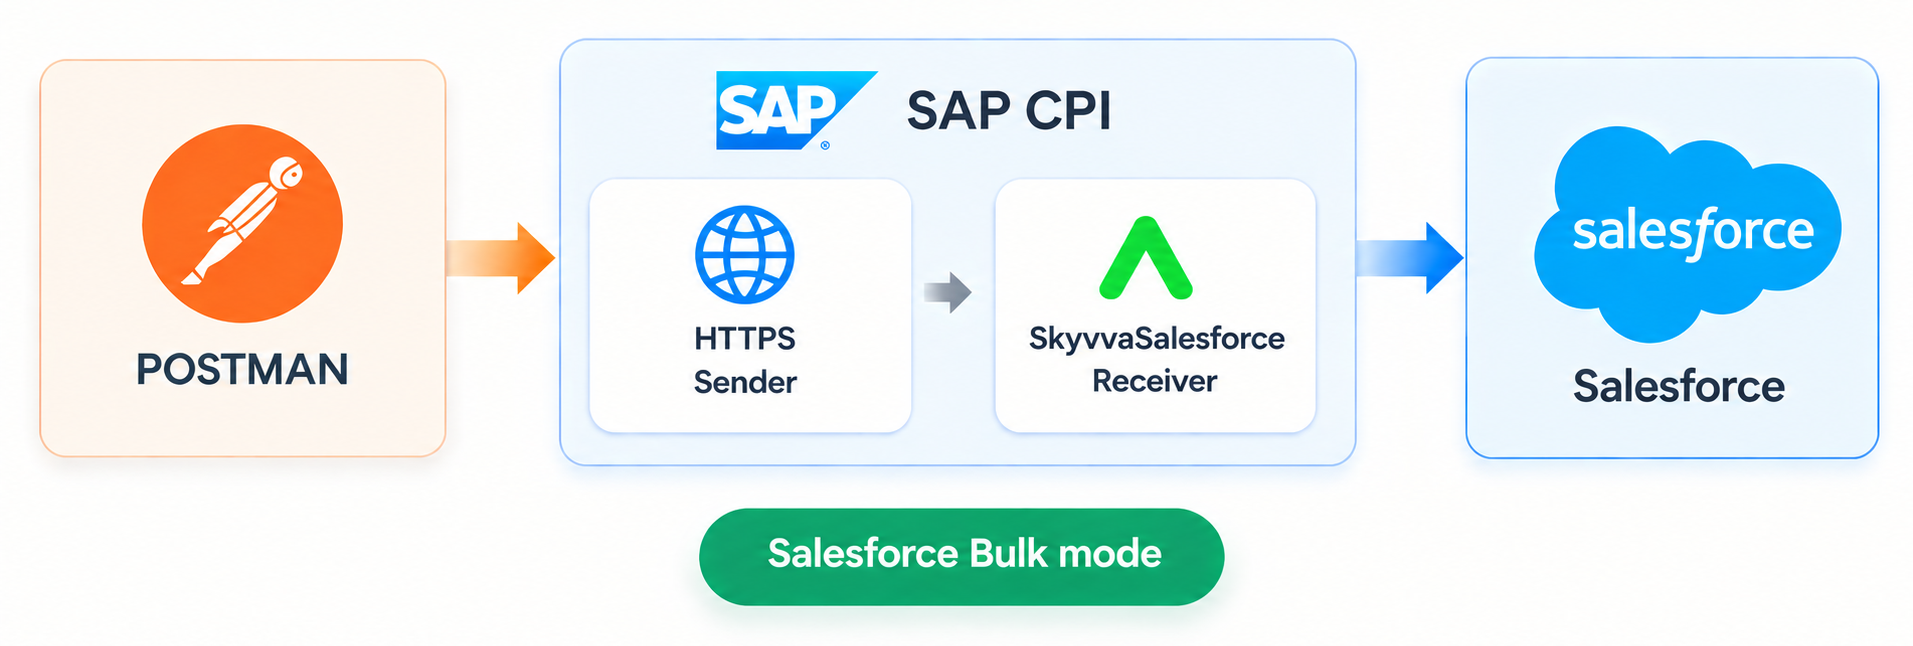
Figure 1: End-to-end message flow using Salesforce Bulk mode.
1. Salesforce Interface Development
1.1 Create the Interface
Create a SKYVVA Inbound Interface under Integration in Salesforce (create the parent Integration record first if you don't already have one).
For this example, create the interface AccountSalesforceBulk_IN. Since this mode loads a single flat object, there's no hierarchical mapping step for this interface — configure it the same way you would for a normal Account-only interface.
Configure the interface:
| Setting | Value |
|---|---|
| Interface Name | AccountSalesforceBulk_IN |
| Integration | Your SAP CPI Integration App record |
| Source/Target Name | Account |
| Status | Deployed |
| Interface Direction | Inbound |
| Processing Mode | Asynchronous |
| Operation Type | Upsert |
| Message Type | (leave blank) |
| External Mapping | Enabled |
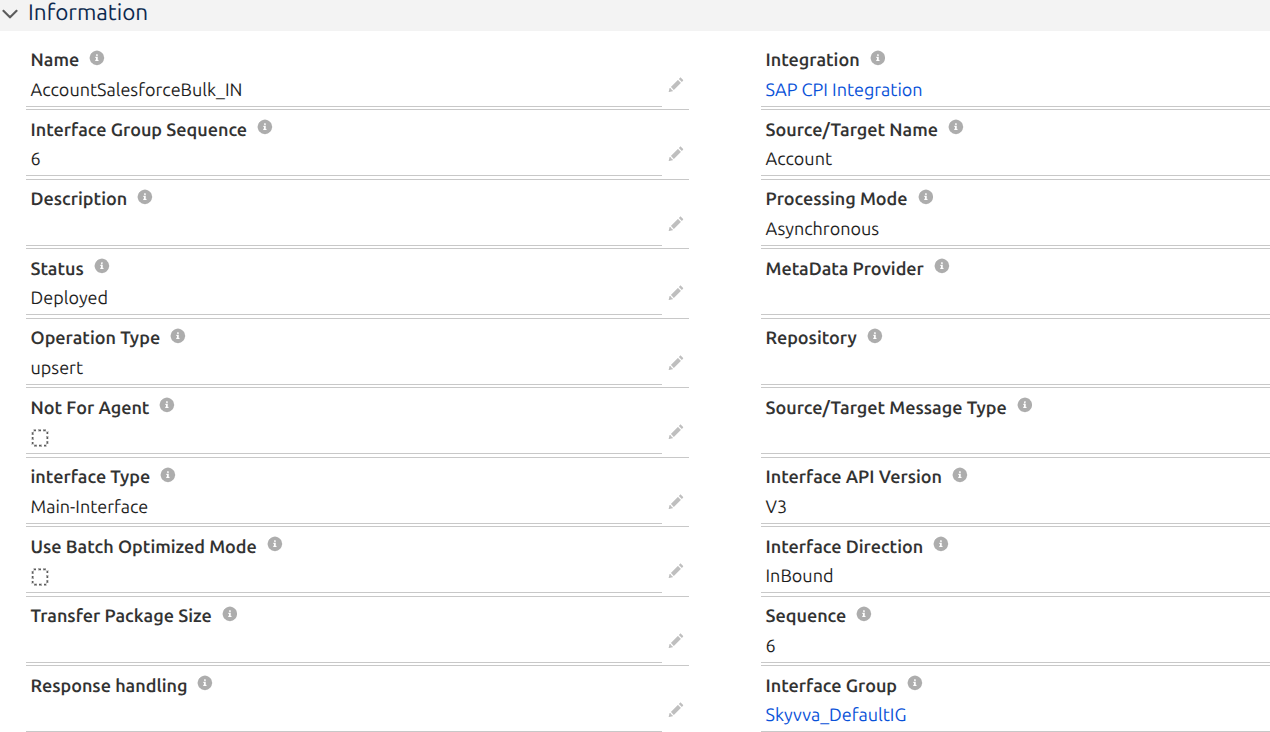
Figure 2: SKYVVA Inbound Interface AccountSalesforceBulk_IN.
With External Mapping enabled, set Salesforce External ID = skyvvasolutions__ERP_DEBTOR_ID__c in the interface's Inbound Setup section — the external key used to match/upsert Account records:
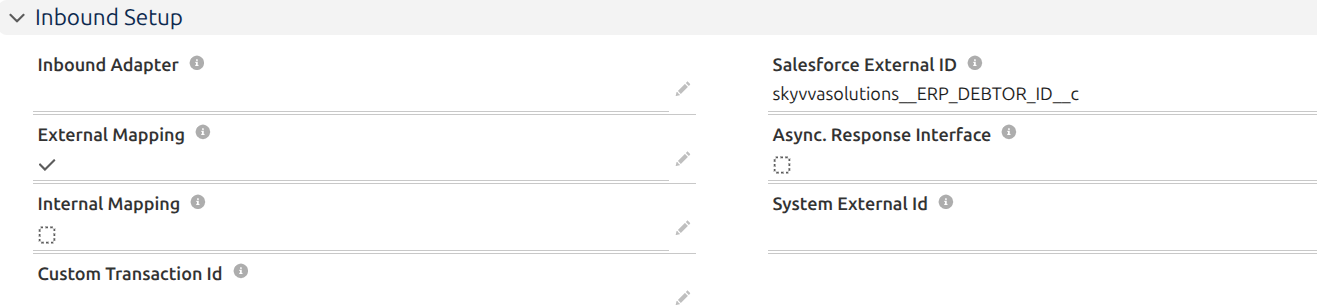
Figure 3: Interface AccountSalesforceBulk_IN — Inbound Setup, External Mapping enabled with Salesforce External ID skyvvasolutions__ERP_DEBTOR_ID__c.
1.2 Configure Bulk Settings
In the Bulk Setting section of the interface, set:
| Field | Value | Why it matters |
|---|---|---|
Bulk Processing Mode | Parallel | Parallel (the default) is the fastest way to load high-volume data. Choose Serial only if the records must be processed strictly in order — for example, if later records in the set depend on earlier ones already being committed. |
Note: There's no package-size field to set for this mode — the adapter automatically splits the records into batches sized to stay under Salesforce Bulk API's own limits. The package-size fields used in the Batch/Bulk/Asynchronous tutorials elsewhere in this series don't apply here.
Note: The interface also has its ownBULK Mode/Bulk Versionfields (in this same Bulk Setting section), but they don't need to be touched for this tutorial — leaveBULK Modeunchecked andBulk Versionblank. Whenever a request comes in through a CPI channel set toMode = Salesforce Bulk, the adapter automatically applies the correct bulk settings for that request on its own, regardless of what's actually saved on the interface. So these two fields have no effect on how this mode behaves — set them however you like.
One thing worth knowing: the adapter hardcodes the data-load job itself to Salesforce's older Bulk API v1 (the one built on an asynchronous job that gets checked periodically until it finishes) every time it processes aSalesforce Bulkrequest — it overwrites the interface's ownBulk Versionvalue on every call, so there's no way to make the data load use Bulk API v2 from CPI, regardless of whatBulk Versionyou might see set on some other interface. The adapter's own write-back of Message records after the job finishes (§4.2) is a separate step and always uses Bulk API v2 instead — that's not a setting either, just how that specific step is built.
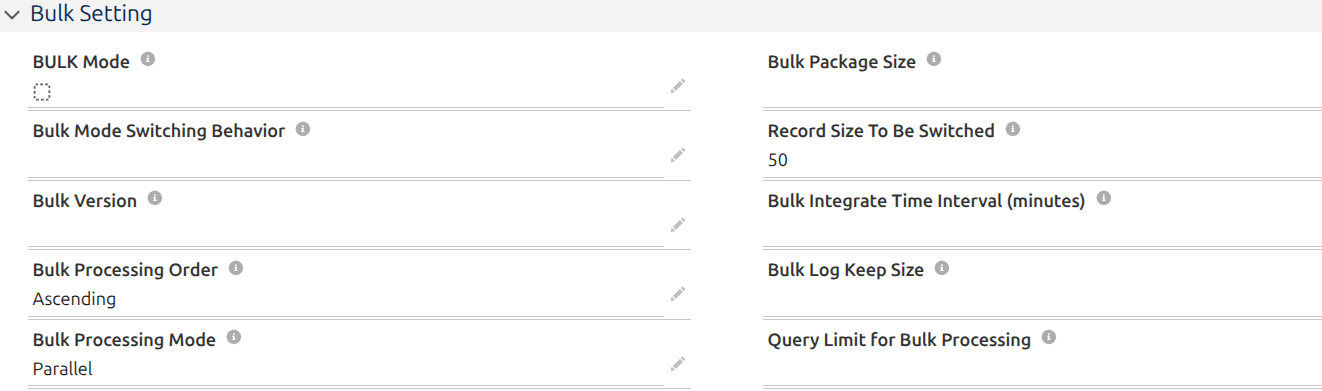
Figure 4: Interface Bulk Setting — Bulk Processing Mode = Parallel, BULK Mode left unchecked and Bulk Version left blank.
After completing the configuration, save the interface.
2. SAP CPI Development
2.1 Create the Integration Flow
Create the package in SAP CPI under Design and add the integration flow.
Example:
| Item | Example |
|---|---|
| Integration Package | Skyvva Salesforce Adapter Testing |
| Integration Flow | Account_Skyvva_SalesforceBulk |
The flow uses an HTTPS Sender, a Message Mapping step, and a SkyvvaSalesforce Receiver — the Message Mapping step is what transforms the payload before it reaches Salesforce, taking the place a separate Content Modifier would otherwise need to.
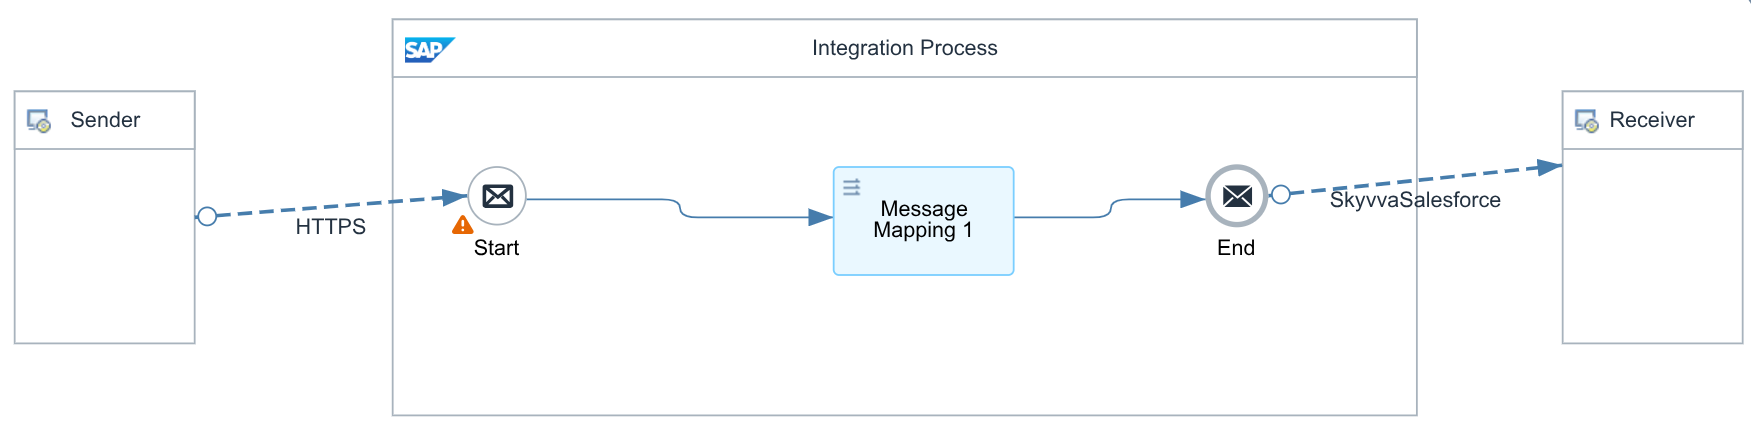
Figure 5: Integration flow for the Salesforce Bulk mode example.
Important: the Message Mapping step may show a warning icon. Hovering it reveals: "Http Sender Component may not pass XML or JSON message to Message Mapping. Message Mapping supports XML or JSON input only." This is CPI's design-time validator flagging that it can't statically prove the HTTPS Sender's output is XML/JSON — the standard HTTPS Sender adapter has no fixed content-type contract, so CPI can't guarantee it at design time. It doesn't block deployment: this flow deploys and runs successfully despite it. Safe to leave as-is as long as callers actually send XML/JSON matching Request Format, as this tutorial's Postman example does.
Where the target schema comes from: export it via the Interface record's Generate MetaData button — Format = XSD Schema, API = V3/Integrate. Then, inside the Message Mapping step's own editor (double-click it on the iFlow canvas), go to the Target panel → Select → Add → upload the downloaded .xsd → pick its root element as the Target Message Type. The file is stored as a resource on this specific integration flow, not somewhere interface/adapter-level or CPI-wide — any other iFlow needing it has to import its own copy.
2.2 Configure the HTTPS Sender Channel
Select the standard SAP HTTPS sender adapter.
General tab: Direction Sender, Adapter Type HTTPS, Transport Protocol HTTPS, Message Protocol None — fixed values, identical in every tutorial that uses this sender.
Connection tab:
| Field | Example value |
|---|---|
| Address | /skyvva/AccountIntegrateSalesforceBulkV3 |
| Authorization | User Role |
| User Role | ESBMessaging.send |
| CSRF Protected | Unchecked |
Important: The configured User Role must already exist and be assigned to the CPI user/credential that Postman authenticates as, or the sender rejects the request with 403 Forbidden.
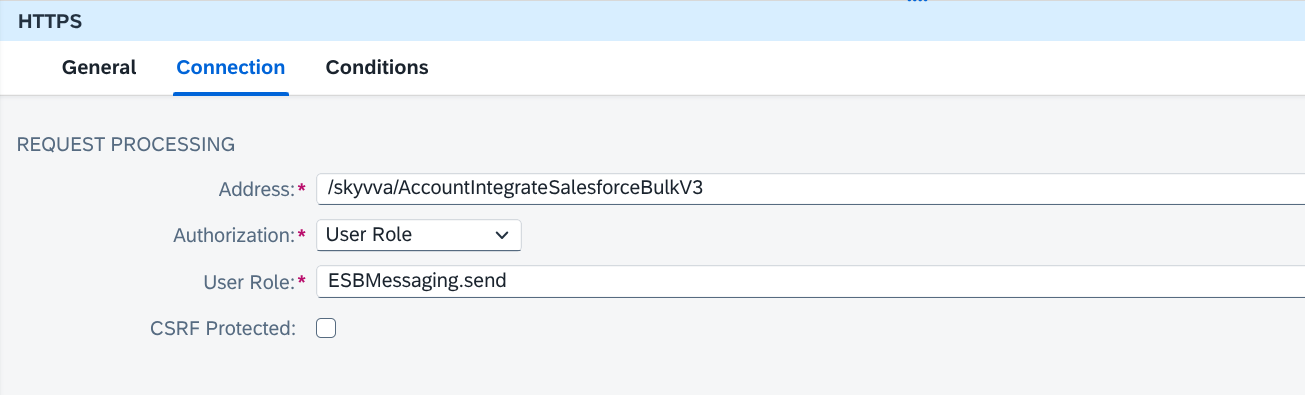
Figure 6: HTTPS sender channel — Connection tab.
2.3 Configure the SkyvvaSalesforce Receiver Channel
Select SkyvvaSalesforce as the receiver adapter. The receiver channel has three tabs: General, Connection, Skyvva.
General tab: Direction Receiver, Adapter Type SkyvvaSalesforce, Transport Protocol https, Message Protocol skyvva — fixed values, identical for every SkyvvaSalesforce receiver channel.
2.3.1 Connection Tab
| Field | Example value |
|---|---|
| Authentication Type | OAuth2 |
| OAuth2 Flow | Username-Password Credential (or Client Credential) |
| Login Url | https://test.salesforce.com |
| User Credential | Your CPI Security Material alias for the Salesforce user (shown only for the Username-Password flow) |
| Client Credential | Your CPI OAuth2 Client Credentials artifact (required for either flow) |
Note: There is no separate "Client Id"/"Client Secret" pair on the current adapter — both are held inside the single Client Credential OAuth2 artifact deployed in the CPI keystore. For the full field reference see 1. SKYVVA CPI Salesforce Receiver Adapter in SAP Cloud Integration.md §3.
2.3.2 Skyvva Tab — Request Settings
| Field | Value |
|---|---|
| Skyvva API Version | V3 |
| Integration | Your SKYVVA Integration |
| Interface | AccountSalesforceBulk_IN |
| Mode | Salesforce Bulk |
| Request Format | XML |
| Response Format | XML |
| Skyvva App Version | your Salesforce package version, e.g. 2.51.0 |
| Salesforce Api Version | 59.0 (or your org's current API version) |
Note:Processing Behavioris not shown for this configuration — it only appears whenMode = Asynchronous, not forSalesforce Bulk.
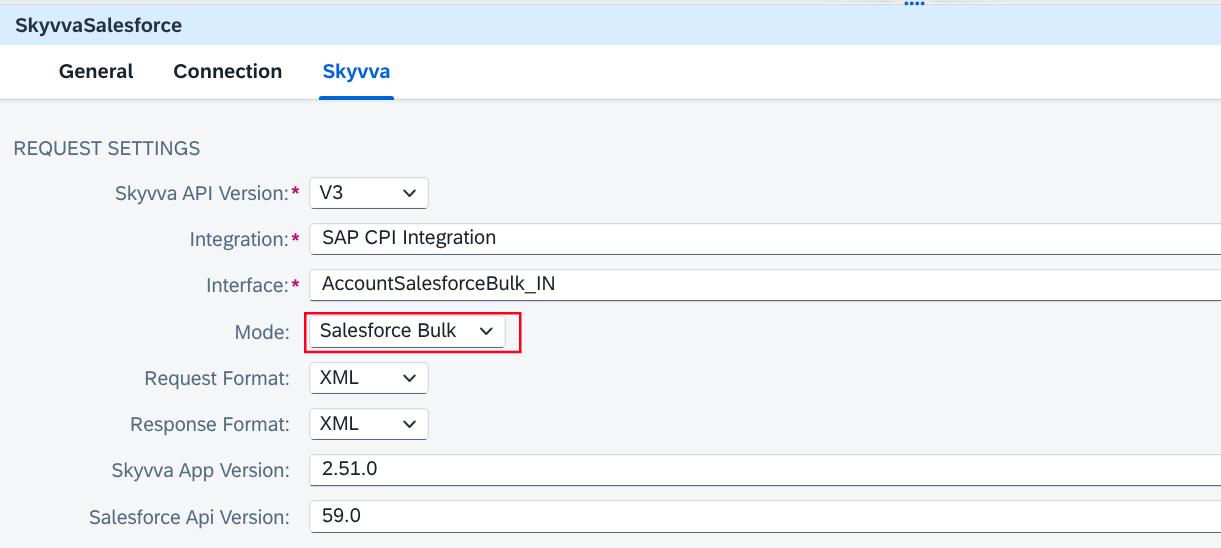
Figure 7: SkyvvaSalesforce receiver channel — Skyvva tab, Mode = Salesforce Bulk.
2.3.3 Skyvva Tab — Adapter Settings
| Field | Value |
|---|---|
| Logging option | Default |
| Enable retry for fatal connectivity errors | Unchecked (leave disabled for this test) |
| HTTP client timeout (sec) | 60 |
Once all channel parameters are defined, save the integration flow and deploy it.
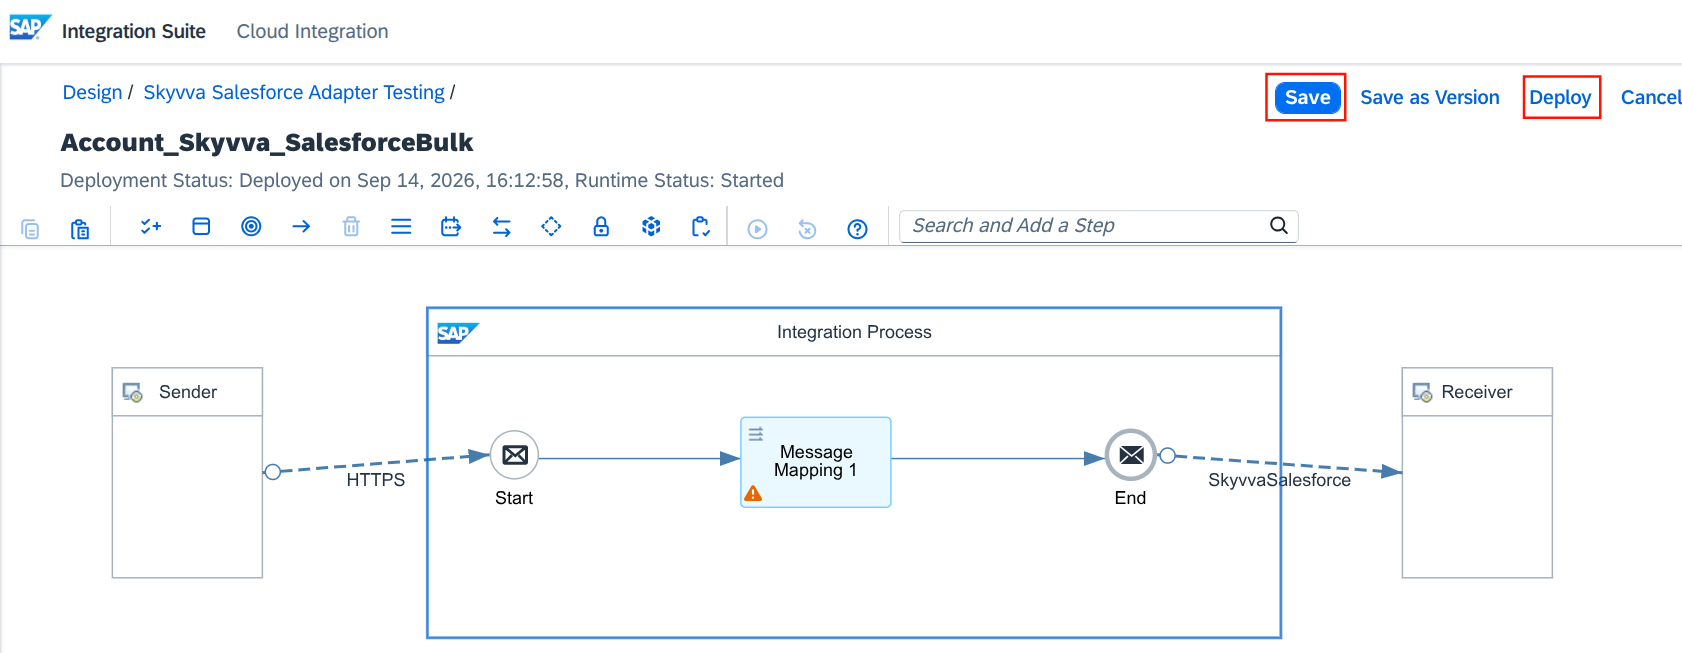
Figure 8: Integration flow deployed. (screenshot to be added)
2.4 Get the SAP CPI Endpoint URL
Go to CPI → Monitoring → Manage Integration Content, locate the deployed integration flow, and copy its endpoint URL — this is the URL Postman will POST to in §3.
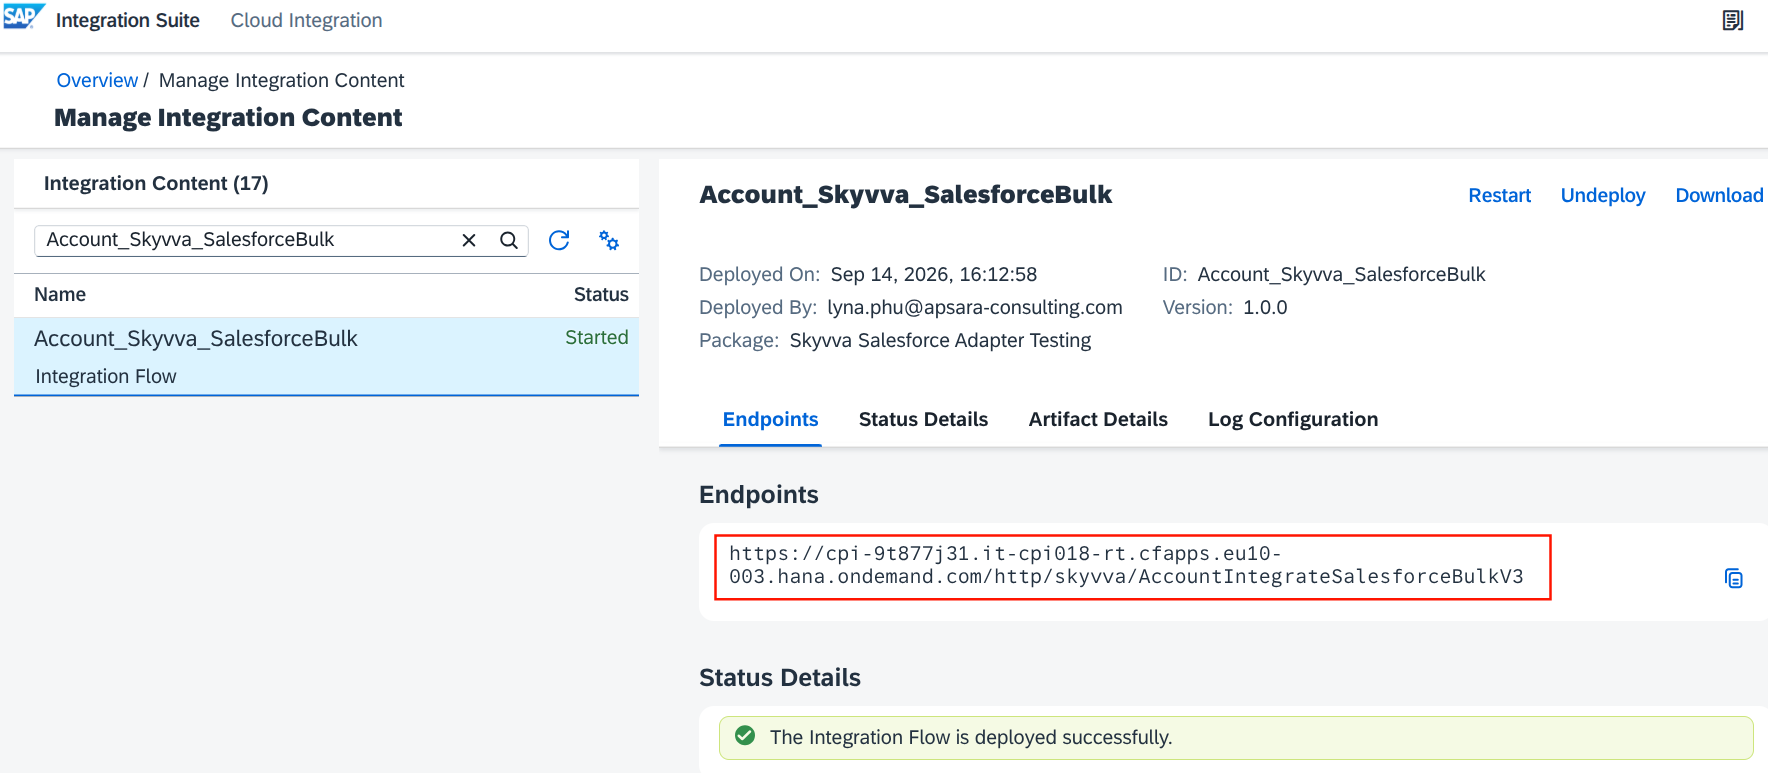
Figure 9: Manage Integration Content — endpoint URL. (screenshot to be added)
Note: The endpoint URL shape depends on the tenant generation — Neo tenants usehttps://{{TenantId}}-iflmap.hcisbp. region>.hana.ondemand.com/http/<Address>, current SAP BTP Integration Suite (Cloud Foundry) tenants usehttps://{{TenantId}}.<runtime-cluster>.cfapps.<region>.hana.ondemand.com/http/<Address>. Always copy the exact URL from your own tenant's Manage Integration Content panel rather than assembling it by hand.
3. Testing with Postman
Use the endpoint URL from step 2.4. Send a payload with enough Account records to be a meaningful test — a handful of records is enough to prove the flow works end to end, but this mode is built for volumes much larger than a normal request (thousands of records per job).
Create a new request with the following configuration:
| Setting | Value |
|---|---|
| Method | POST |
| URL | Your SAP CPI endpoint URL |
| Authorization | Authentication configured for the HTTPS Sender |
| Content-Type | Match the configured Request Format |
Because this example uses:
Request Format = XML
configure the header as:
Content-Type: application/xml
Because this interface loads a single flat object, the payload is a plain list of Account records — no nested Contact elements, since this mode doesn't support the hierarchical shape used in the Batch/Bulk/Auto-Switch/Asynchronous tutorials elsewhere in this series:
<?xml version="1.0" encoding="UTF-8"?>
<Accounts>
  <Account>
    <ERP_DEBTOR_ID__c>ACC-000001</ERP_DEBTOR_ID__c>
    <Name>CPI Test Account 1</Name>
    <Phone>+49-89-2867825</Phone>
    <BillingStreet>CPI Test Street</BillingStreet>
    <BillingCity>Frankfurt</BillingCity>
    <BillingPostalCode>42098</BillingPostalCode>
    <BillingCountry>DE</BillingCountry>
  </Account>
  <!-- ... more Account elements, same shape ... -->
</Accounts>
At the volumes this mode is meant for (thousands of records), pasting the payload into Postman's raw body editor gets unwieldy fast. In practice, generate the XML file separately and attach it via Postman's binary body option instead — Content-Type still governs how the sender interprets it, so the header above applies either way. The screenshot below shows a request with a 5,126-record file attached this way:
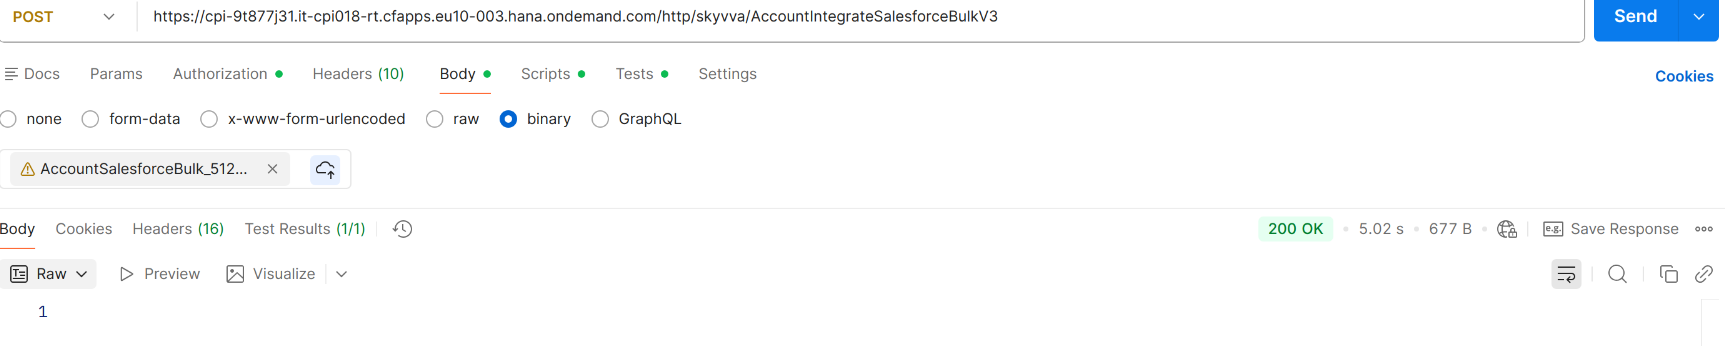
Figure 10: POSTMAN request — binary body with a generated multi-thousand-record XML file attached — and response for Salesforce Bulk mode.
A successful call confirms Salesforce accepted the batch for upload — not that any Account records exist yet. Salesforce still needs to run the Bulk job, and the adapter's own background process still needs to notice it finished, before the records are actually created or updated and the corresponding Message records appear in Salesforce. Always confirm the real outcome in SAP CPI → Monitor Message Processing (§4.1) and Salesforce → Message Monitoring (§4.2) rather than relying on the immediate response body — for this mode more than any other in this series, since completion can take noticeably longer than a normal request.
4. Monitoring
4.1 SAP CPI
Go to CPI → Monitor → Monitor Message Processing and verify the message completed successfully. This confirms the CPI side of the flow only — that the HTTPS sender accepted the request and the receiver channel handed it off to the SKYVVA Inbound Interface; it does not yet confirm Salesforce's Bulk job itself finished (check that in §4.2 below).
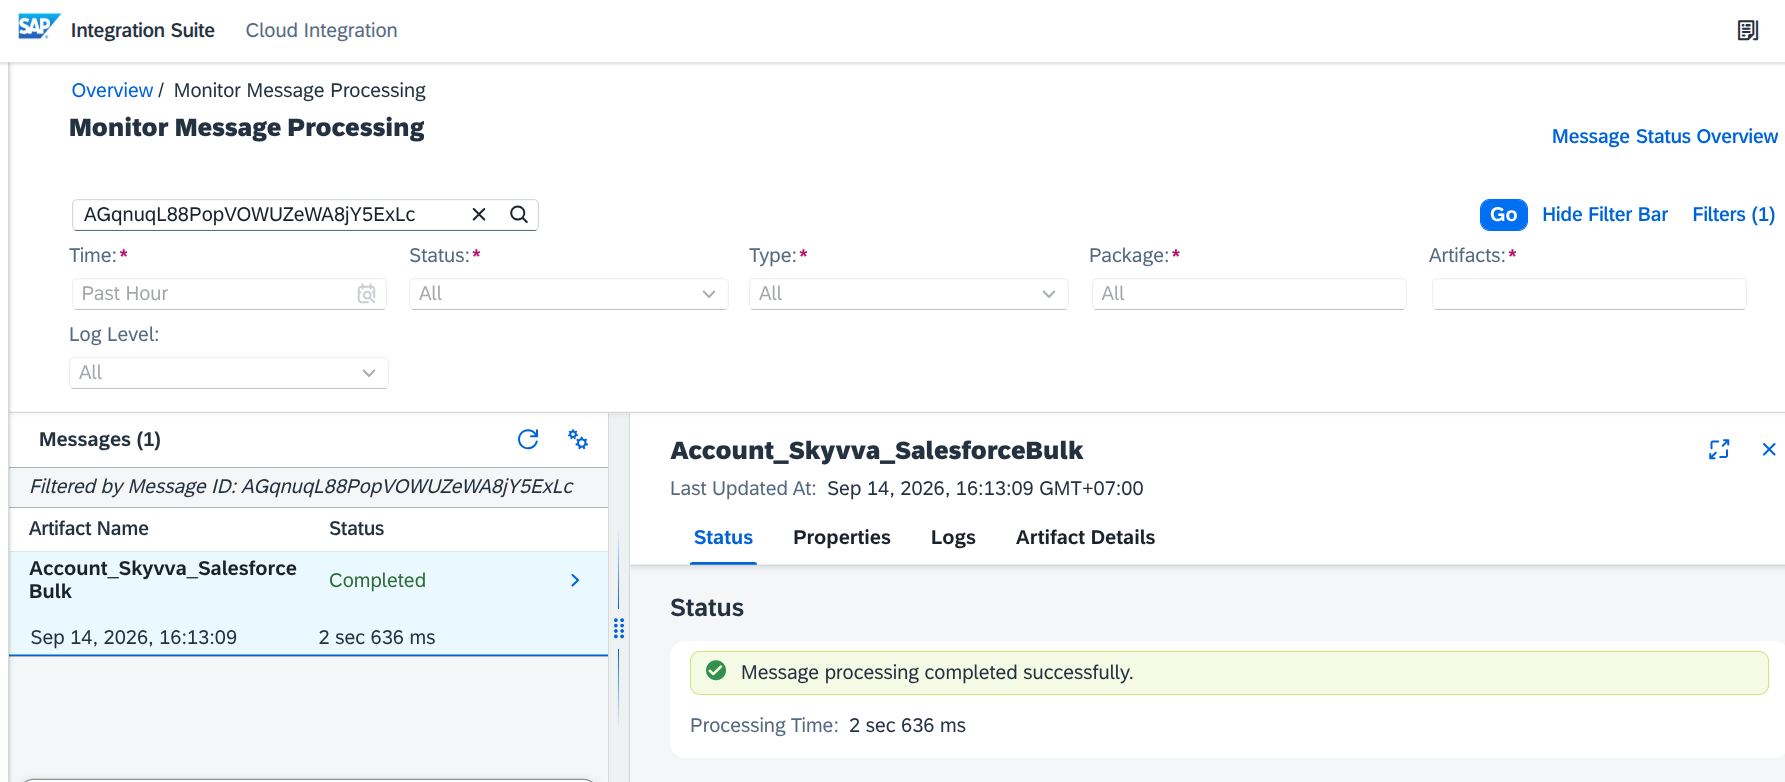
Figure 11: CPI Monitor Message Processing — the Account_Skyvva_SalesforceBulk message with status Completed.
4.2 Salesforce
Because this mode uses Salesforce's own Bulk API, the job also shows up on Salesforce's native Bulk Data Load Jobs page (Setup → Bulk Data Load Jobs) — this is a different place than the SKYVVA Bulk Control Board used by Skyvva Bulk mode. Once the job finishes there, check Salesforce → Message Monitoring to confirm the resulting Message and Account records.
Opening the job from that list shows its detail page — object, record counts, and (per the earlier note) the older, asynchronous Bulk API version the adapter always uses for this mode:
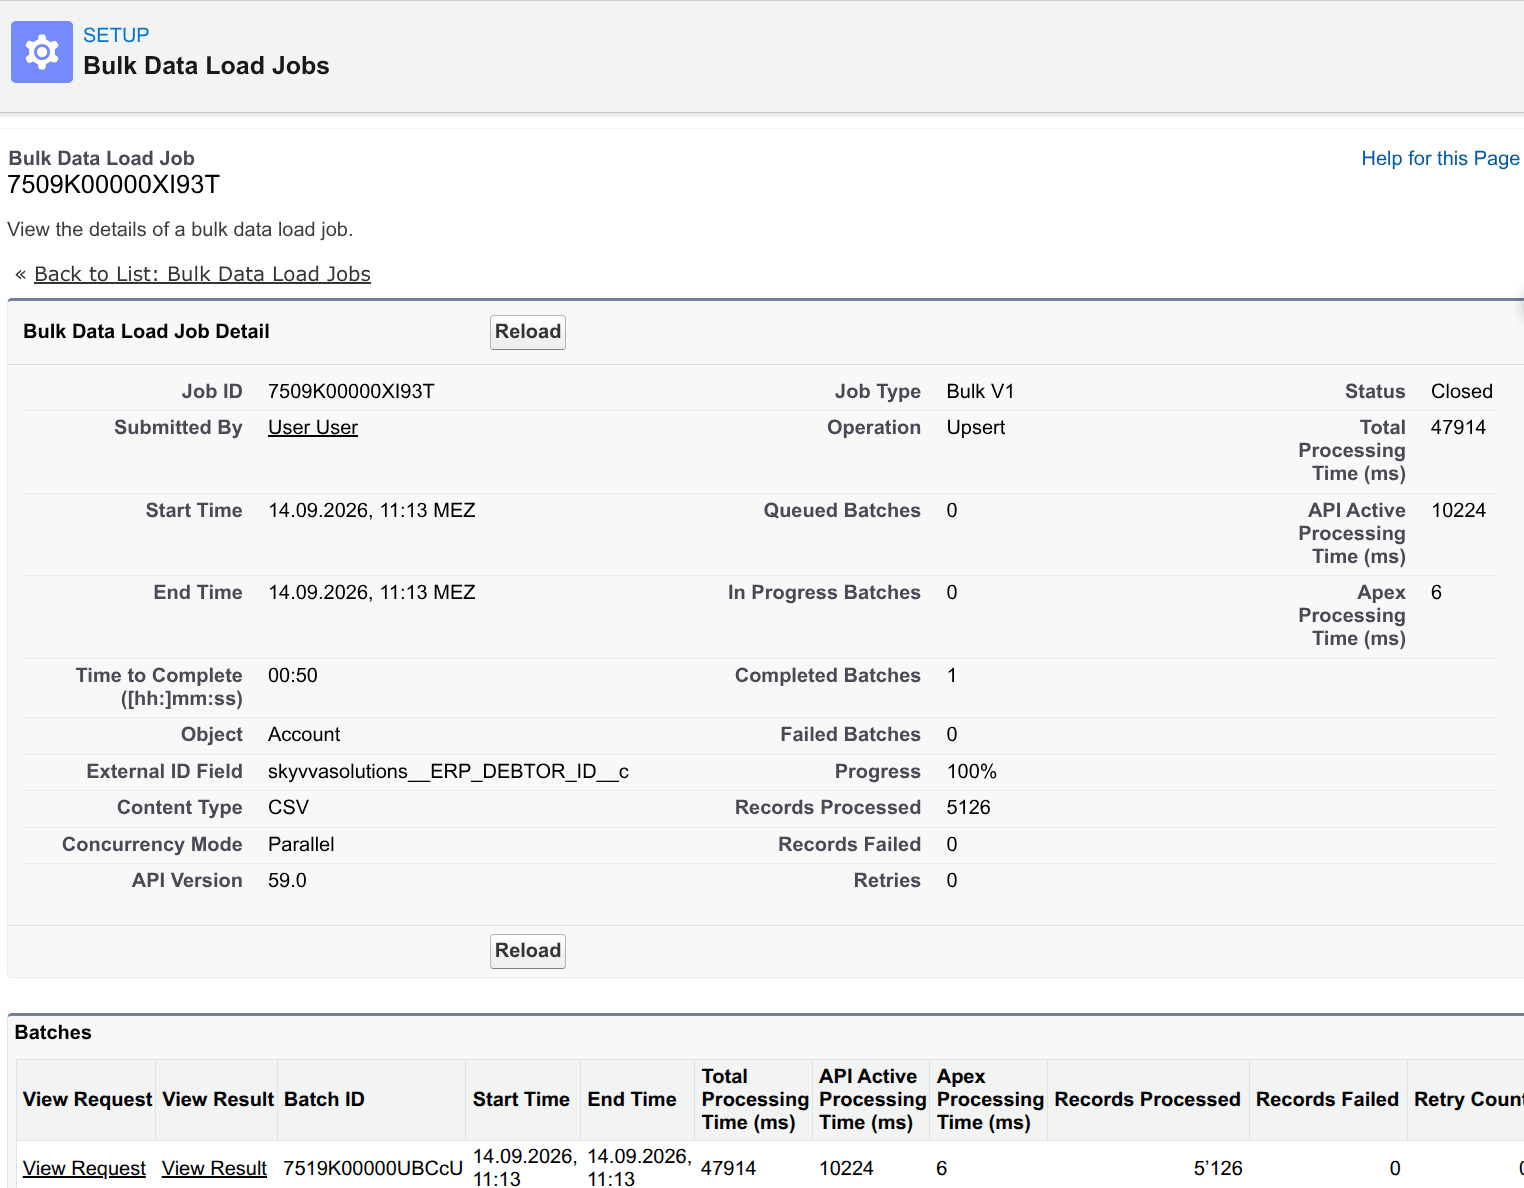
Figure 12: Bulk Data Load Job detail for the Account load — Job Type: Bulk V1, Content Type: CSV (the adapter converts the inbound XML to CSV before handing it to Salesforce's Bulk API), 5,126 records processed, 0 failed.
Does this mode create a Message in SKYVVA? Yes, by default — but not as a single aggregate summary. Once the Bulk job finishes on Salesforce's side, the adapter's background process writes back one Message record per processed record, by submitting its own separate Bulk API job against the Message object. That means a Salesforce Bulk mode run actually produces two Bulk Data Load Jobs, visible side by side on the same list — the original load against your target object, and this follow-up job against Message:
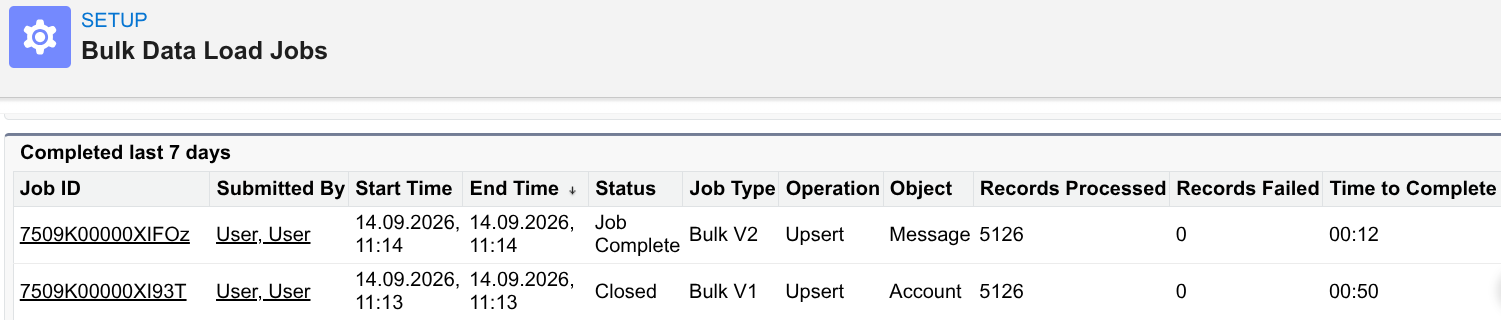
Figure 13: Bulk Data Load Jobs list showing both jobs from the same run — the Bulk V1 job against Account (the data load) and a second Bulk V2 job against Message (the adapter writing back one Message record per processed record), each showing 5,126 records processed.
Whether a message actually gets created depends on a couple of interface/integration settings, and they behave differently — don't conflate them:
Bypass Message Layer(on the Interface) checked → no message is ever created, success or failure.Delete Completed but keep other Message(on the Interface), orDelete Messages(on the Integration) → a message is created, but only when records actually failed; a fully successful run creates none.- Leave all of the above off (the default) if you want every run of this mode — success or failure — to be visible in Message Monitoring.
With the defaults left off, Message Monitoring shows the full set — one row per input record, each linked back to the AccountSalesforceBulk_IN interface, matching the 5,126 records processed above:
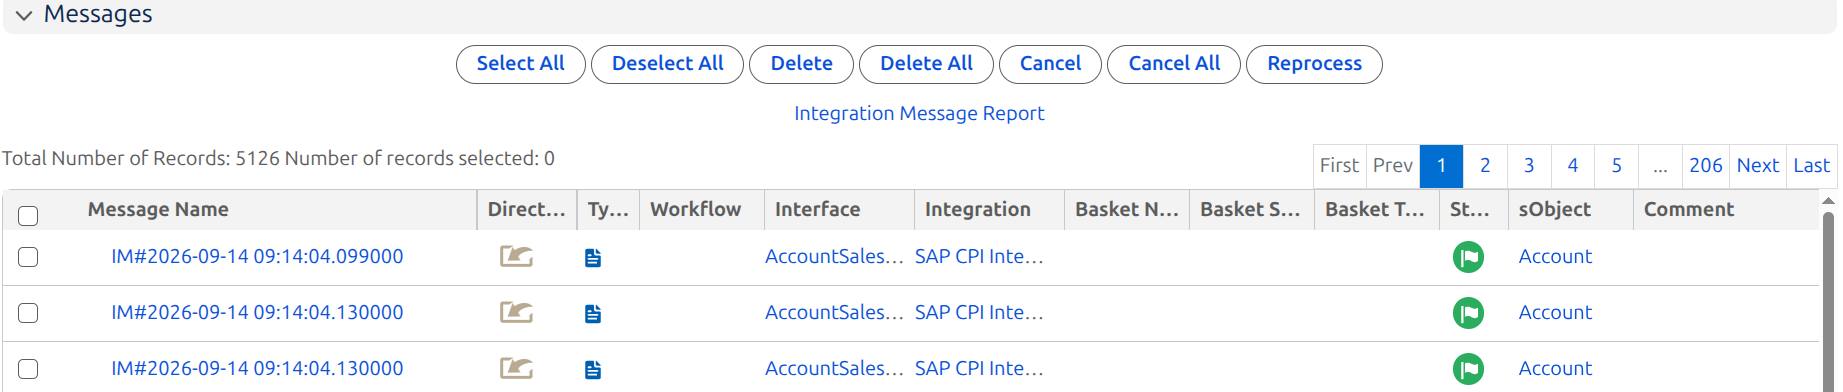
Figure 14: Salesforce Message Monitoring — 5,126 individual Message records (Total Number of Records: 5126) from this run, one per Account processed, not a single aggregate summary.
After confirming the messages, verify that the Account records were created or updated successfully.
Summary
The complete integration flow is:
POSTMAN
   ↓
HTTPS Sender
   ↓
SAP CPI Integration Flow
   ↓
SkyvvaSalesforce Receiver (Mode = Salesforce Bulk)
   ↓
SKYVVA Inbound Interface
   ↓
Salesforce Bulk API job (batched automatically)
   ↓
Background job checker confirms completion
   ↓
Salesforce Account records + one Message record per processed record
Configuration Summary
| Component | Configuration |
|---|---|
| SKYVVA Interface | Inbound, Asynchronous, Upsert |
| Bulk Processing Mode | Parallel |
| SKYVVA API Version | V3 |
| Mode | Salesforce Bulk |
| Request/Response Format | XML |
Salesforce Bulk mode hands a flat, single-object record set directly to Salesforce's own Bulk API— the same mechanism behind Salesforce Data Loader — rather than routing it through SKYVVA's own basket engine. Completion isn't tied to the original request: a background process in the adapter keeps checking the job until Salesforce finishes it, so always confirm the final result in Monitoring rather than the immediate response.