1. How to create an inbound interface using integrate SFDC Bulk mode with SKYVVA V3 Connector Module?
This document describes how to create an inbound interface using SFDC Bulk mode with Skyvva V3 connector module. What Is Bulk? SKYVVA Bulk Interface Processing is an interface uses for running bulk attachments. When you have a huge amount of data I.e data >= 5000records, then we should use bulk processing to process the interface. We should know some terms:
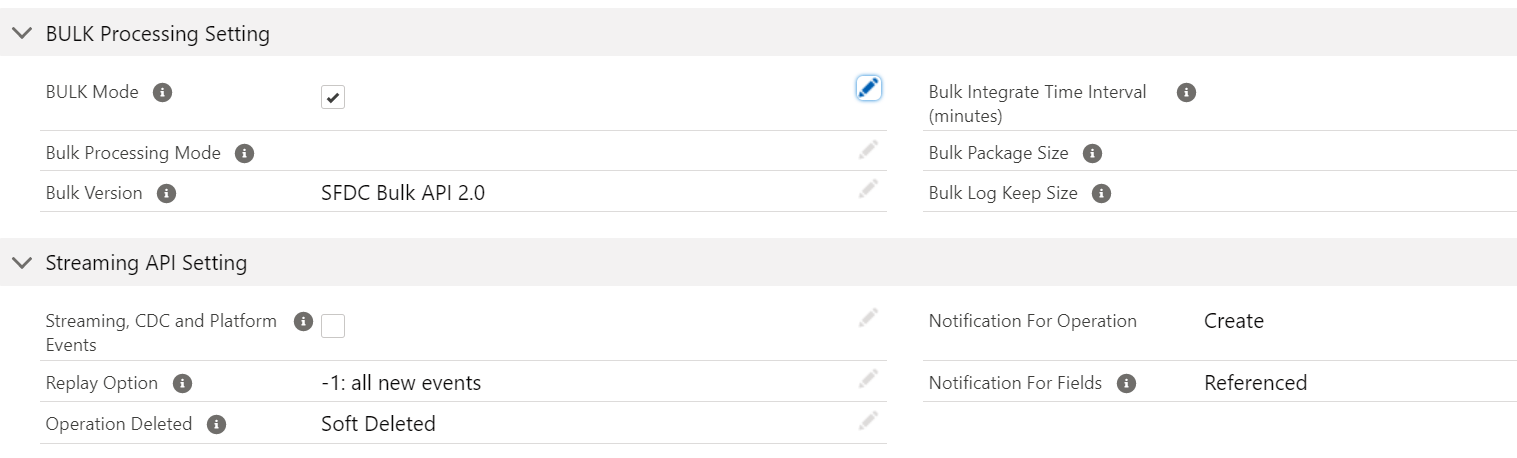
- BULK Mode: We have to set this flag to run our interface in bulk mode using salesforce bulk API.
- SKYVVA Bulk: SKYVVA Bulk is slow but very powerful, it allows you to do business mapping using our mapping tool and formula. Likewise, you can use SKYVVA workflow to validate the data before posting. You can use SKYVVA Bulk mode with both Bulk-processing mode, which are Parallel and Serial. The default value is Serial.
- SFDC Bulk: We support SFDC pure bulk mode in version 1.0 or 2.0 that is very fast but cannot use SKYVVA mapping tool to do business data mapping. On the other hand, SFDC Bulk require the data has to be mapped already on the sender side and doing additional mapping to enrich the business logic is not possible using SKYVVA mapping. This mode will work with both processing mode, Parallel and Serial, for version 1.0. Version 2.0, you can only use with Serial mode processing. We cannot split the messages as batch by using SFDC Bulk mode.
- Bulk Version: SKYVVA support SFDC pure bulk mode in version1.0 or version 2.0 then we have our own skyvva bulk mode. This use skyvva workflow and mapping and thus it is more powerful but slower than pure bulk API technique from salesforce.
- Bulk Processing Mode: This fields indicate two modes which is support with bulk version 1.0 and bulk version 2.0 only parallel mode is supported. So the value is depend here the selection of field bulk version. For example When we want to use ‘ serial‘ we should select bulk 1.0.
- Parallel: When you select this processing mode, it will run parallel.
- Serial: When you select this mode, it will not run at the same time.
- Bulk Package Size: This parameter determine how many records is splitted into Bulk data size. If your Message contain 10.000 records and the value for this parameter is 1000 so you will get 10 bulk data set in Salesforce.
- Bulk Monitor Keep Size: The number of bulk execute logs to be keep.
- Bulk Sch Frequency: This is the schedule time frequency for bulk scheduler on
- Bulk Integrate Time Interval (minute): The interval (minutes) used for integrate bulk job scheduler. For example, if its value is 10, then the integrate bulk scheduler will be run every 10 minutes.
Skyvva interface creation Create an interface, for example, "IntegrateBulk" as shown below.
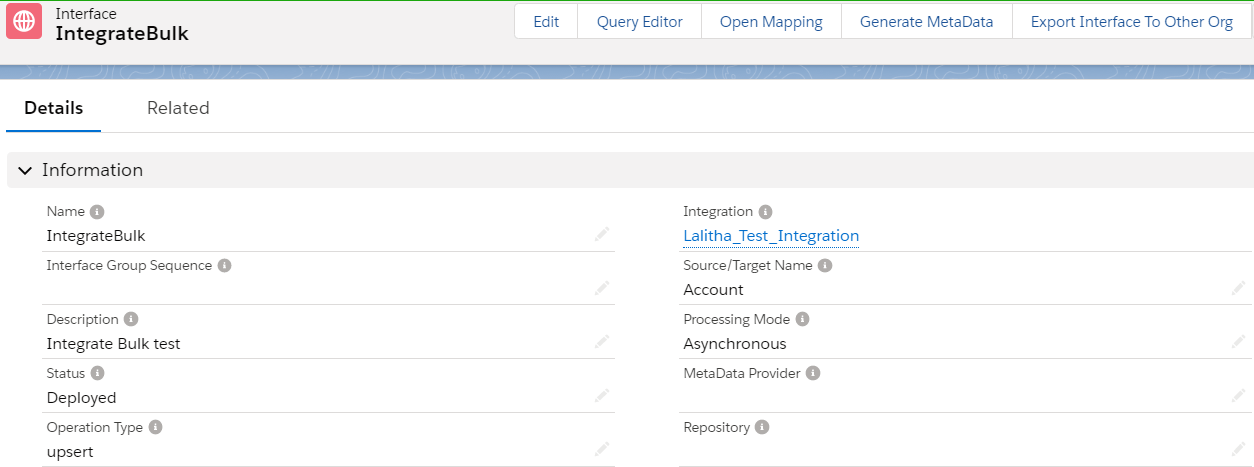
As we are using SFDC Bulk So, we have to check the Bulk mode checkbox as shown below
Now save the interface and download the WSDL from the classic mode.
Import WSDL into ESR First, we have to create a namespace in ESR like "urn:skyvva:integrateBulk". Now create an external definition under the namespace like below. Here the WSDL is for Account. So, we can give the name as AccountIntegrateBulk.
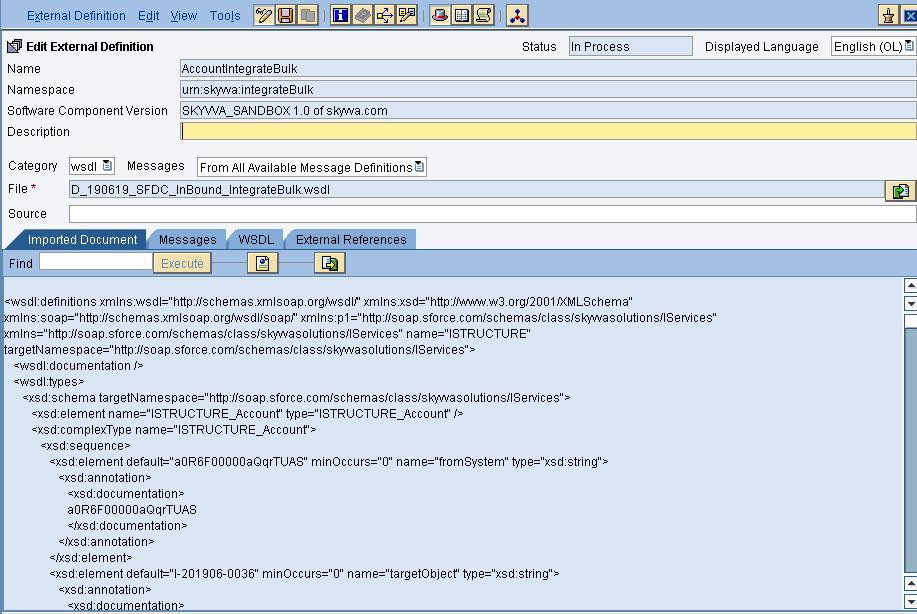
Import the WSDL and save and activate the external definition.
- Source data type
Create sender data type as shown below
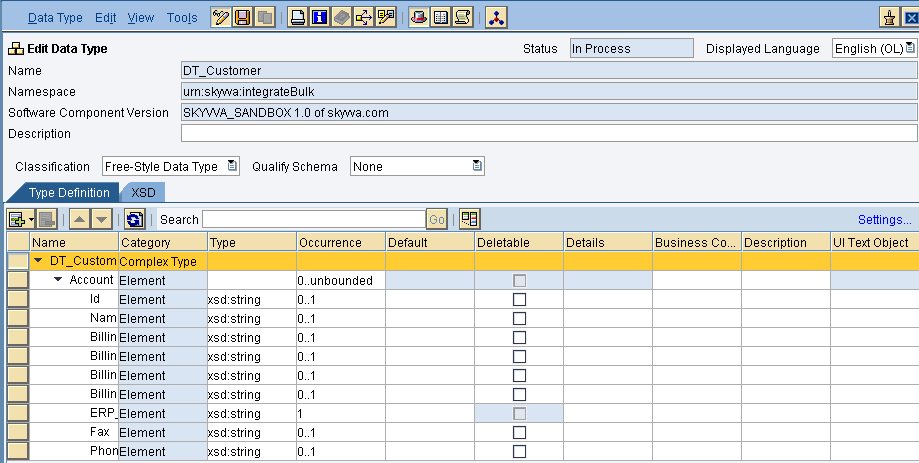
after creating the source data type click on save and activate.
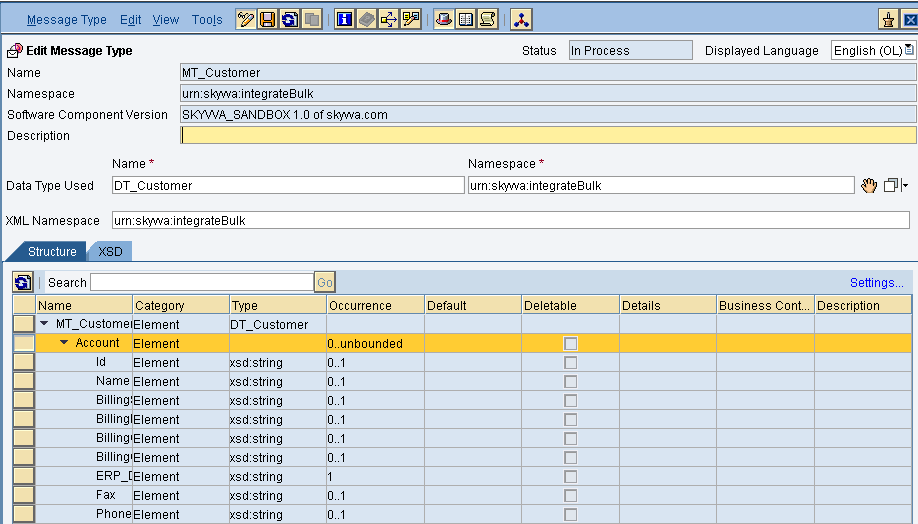
- Source message type
Create the message type as shown below.
- Outbound Service Interface
Create an Outbound service interface, in that select category as outbound and select the respective message type.
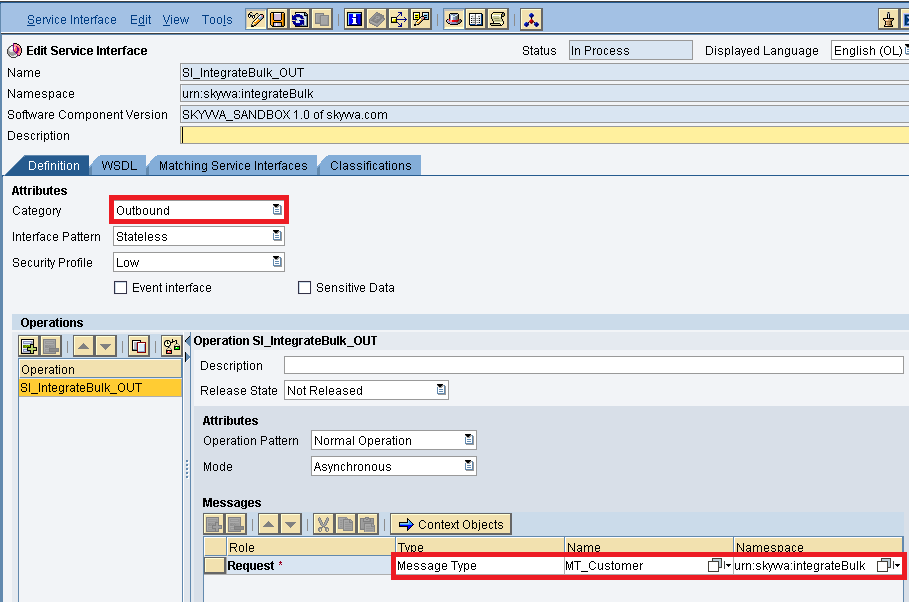
then save and activate the outbound service interface.
- Inbound Service Interface
Create an inbound service interface, in that select category as inbound and select the respective external definition.
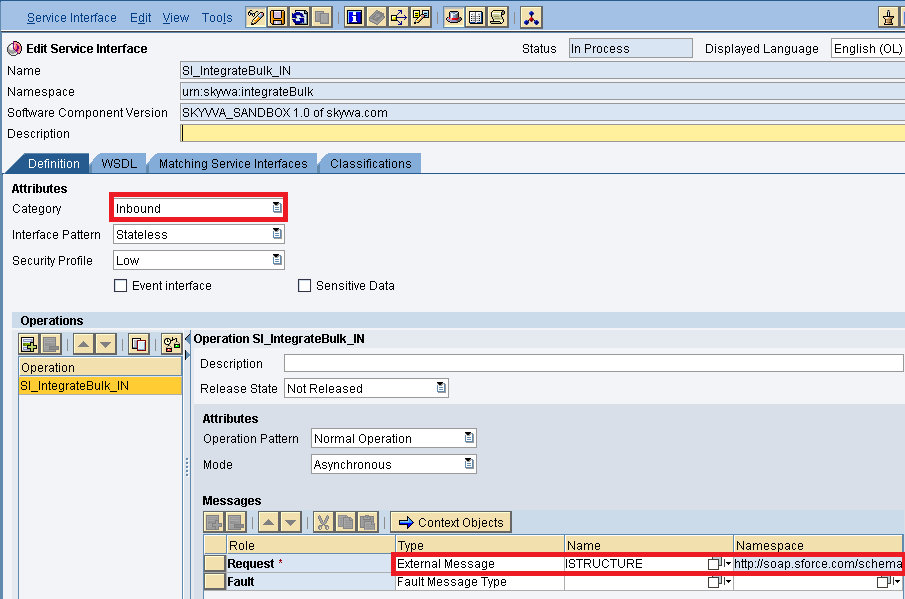
Save and active the inbound service interface.
- Message Mapping
Create message mapping as shown below
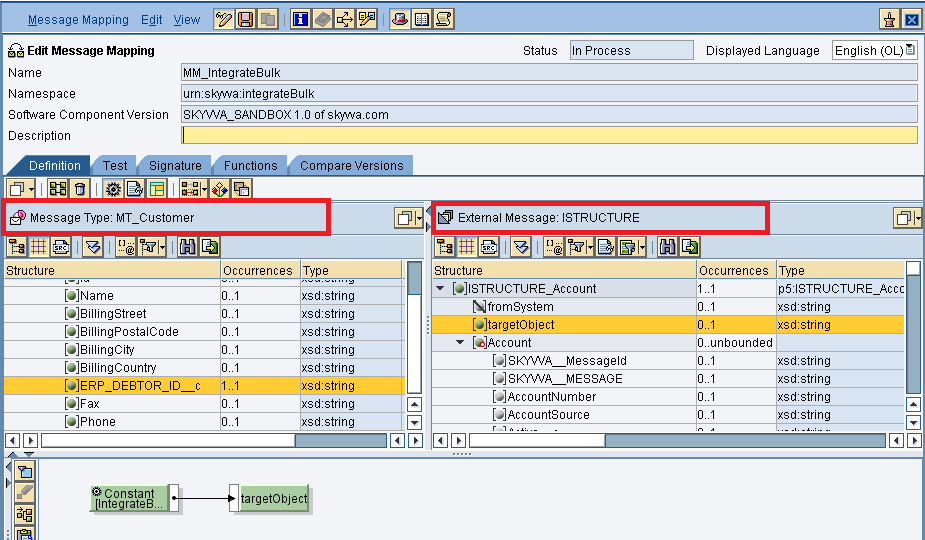
Insert the respective source and target structure and then do the mapping. Now save and activate the message mapping.
- Operation Mapping
Create Operation mapping as shown below

Select the respective outbound and inbound service interfaces and also the message mapping then save and activate the operation mapping.
- Mapping logic flow with Skyvva runtime
You have to map business data from SAP e.g. IDoc, BAPI or Proxy into the Skyvva WSDL business structure. This business structure is the result of your operation mapping in PO and will be passed into the soap receiver channel. This structure will be converted by the Skyvva module "Skyvva/V3/Integration" which is a new custom V3 module used in the soap receiver channel.
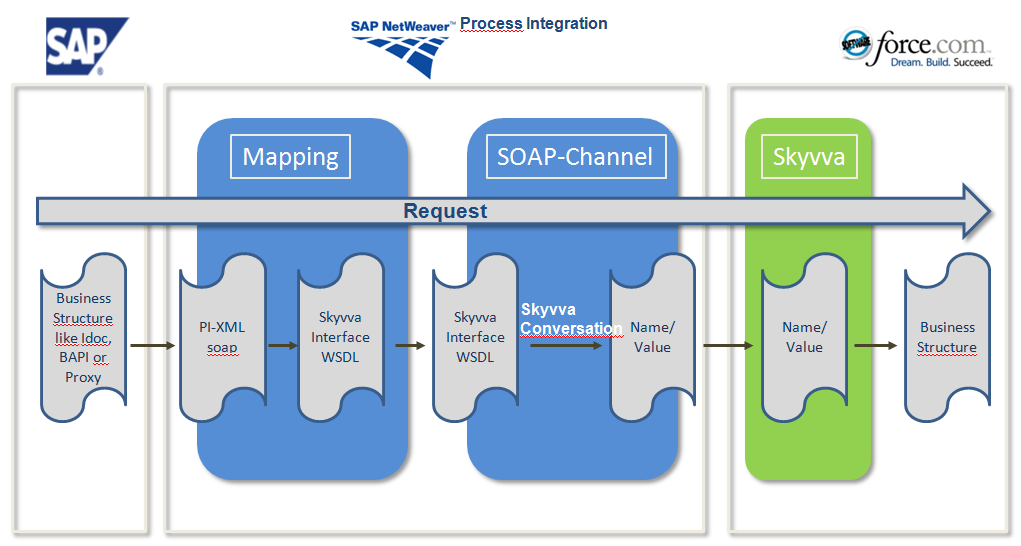
We have to use Skyvva connector module in the soap receiver channel.
- Skyvva/V3/Integration

Creation of Integrated Configuration Objects After creating the objects in ESR. We have to configure these objects in the integration directory. First, we have to create Configuration Scenario.

An Integration scenario has the following objects.
- Business System for Sender and Receiver
- Sender and Receiver Communication channel
- Integrated Configuration
These are the objects we should create. We have to define our business system e.g. for the SAP-Backend. For Salesforce you can use our proposal "Salesforce" as the business system. We have to import these business systems from SLD.
Configuring the Sender SOAP communication channel Create sender communication channel as shown below. Since we are using SOAP UI as a source. So, here we are using SOAP in the sender channel.
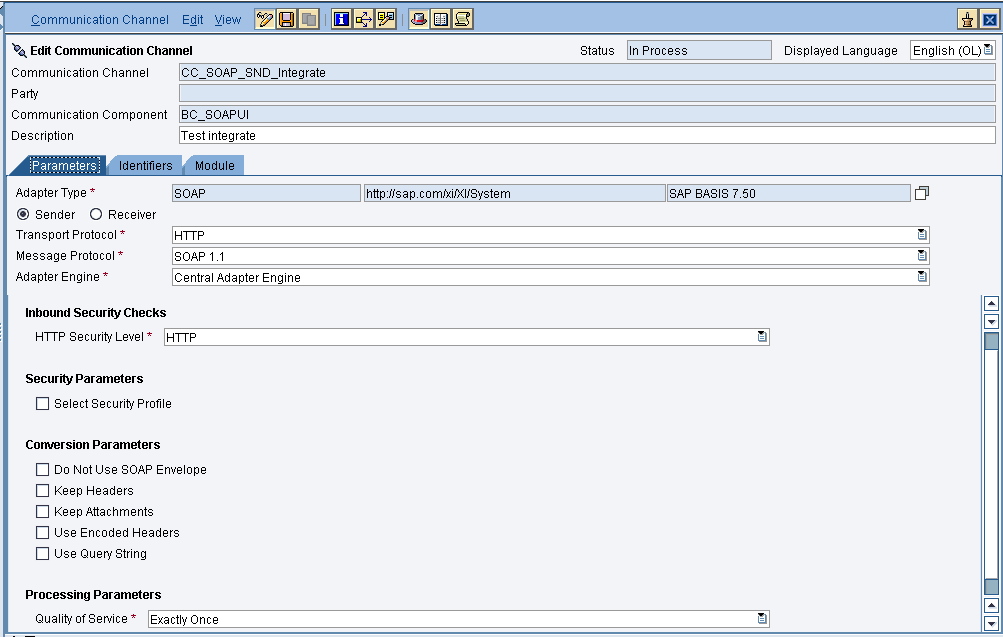
Provide the necessary details as shown and then save and activate the channel.
- Configuring the SOAP receiver channel
Configuration for Tab "General"
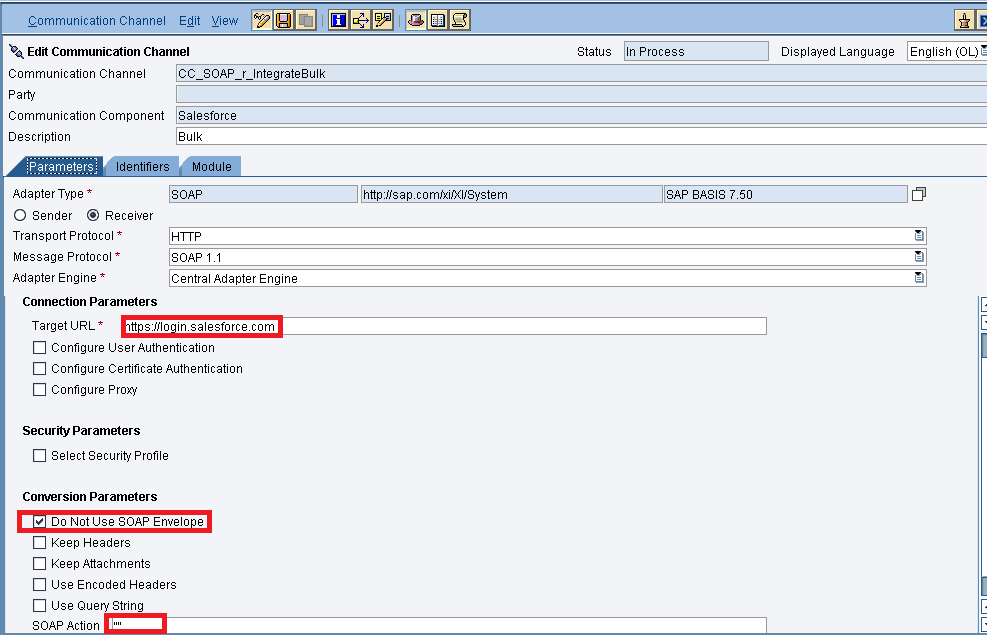
Specify the parameters as shown in the above screenshot. Below is the configuration for the "Advanced" Tab.
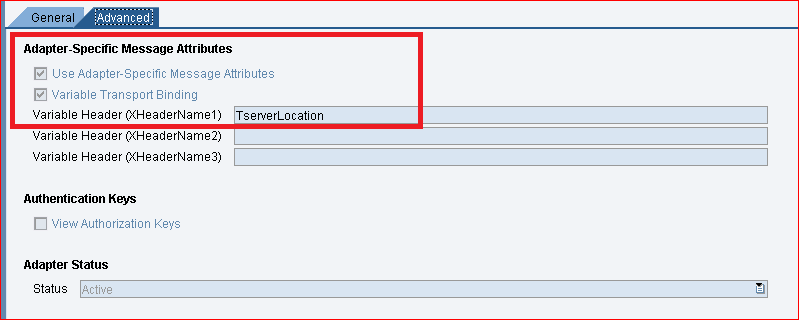
The value "TserverLocation" has to be entered for the parameter Variable Header (XHeaderName1). Below are the settings for Tab "Module". Here, the SKYVVA new V3 module containing the logic for session handling must be specified.
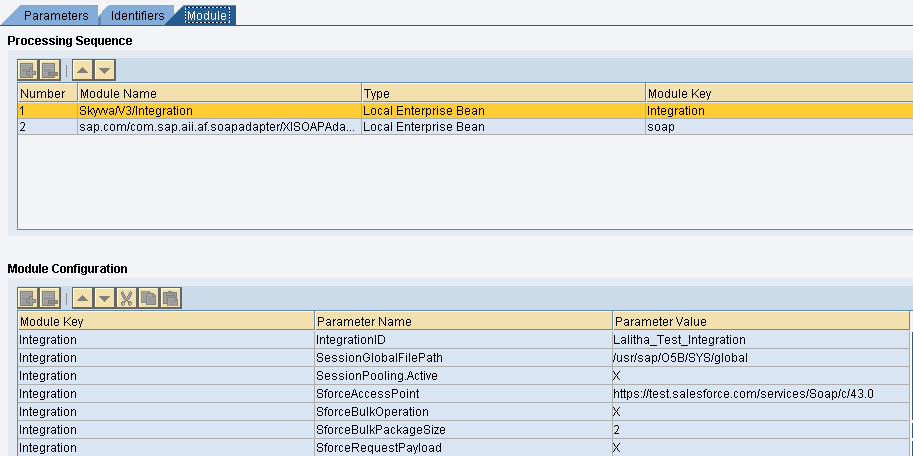

Configuration of module parameters are described in detail below Skyvva Module Parameters
Parameter Description Value
IntegrationID This parameter contains the skyvva engine integration id on Salesforce. Here we recommend to use only Integration name instead of id because if we transport the objects from one environment to other environment IntegrationId will be changed but Integration Name will not be changed. Lalitha_Test_Integration
SessionGlobalFilePath This parameter holds the path in which the session id is being stored /usr/sap/O5B/SYS/global
SforceAccessPoint This parameter represents the URL(endpoint) for getting the session id. The URL is that of the Enterprise WSDL for Salesforce used for logging in and getting the session id https://test.salesforce.com/services/Soap/c/43.0
SessionPooling.Active A flag that actives or deactivates the session pooling. Set for better performance X
SforceRequestPayload It will show the request payload of skyvva X
SforceSecurityToken This parameters holds the security token from salesforce. Necessary only of configured in the salesforce instance By54dfe0000DerYvvv
SforceShowSAPChannelParameters It displays the SAP PI parameters in the output log X
SforceUsername This parameter is the salesforce username xxx@bbbb.com
SforceWebServiceOperation Defines the webservice operation in skyvva integrateBulk
pwdSforceLoginPassword It holds the password of the salesforce user used to log in to the salesforce xxxxxxx
SforceBulkPackageSize
This parameter determines how many records are split into chunks of the package size. For example if PI message contains 1000 records and the value of this parameter is 100 then we will get 10 batches each contain 100 records.
Ex – 1000
sforceBulkMode It specifies the mode of Bulk SFDC Bulk 2.0
SforceBulkOperation This parameter is set when the interface uses the Bulk API. The bulk API enables transferring of mass data X
SforceBulkInterfaceId It specifies the name of the skyvva interface IntegrateBulk
Integrated Configuration Create integrated configuration objects as shown below.
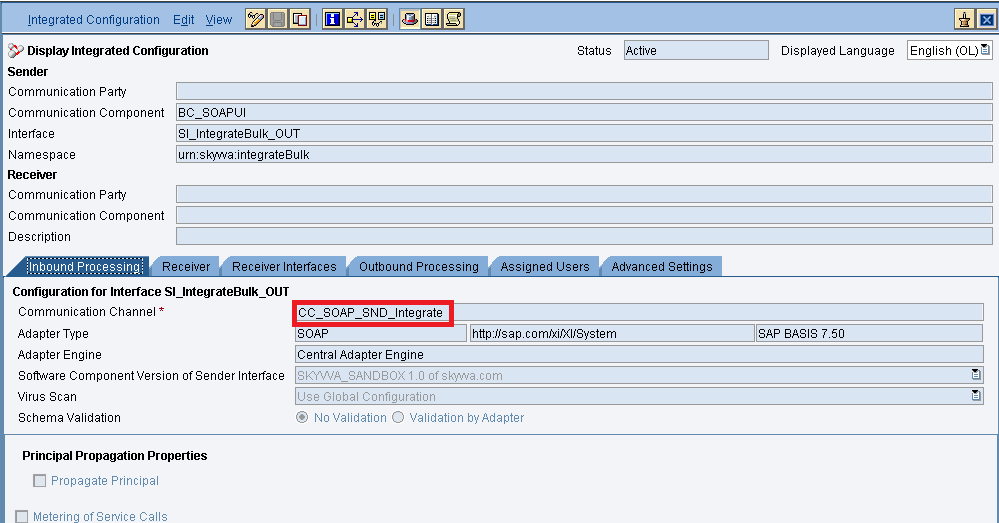
Enter the required data e.g. the Communication Component, Interface and Namespace and then click on create button to create an ICO. Now go through the tabs from left to right to configure the relevant objects. In this first tab “Inbound Processing” here we have to specify the sender communication channel.
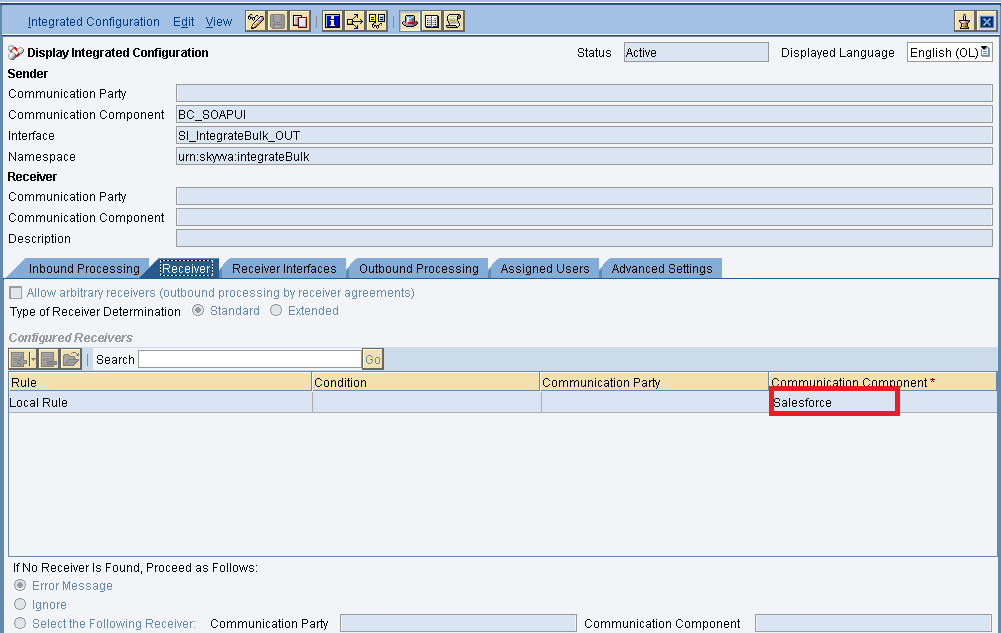
Here in the “Receiver” tab, we have to specify the receiver business system.

In Receiver interfaces tab specify the operation mapping.
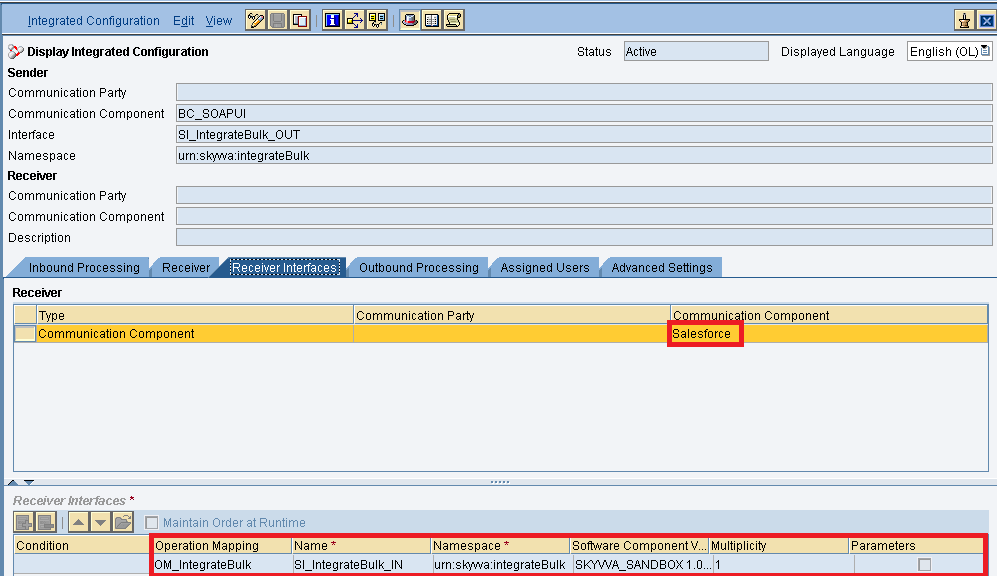
In the “outbound processing” tab, we have to specify the receiver channel. Test the Inbound Interface. Triggering the data from Source system. Now we have to check the result in Salesforce bulk data load as shown below.
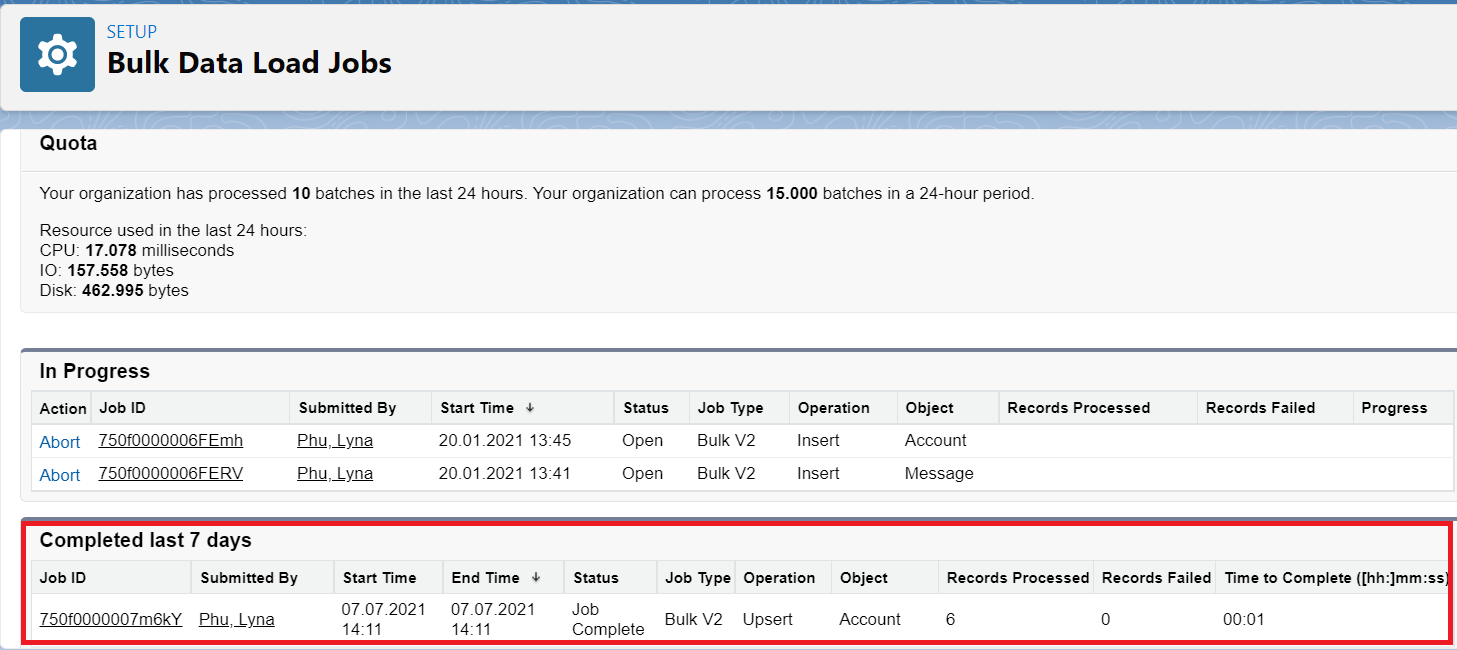
Here we use bulk version = SFDC Bulk API. So, the data will be posted into the Salesforce database directly. In the Bulk API Stream, we have added two new parameters like 'BulkCreateLogFile' and 'BulkLogFileFolder' where we can now create the error file for the bulk batch job. Each job has only one batch and not many batches like bulk v1. But the batches can have a size till 100 Mb which can contain millions of records. We create the file for error analysis to see the failed message but when the record could be posted successfully we are not creating anything into our message monitor. We can see only failed records in the message monitoring here we have a possibility to do the message reprocessing. So, our support for the SFDC bulk v2.0 option is a better one as of the pure bulk api Note: We cannot see successful messages in message monitor. We can see only failed messages in message monitor and also we can reprocess the failed messages.